Developer Blog

Tipps und Tricks für Entwickler und IT-Interessierte

Azure Open AI – The Roadmap to become an expert

Roadmap

  • Basics of Programming: Python is a great starting point due to its simplicity and extensive support in the AI field. Familiarize yourself with variables, data types, loops, conditionals, functions, and object-oriented programming. Resources: Codecademy, LeetCode, HackerRank.
  • Understanding of AI and Machine Learning: Learn about foundational concepts like supervised learning, unsupervised learning, reinforcement learning, regression, classification, clustering, neural networks. Resources: Andrew Ng’s course on Coursera, “Hands-On Machine Learning with Scikit-Learn, Keras, and TensorFlow” by Aurélien Géron.
  • Study Deep Learning: Deep learning is a special kind of machine learning involving artificial neural networks with several layers (“deep” structures). Study convolutional networks (used in image recognition), recurrent networks (used in sequence data), and the concept of deep reinforcement learning. Resources: Deep Learning Specialization by Andrew Ng on Coursera, “Deep Learning” by Ian Goodfellow, Yoshua Bengio and Aaron Courville.
  • Learn about Microsoft Azure: Azure is a cloud platform offering services like compute power, storage options, and AI models. Learn how to navigate the Azure portal, create/manage resources, and understand core services (Azure Compute, Azure Storage, Azure Data Services). Resources: Microsoft Learn, Azure documentation.
  • Microsoft’s AI Services: Azure AI services include Azure Machine Learning for building, training, and deploying machine learning models, and Azure Cognitive Services for pre-trained AI services like vision, speech, and language processing. Resources: Microsoft Learn’s path for AI Engineer, Azure AI documentation.
  • Azure OpenAI: Azure OpenAI offers access to powerful models like GPT-3 for tasks like text generation, translation, summarization, etc. Learn how to call these APIs from your application and how to use the results effectively. Resources: Azure OpenAI documentation, OpenAI’s GPT-3 playground.
  • Projects: Practical projects could include building a chatbot using Azure Bot Service and QnA Maker, creating a text summarizer using GPT-3, or developing a computer vision application using Azure Cognitive Services.
  • Stay Updated: AI is an ever-evolving field. Blogs like Towards Data Science, Medium, the Microsoft Azure blog, and arXiv for research papers can keep you updated. Webinars and online forums like AI Saturdays, AI Fest, and Stack Overflow also help.
  • Certifications: Certifications like the Microsoft Certified: Azure AI Engineer Associate or Microsoft Certified: Azure Data Scientist Associate validate your skills and knowledge. They require a solid understanding of Azure services and machine learning concepts.
  • Contribute to the Community: Sharing your knowledge and experience helps solidify your understanding and establishes your expertise. Write blogs or make YouTube videos explaining concepts, give talks at local meetups or conferences, contribute to open-source projects on GitHub, or answer questions on forums like Stack Overflow.

Understanding of AI and Machine Learning

  • Mathematical Foundations: Brush up on your knowledge of Linear Algebra, Calculus, Probability, and Statistics. These are essential for understanding machine learning algorithms.
  • Programming Skills: Python is the most used language in the field of machine learning. Familiarize yourself with Python, its libraries like NumPy, Pandas, and Matplotlib, and an IDE such as Jupyter Notebook.
  • Data Preprocessing: Learn how to clean and preprocess data, handle missing data, and perform feature scaling. Understand the importance of data visualization for exploring your dataset.
  • Supervised Learning: Start with simple linear regression and then move on to multiple linear regression, logistic regression, k-nearest neighbors, support vector machines, and decision trees. Understand the concept of overfitting and underfitting, and techniques to combat them like regularization.
  • Unsupervised Learning: Learn about clustering techniques like K-means and hierarchical clustering. Understand dimensionality reduction techniques like Principal Component Analysis (PCA).
  • Advanced Topics: Once you’re comfortable with the basics, move onto more advanced topics like ensemble methods, neural networks, and deep learning. Learn about different types of neural networks like Convolutional Neural Networks (CNNs), Recurrent Neural Networks (RNNs), and transformers.
  • Tools and Libraries for Machine Learning: Get hands-on experience with Scikit-Learn, TensorFlow, and Keras. Learn how to build, train, and evaluate models with these libraries.
  • Validation and Evaluation Metrics: Understand validation techniques like k-fold cross-validation. Learn about different evaluation metrics like accuracy, precision, recall, F1 score, ROC AUC, mean squared error, etc.
  • Special Topics: Study special topics like natural language processing, reinforcement learning, generative adversarial networks, transfer learning, etc.
  • Projects: Apply your knowledge to real-world projects. This could be anything from predicting house prices to building a chatbot.
  • Stay Updated and Keep Learning: Machine learning is a rapidly evolving field. Read research papers, follow relevant blogs, participate in Kaggle competitions, and take online courses to keep your knowledge up-to-date.

Deep Learning

  • Mathematical Foundations: Make sure you have a good understanding of Linear Algebra, Calculus, Probability, and Statistics. These are crucial for understanding how deep learning algorithms work.
  • Programming Skills: Python is the most common language in the field of deep learning. Make sure you’re comfortable with it. Libraries like NumPy and Matplotlib will also be useful.
  • Understanding of Machine Learning: Before delving into deep learning, you should have a solid understanding of basic machine learning concepts and algorithms. This includes concepts like overfitting, underfitting, bias-variance tradeoff, and understanding of algorithms like linear regression, logistic regression, and more.
  • Introduction to Neural Networks: Start with understanding what neural networks are and how they work. Learn about the architecture of neural networks, activation functions, and the backpropagation algorithm for training neural networks.
  • Frameworks for Deep Learning: Get hands-on experience with deep learning frameworks like TensorFlow and PyTorch. Learn how to define, train, and evaluate neural networks with these libraries.
  • Convolutional Neural Networks (CNNs): These are used primarily for image processing, object detection, and recognition tasks. Understand the architecture of CNNs and concepts like convolutional layers, pooling layers, and filters.
  • Recurrent Neural Networks (RNNs): Used for sequence data like time series and natural language. Learn about the structure of RNNs, the problem of long-term dependencies, and solutions like LSTM (Long Short-Term Memory) and GRU (Gated Recurrent Units).
  • Advanced Topics in Deep Learning: Explore advanced topics like autoencoders, generative adversarial networks (GANs), transfer learning, reinforcement learning, etc.
  • Deep Learning for Natural Language Processing: Understand how deep learning is used in NLP. Learn about Word2Vec, GloVe, RNNs, LSTMs, GRUs, and Transformer models like BERT.
  • Projects: Apply your knowledge to real-world projects. This could be anything from image recognition tasks, text generation, sentiment analysis, etc.
  • Stay Updated and Keep Learning: Deep learning is a rapidly evolving field. Follow the latest research papers, participate in online courses and challenges like those on Kaggle.

Book on Machine Learning

Introduction to Machine Learning

  • Definition and Importance
  • Applications of Machine Learning
  • Types of Machine Learning: Supervised, Unsupervised, Reinforcement Learning

Mathematical Foundations

  • Linear Algebra
  • Calculus
  • Probability and Statistics
  • Exercises and Sample Problems

Python for Machine Learning

  • Python Basics
  • Python Libraries: NumPy, Pandas, Matplotlib
  • Exercises: Python Coding Problems

Data Preprocessing

  • Importing Data
  • Cleaning Data
  • Feature Engineering
  • Data Visualization
  • Exercises: Data Cleaning and Visualization

Supervised Learning

  • Regression Analysis
    • Simple Linear Regression
    • Multiple Linear Regression
    • Logistic Regression
  • Classification Algorithms
    • Decision Trees
    • K-Nearest Neighbors
    • Support Vector Machines
  • Exercises: Implementing Supervised Learning Algorithms

Unsupervised Learning

  • Clustering
    • K-Means Clustering
    • Hierarchical Clustering
  • Dimensionality Reduction
    • Principal Component Analysis
  • Exercises: Implementing Unsupervised Learning Algorithms

Evaluating Machine Learning Models

  • Overfitting and Underfitting
  • Bias-Variance Tradeoff
  • Cross-Validation
  • Performance Metrics
  • Exercises: Evaluating Models

Neural Networks and Deep Learning

  • Introduction to Neural Networks
  • Backpropagation
  • Convolutional Neural Networks
  • Recurrent Neural Networks
  • Exercises: Implementing Neural Networks

Advanced Topics

  • Ensemble Methods
  • Reinforcement Learning
  • Natural Language Processing
  • Transfer Learning
  • Generative Adversarial Networks
  • Exercises: Advanced Topics Projects

Case Studies in Machine Learning

  • Case Study 1: Predictive Analytics
  • Case Study 2: Image Recognition
  • Case Study 3: Natural Language Processing

Future Trends in Machine Learning

Appendix

References and Further Reading

Glossary of Machine Learning Terms

Unveiling the Power of Whisper AI: Architecture and Practical Implementations

Introduction

Welcome to the fascinating world of Whisper AI, OpenAI’s groundbreaking speech recognition system. As we delve deeper into the digital age, the ability to accurately transcribe and understand human speech has become invaluable. From powering virtual assistants to enhancing accessibility in technology, speech-to-text solutions are reshaping our interaction with devices.

This article will explore the intricate architecture of Whisper AI, guide you through its usage via command line, Python, and even demonstrate how to integrate it into a Flask application.

Whether you’re a developer, a tech enthusiast, or simply curious, join me in unraveling the capabilities of this remarkable technology.

Section 1: Understanding Whisper AI

Whisper AI stands as a testament to the advancements in artificial intelligence, specifically in speech recognition. Developed by OpenAI, this system is designed not just to transcribe speech but to understand it, accommodating various accents, dialects, and even noisy backgrounds.

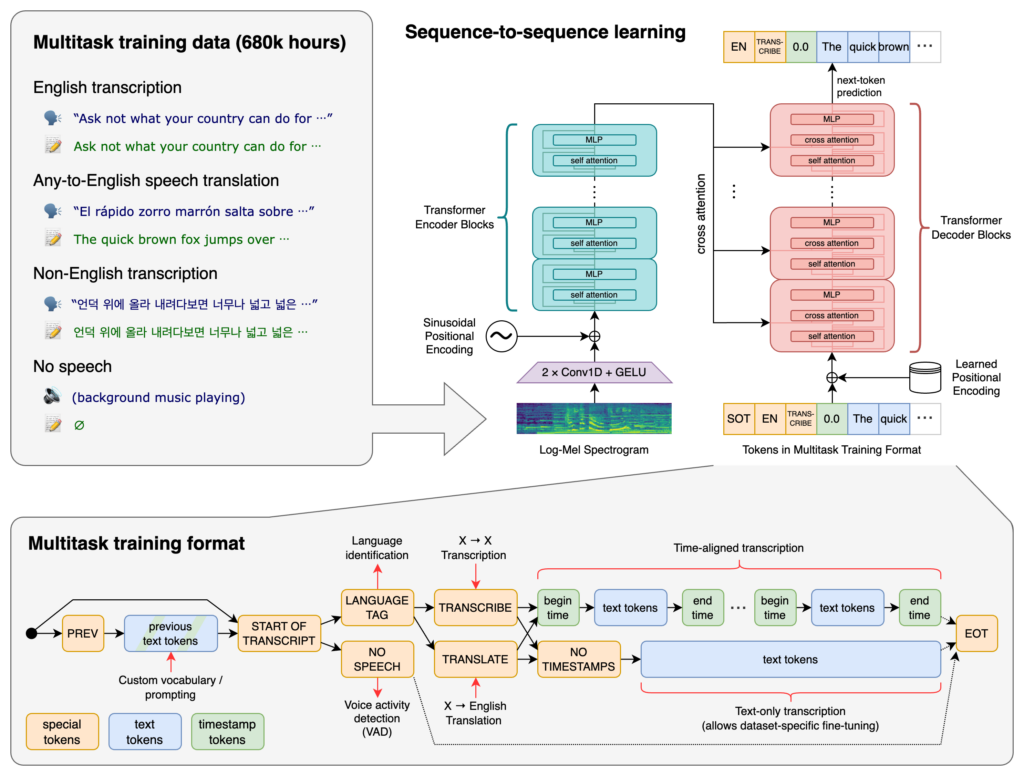
Whisper is a general-purpose speech recognition model. It is trained on a large dataset of diverse audio and is also a multi-task model that can perform multilingual speech recognition as well as speech translation and language identification.

The development of Whisper AI marks a significant milestone, showcasing OpenAI’s commitment to pushing the boundaries of AI and machine learning. In a world where effective communication is key, Whisper AI is a step towards bridging gaps and making technology more accessible to all.

Section 2: The Architecture of Whisper AI

At the heart of Whisper AI lies a sophisticated neural network, likely based on the Transformer model, renowned for its effectiveness in processing sequential data like speech.

These models are trained on vast datasets, enabling the system to recognize and interpret a wide array of speech patterns. What sets Whisper AI apart is its multilingual capabilities, proficiently handling different languages and dialects.

This architectural marvel not only enhances accuracy but also ensures inclusivity in speech recognition technology.

Section 3: Getting Started with Whisper AI

To embark on your journey with Whisper AI, a Python environment is a prerequisite. The system’s robustness requires adequate hardware specifications to function optimally.

Installation is straightforward: Whisper AI’s official documentation or https://github.com/openai/whisper provides comprehensive guides to get you started.

So, first: setup a python. virtual environment:

$ python -m venv venv
$ . venv/bin/activate
$ which python
<Your current directoy>/venv/bin/python

Next step: install required tool for whisper:

$ sudo apt update && sudo apt install ffmpeg

And, at last: install whisper:

$ pip install git+https://github.com/openai/whisper.git 

And your done.

Section 4: Using Whisper AI via Command Line

Whisper AI shines in its simplicity of use, particularly via the command line. After a basic setup, transcribing an audio file is as simple as running a command

For instance, whisper youraudiofile.mp3 could yield a text transcription of the recorded speech. This ease of use makes Whisper AI an attractive option for quick transcription tasks, and the command line interface provides a straightforward way for anyone to harness its power.

Run the following commmand to transcribe your audio file:

$ whisper <your audio file> --model medium --threads 16

See some samples in the following Section and in Section 9.

Section 5: Integrating Whisper AI with Python

Python enthusiasts can rejoice in the seamless integration of Whisper AI with Python scripts.

Imagine a script that takes an audio file and uses Whisper AI to transcribe it – this can be as concise as a few lines of code.

import whisper

model = whisper.load_model("base")
result = model.transcribe("audio.mp3")
print(result["text"])

The API’s intuitive design means that with basic Python knowledge, you can create scripts to automate transcription tasks, analyze speech data, or even build more complex speech-to-text applications.

import whisper

model = whisper.load_model("base")

# load audio and pad/trim it to fit 30 seconds
audio = whisper.load_audio("audio.mp3")
audio = whisper.pad_or_trim(audio)

# make log-Mel spectrogram and move to the same device as the model
mel = whisper.log_mel_spectrogram(audio).to(model.device)

# detect the spoken language
_, probs = model.detect_language(mel)
print(f"Detected language: {max(probs, key=probs.get)}")

# decode the audio
options = whisper.DecodingOptions()
result = whisper.decode(model, mel, options)

# print the recognized text
print(result.text)

Section 6: Building a Flask Application with Whisper AI

Integrating Whisper AI into a Flask application opens a realm of possibilities. A simple Flask server can receive audio files and return transcriptions, all powered by Whisper AI.

This setup is ideal for creating web applications that require speech-to-text capabilities. From voice-commanded actions to uploading and transcribing audio files, the combination of Flask and Whisper AI paves the way for innovative web-based speech recognition solutions.

Here is a short code for a flask app:

from flask import Flask, abort, request
from flask_cors import CORS
from tempfile import NamedTemporaryFile
import whisper
import torch

torch.cuda.is_available()
DEVICE = "cuda" if torch.cuda.is_available() else "cpu"

model = whisper.load_model("base", device=DEVICE)

app = Flask(__name__)
CORS(app)

@app.route("/")
def hello():
    return "Whisper Hello World!"

@app.route('/whisper', methods=['POST'])
def handler():
    if not request.files:
        abort(400)

    results = []

    for filename, handle in request.files.items():
        temp = NamedTemporaryFile()
        handle.save(temp)
        result = model.transcribe(temp.name)
        results.append({
            'filename': filename,
            'transcript': result['text'],
        })

    return {'results': results}

Section 7: Advanced Features and Customization

For those looking to push the boundaries, Whisper AI offers advanced features and customization options.

Adapting the system to recognize specific terminologies or accent nuances can significantly enhance its utility in specialized fields. This level of customization ensures that Whisper AI remains a versatile tool, adaptable to various professional and personal needs.

Section 8: Ethical Considerations and Limitations

As with any AI technology, Whisper AI brings with it ethical considerations.

The paramount concern is privacy and the security of data processed by the system. Additionally, while Whisper AI is a remarkable technology, it is not without limitations. Potential biases in language models and challenges in understanding heavily accented or distorted speech are areas that require ongoing refinement.

Addressing these concerns is crucial for the responsible development and deployment of speech recognition technologies.

Section 9: Samples

First, get your audio file to transcribed. I choose a famous speech from Abraham Lincoln and get it from Youtube.

$ yt-dlp -S res,ext:mp4:m4a "https://www.youtube.com/watch?v=bC4kQ2-kHZE" --output Abraham-Lincoln_Gettysburg-Address.mp4

Then, i use whisper to transcribe the audio.

$ whisper Abraham-Lincoln_Gettysburg-Address.mp4  --model medium --threads 16  --output_dir .
.../.venv/python/3.11/lib/python3.11/site-packages/whisper/transcribe.py:115: UserWarning: FP16 is not supported on CPU; using FP32 instead
  warnings.warn("FP16 is not supported on CPU; using FP32 instead")
Detecting language using up to the first 30 seconds. Use `--language` to specify the language
Detected language: English
[00:00.000 --> 00:19.660]  4 score and 7 years ago, our fathers brought forth on this continent a new nation, conceived
[00:19.660 --> 00:28.280]  in liberty and dedicated to the proposition that all men are created equal.
[00:28.280 --> 00:37.600]  Now we are engaged in a great civil war, testing whether that nation, or any nation so conceived
[00:37.600 --> 00:43.680]  and so dedicated, can long endure.
[00:43.680 --> 00:48.660]  We are met on a great battlefield of that war.
[00:48.660 --> 00:54.800]  We have come to dedicate a portion of that field as a final resting place for those who
[00:54.800 --> 00:59.840]  here gave their lives that that nation might live.
[00:59.840 --> 01:09.600]  It is altogether fitting and proper that we should do this, but in a larger sense, we
[01:09.600 --> 01:18.440]  cannot dedicate, we cannot consecrate, we cannot hallow this ground.
[01:18.440 --> 01:25.720]  The brave men, living and dead, who struggled here, have consecrated it, far above our
[01:25.720 --> 01:30.640]  poor power to add or detract.
[01:30.640 --> 01:37.280]  The world will little note, nor long remember what we say here, but it can never forget
[01:37.280 --> 01:40.040]  what they did here.
[01:40.040 --> 01:47.440]  It is for us, the living rather, to be dedicated here, to the unfinished work which they who
[01:47.440 --> 01:52.360]  fought here have thus far so nobly advanced.
[01:52.360 --> 01:59.680]  It is rather for us to be here dedicated to the great task remaining before us, that from
[01:59.680 --> 02:06.220]  these honored dead we take increased devotion to that cause for which they gave the last
[02:06.220 --> 02:13.960]  full measure of devotion, that we here highly resolve that these dead shall not have died
[02:13.960 --> 02:23.520]  in vain, that this nation, under God, shall have a new birth of freedom, and that government
[02:23.520 --> 02:31.000]  of the people, by the people, for the people, shall not perish from the earth.

Conclusion

Whisper AI represents a significant leap in speech recognition technology. Its implications for the future of human-computer interaction are profound. As we continue to explore and expand the capabilities of AI, tools like Whisper AI not only enhance our present but also shape our future in technology.

I encourage you to explore Whisper AI, experiment with its features, and share your experiences. The journey of discovery is just beginning.

Just image, if AI is helping you in daily tasks, you have more free time for other things:

Additional Resources

For those eager to dive deeper, the Whisper AI documentation, available on OpenAI’s official website and GitHub, offers extensive information and tutorials. Community forums and discussions provide valuable insights and practical advice for both novice and experienced users.

Power Apps | CookBook

Components

Button

Enable Button depending on multipe Conditions (e.g. Dropdowns are selected):

Set OnChange of Coomponents:

Set DisplayMode of Component:

If(IsBlank(Radio1.Selected.Value), DisplayMode.Disabled, DisplayMode.Edit)

DropDown

Populate Dropdown

Switch(
    <Dropdown>.Selected.Value,
    "Value A", "a",
    "Value B", "b",
    "Value C", "c",
    <Dropdown>.Selected.'name '
) 

Populating dropdown which depends on selection of a control

OnVisible property of Screen:

ClearCollect(defaultDemands, Defaults(Demands));
Clear(defaultDemands);
Patch(defaultDemands, Defaults(Demands), {Name:"Select Product"})

Items property of dropdown you can choose between the two collections depending on the state of the radio selection:

If(
    IsBlank(<Radio>.Selected.Value),
    defaultDemands,
    Filter(ProductDemands, ProductValue = <Radio>.Selected.Value)
)

JSON

Extract Value from JSON

Match(
    jsonString, 
    """elementName"": *""(?<value>[^""]+)"
).value

Styling

Color

Set Color of Button:

Define a variable with the desired color in App.OnStart

Set BasePalletColor of Component to this variable:

FFMPEG | Compress video files

Compress and Convert MP4 to WMV

Compress and Convert MP4 to Webm for YouTube, Ins, Facebook

ffmpeg -i source.mp4 -c:v libvpx-vp9 -b:v 0.33M -c:a libopus -b:a 96k \<br>-filter:v scale=960x540 target.webm

Compress and Convert H.264 to H.265 for Higher Compression

ffmpeg -i input.mp4 -vcodec libx265 -crf 28 output.mp4

Set CRF in FFmpeg to Reduce Video File Size

ffmpeg -i input.mp4 -vcodec libx264 -crf 24 output.mp4

Reduce video frame size to make 4K/1080P FHD video smaller

ffmpeg -i input.avi -vf scale=1280:720 output.avi

Command-line – resize video in FFmpeg to reduce video size

ffmpeg -i input.avi -vf scale=852×480 output.avi

Resize video in FFmpeg but keep the original aspect ratio

Specify only one component, width or height, and set the other component to -1, for eample,

ffmpeg -i input.jpg -vf scale=852:-1 output_852.png

Converting WebM to MP4

ffmpeg -i video.webm video.mp4

When the WebM file contains VP8 or VP9 video, you have no choice but to transcode both the video and audio.

Video conversion can be a lengthy and CPU intensive process, depending on file size, video and audio quality, video resolution, etc. but FFmpeg provides a series of presets and controls to help you optimize for quality or faster conversions.

A note on video quality

When encoding video with H.264, the video quality can be controlled using a quantizer scale (crf value, crf stands for Constant Rate Factor) which can take values from 0 to 51: 0 being lossless, 23 the default and 51 the worst possible. So the lower the value the better the quality. You can leave the default value or, for a smaller bitrate, you can raise the value:

ffmpeg -i video.webm -crf 26 video.mp4

Video presets

FFmpeg also provides several quality presets which are calibrated for a certain encoding speed to compression ratio. A slower preset will provide a better compression. The following presets are available in descending order: ultrafastsuperfastveryfastfaster, fastmediumslowslower and veryslow. The default preset is medium but you can choose a faster preset:

ffmpeg -i video.webm -preset veryfast video.mp4

Placing the MOOV atom at the beginning

All MP4 files contain a moov atom. The moov atom contains information about the length of the video. If it’s at the beginning it immediately enables a streaming video player to play and scrub the MP4 file. By default FFmpeg places the moov atom at the end of the MP4 file but it can place the mov atom at the beginning with the -movflags faststart option like this:

ffmpeg -i video.webm -movflags faststart video.mp4

Using Levels and Profiles when encoding H.264 video with FFmpeg

To ensure the highest compatibility with older iOS or Android devices you will need to use certain encoding profiles and levels. For example a video encoded with the High Profile and Level 4.2 will work on iPhone 5S and newer but not on older iOS devices.

ffmpeg -i video.webm -movflags faststart -profile:v high -level 4.2 video.mp4

Converting WebM with H.264 video to MP4

In some rare cases the .webm file will contain H.264 video and Vorbis or Opus audio(for example .webm files created using the MediaRecorder API on Chrome 52+ ). In such cases you don’t have to re-encode the video data since it’s already in the desired H.264 format (re-encoding is also not recommended since you’ll be loosing some quality in the process while consuming CPU cycles) so we’re just going to copy over the data

To copy the video data and transcode the audio in FFmpeg you use the -c:v copy option:

ffmpeg -i video.webm -c:v copy video.mp4

BeautifulSoup | Complete Cheatsheet with Examples

Installation

pip install beautifulsoup4
from bs4 import BeautifulSoup

Creating a BeautifulSoup Object

Parse HTML string:

html = "<p>Example paragraph</p>"
soup = BeautifulSoup(html, 'html.parser')

Parse from file:

with open("index.html") as file:
  soup = BeautifulSoup(file, 'html.parser')

BeautifulSoup Object Types

When parsing documents and navigating the parse trees, you will encounter the following main object types:

Tag

A Tag corresponds to an HTML or XML tag in the original document:

soup = BeautifulSoup('<p>Hello World</p>')
p_tag = soup.p

p_tag.name # 'p'
p_tag.string # 'Hello World'

Tags contain nested Tags and NavigableStrings.

NavigableString

A NavigableString represents text content without tags:

soup = BeautifulSoup('Hello World')
text = soup.string

text # 'Hello World'
type(text) # bs4.element.NavigableString

BeautifulSoup

The BeautifulSoup object represents the parsed document as a whole. It is the root of the tree:

soup = BeautifulSoup('<html>...</html>')

soup.name # '[document]'
soup.head # <head> Tag element

Comment

Comments in HTML are also available as Comment objects:

<!-- This is a comment -->

Copy

comment = soup.find(text=re.compile('This is'))
type(comment) # bs4.element.Comment

Knowing these core object types helps when analyzing, searching, and navigating parsed documents.

Searching the Parse Tree

By Name

HTML:

<div>
  <p>Paragraph 1</p>
  <p>Paragraph 2</p>
</div>

Python:

paragraphs = soup.find_all('p')
# <p>Paragraph 1</p>, <p>Paragraph 2</p>

By Attributes

HTML:

<div id="content">
  <p>Paragraph 1</p>
</div>

Python:Copy

div = soup.find(id="content")
# <div id="content">...</div>

By Text

HTML:

<p>This is some text</p>

Python:

p = soup.find(text="This is some text")
# <p>This is some text</p>

Searching with CSS Selectors

CSS selectors provide a very powerful way to search for elements within a parsed document.

Some examples of CSS selector syntax:

By Tag Name

Select all

tags:

soup.select("p")

By ID

Select element with ID “main”:

soup.select("#main")

By Class Name

Select elements with class “article”:

soup.select(".article")

By Attribute

Select tags with a “data-category” attribute:

soup.select("[data-category]")

Descendant Combinator

Select paragraphs inside divs:

soup.select("div p")

Child Combinator

Select direct children paragraphs:

soup.select("div > p")

Adjacent Sibling

Select h2 after h1:

soup.select("h1 + h2")

General Sibling

Select h2 after any h1:

soup.select("h1 ~ h2")

By Text

Select elements containing text:

soup.select(":contains('Some text')")

By Attribute Value

Select input with type submit:

soup.select("input[type='submit']")

Pseudo-classes

Select first paragraph:

soup.select("p:first-of-type")

Chaining

Select first article paragraph:

soup.select("article > p:nth-of-type(1)")

Accessing Data

HTML:

<p class="content">Some text</p>

Python:

p = soup.find('p')
p.name # "p"
p.attrs # {"class": "content"}
p.string # "Some text"

The Power of find_all()

The find_all() method is one of the most useful and versatile searching methods in BeautifulSoup.

Returns All Matches

find_all() will find and return a list of all matching elements:

all_paras = soup.find_all('p')

This gives you all paragraphs on a page.

Flexible Queries

You can pass a wide range of queries to find_all():Name – find_all(‘p’)Attributes – find_all(‘a’, class_=’external’)Text – find_all(text=re.compile(‘summary’))Limit – find_all(‘p’, limit=2)And more!

Useful Features

Some useful things you can do with find_all():Get a count – len(soup.find_all(‘p’))Iterate through results – for p in soup.find_all(‘p’):Convert to text – [p.get_text() for p in soup.find_all(‘p’)]Extract attributes – [a[‘href’] for a in soup.find_all(‘a’)]

Why It’s Useful

In summary, find_all() is useful because:It returns all matching elementsIt supports diverse and powerful queriesIt enables easily extracting and processing result data

Whenever you need to get a collection of elements from a parsed document, find_all() will likely be your go-to tool.

Navigating Trees

Traverse up and sideways through related elements.

Modifying the Parse Tree

BeautifulSoup provides several methods for editing and modifying the parsed document tree.

HTML:

<p>Original text</p>

Python:

p = soup.find('p')
p.string = "New text"

Edit Tag Names

Change an existing tag name:

tag = soup.find('span')
tag.name = 'div'

Edit Attributes

Add, modify or delete attributes of a tag:

tag['class'] = 'header' # set attribute
tag['id'] = 'main'

del tag['class'] # delete attribute

Edit Text

Change text of a tag:

tag.string = "New text"

Append text to a tag:

tag.append("Additional text")

Insert Tags

Insert a new tag:

new_tag = soup.new_tag("h1")
tag.insert_before(new_tag)

Delete Tags

Remove a tag entirely:

tag.extract()

Wrap/Unwrap Tags

Wrap another tag around:

tag.wrap(soup.new_tag('div))

Unwrap its contents:

tag.unwrap()

Modifying the parse tree is very useful for cleaning up scraped data or extracting the parts you need.

Outputting HTML

Input HTML:

<p>Hello World</p>

Python:

print(soup.prettify())

# <p>
#  Hello World
# </p>

Integrating with Requests

Fetch a page:

import requests

res = requests.get("<https://example.com>")
soup = BeautifulSoup(res.text, 'html.parser')

Parsing Only Parts of a Document

When dealing with large documents, you may want to parse only a fragment rather than the whole thing. BeautifulSoup allows for this using SoupStrainers.

There are a few ways to parse only parts of a document:

By CSS Selector

Parse just a selection matching a CSS selector:

from bs4 import SoupStrainer

only_tables = SoupStrainer("table")
soup = BeautifulSoup(doc, parse_only=only_tables)

This will parse only the tags from the document.

By Tag Name

Parse only specific tags:

only_divs = SoupStrainer("div")
soup = BeautifulSoup(doc, parse_only=only_divs)

By Function

Pass a function to test if a tag should be parsed:

def is_short_string(string):
  return len(string) < 20

only_short_strings = SoupStrainer(string=is_short_string)
soup = BeautifulSoup(doc, parse_only=only_short_strings)

This parses tags based on their text content.

By Attributes

Parse tags that contain specific attributes:

has_data_attr = SoupStrainer(attrs={"data-category": True})
soup = BeautifulSoup(doc, parse_only=has_data_attr)

Multiple Conditions

You can combine multiple strainers:

strainer = SoupStrainer("div", id="main")
soup = BeautifulSoup(doc, parse_only=strainer)

This will parse only

.

Parsing only parts you need can help reduce memory usage and improve performance when scraping large documents.

Dealing with Encoding

When parsing documents, you may encounter encoding issues. Here are some ways to handle encoding:

Specify at Parse Time

Pass the from_encoding parameter when creating the BeautifulSoup object:

soup = BeautifulSoup(doc, from_encoding='utf-8')

This handles any decoding needed when initially parsing the document.

Encode Tag Contents

You can encode the contents of a tag:

tag.string.encode("utf-8")

Use this when outputting tag strings.

Encode Entire Document

To encode the entire BeautifulSoup document:

soup.encode("utf-8")

This returns a byte string with the encoded document.

Pretty Print with Encoding

Specify encoding when pretty printing

print(soup.prettify(encoder="utf-8"))

Unicode Dammit

BeautifulSoup’s UnicodeDammit class can detect and convert incoming documents to Unicode:

from bs4 import UnicodeDammit

dammit = UnicodeDammit(doc)
soup = dammit.unicode_markup

This converts even poorly encoded documents to Unicode.

Properly handling encoding ensures your scraped data is decoded and output correctly when using BeautifulSoup.

Django | Debugging Django-App in VS Code

See here how to configure VS Code:

  • Switch to Run view in VS Code (using the left-side activity bar or F5). You may see the message
    “To customize Run and Debug create a launch.json file”.
    This means that you don’t yet have a launch.json file containing debug configurations. VS Code can create that for you if you click on the create a launch.json file link:Django tutorial: initial view of the debug panel
  • Select the link and VS Code will prompt for a debug configuration. Select Django from the dropdown and VS Code will populate a new launch.json file with a Django run configuration.
    The launch.json file contains a number of debugging configurations, each of which is a separate JSON object within the configuration array.
  • Scroll down to and examine the configuration with the name “Python: Django”:
{
  "version": "0.2.0",
  "configurations": [
    {
      "name": "Python: Django",
      "type": "python",
      "request": "launch",
      "program": "${workspaceFolder}\\manage.py",
      "args": ["runserver"],
      "django": true,
      "justMyCode": true
    }
  ]
}
  • This configuration tells VS Code to run "${workspaceFolder}/manage.py" using the selected Python interpreter and the arguments in the args list.
    Launching the VS Code debugger with this configuration, then, is the same as running python manage.py runserver in the VS Code Terminal with your activated virtual environment. (You can add a port number like "5000" to args if desired.)
    The "django": true entry also tells VS Code to enable debugging of Django page templates, which you see later in this tutorial.
  • Test the configuration by selecting the Run > Start Debugging menu command, or selecting the green Start Debugging arrow next to the list (F5):Django tutorial: start debugging/continue arrow on the debug toolbar
  • Ctrl+click the http://127.0.0.1:8000/ URL in the terminal output window to open the browser and see that the app is running properly.
  • Close the browser and stop the debugger when you’re finished. To stop the debugger, use the Stop toolbar button (the red square) or the Run > Stop Debugging command (Shift+F5).
  • You can now use the Run > Start Debugging at any time to test the app, which also has the benefit of automatically saving all modified files.

Grafana: Getting Started

Run Grafana

Run Docker Image

docker run -d --name=grafana -p 3000:3000 grafana/grafana-enterprise:10.0.0-ubuntu

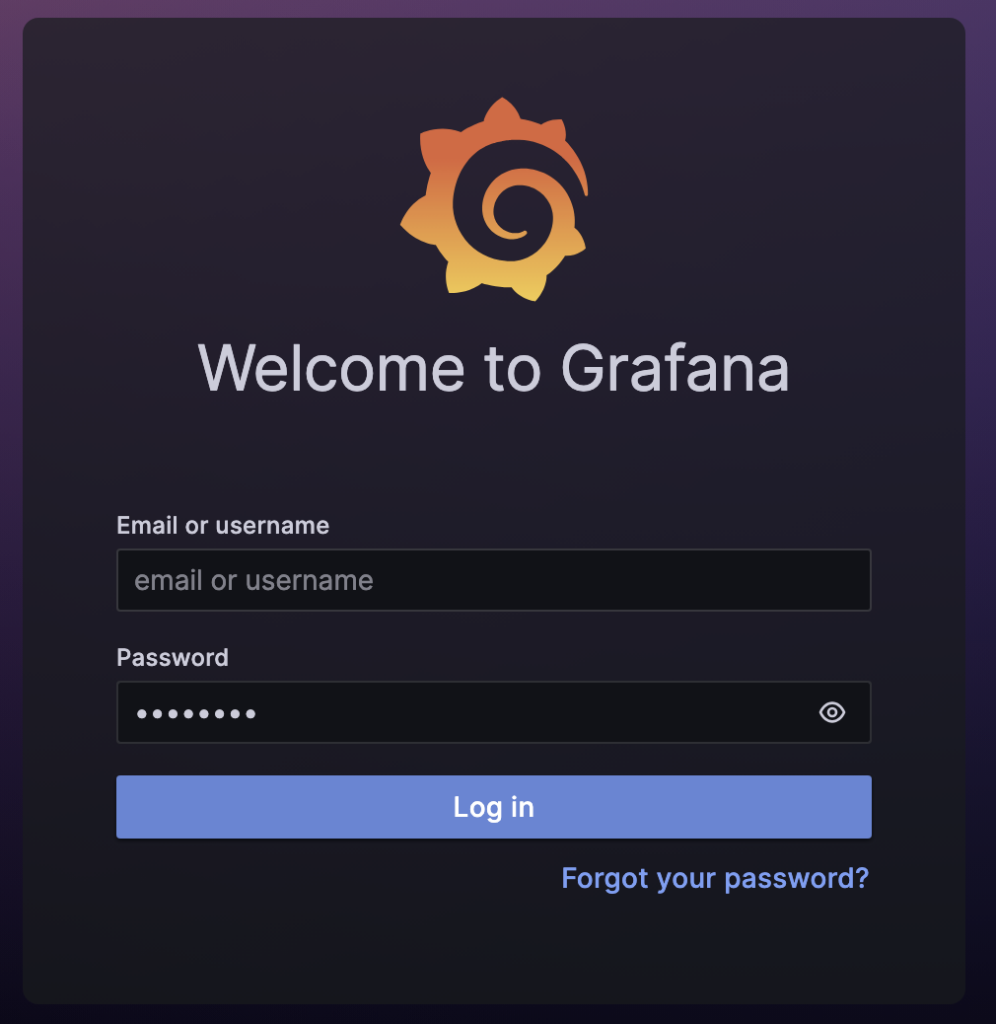
The, start Browser with http://localhost:3000 and login with admin/admin

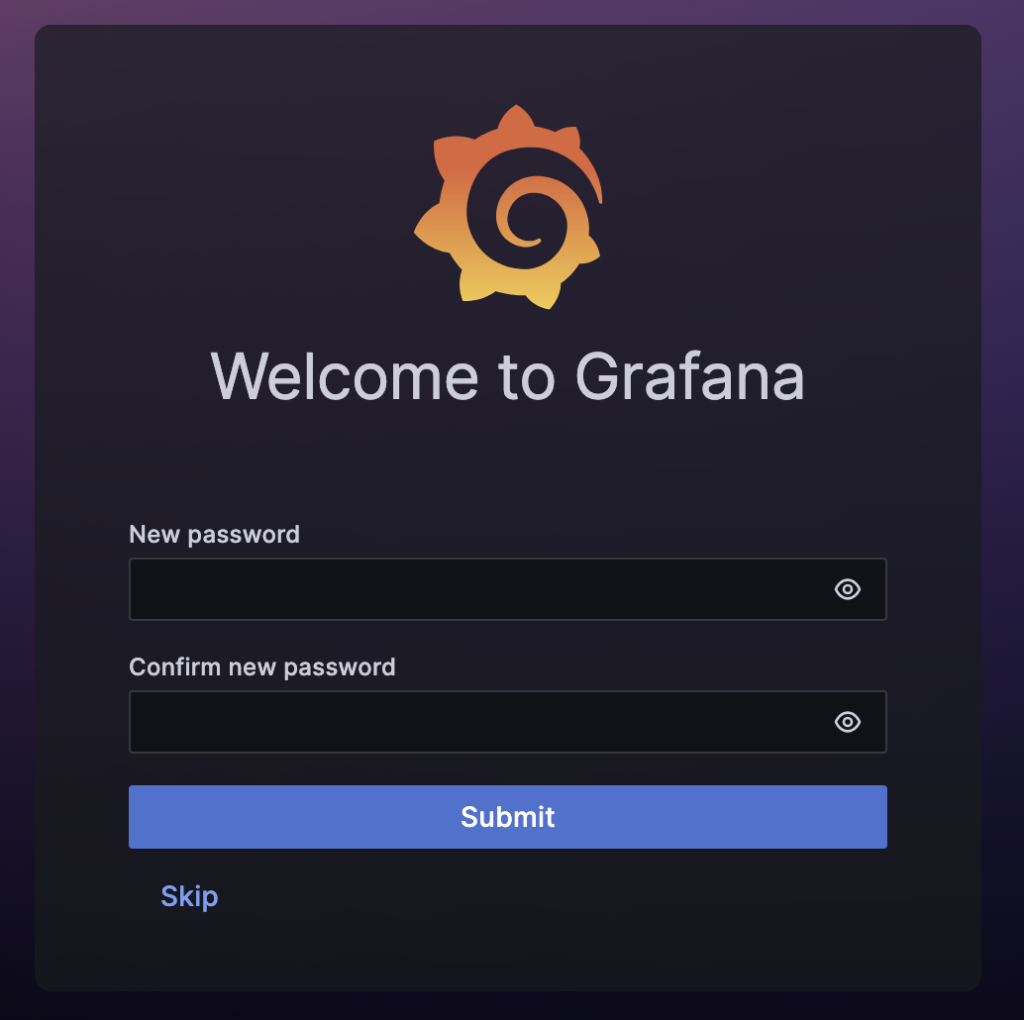
After Login, you have the possibility to change the password. We skip here for now.

Nicepage

Daily: Nicepage – Add GA and Cookies

Nicepage is an awesome Web Page Builder with 400+ Features and 10000+ Templates.

One of the features is to connect to Google Analytics, another is a Cookie Consent Plugin.

Unfortunately, i didn’t succeed in getting both together work. The goal was, only to load the GA code if the consent plugin allowed this.

So i created a workaround:

  • i didn’t configure the Google Tag Manger in the Settings
  • i add custom code to check cookie state and load Google Tag Manager

Add HTML Code to Site:

<script>    
	window.dataLayer = window.dataLayer || [];
    function gtag(){
    	console.log('gtag: arguments=', arguments);
    	dataLayer.push(arguments);
    }
    
    function setupGoogleTagManager(w,d,s,l,i){
        console.log('google tag manager: setup with', i);
        
        w[l]=w[l]||[];
        w[l].push({'gtm.start': new Date().getTime(), event:'gtm.js'});
        var f=d.getElementsByTagName(s)[0],
            j=d.createElement(s),dl=l!='dataLayer'?'&l='+l:'';
        
        j.async=true;j.src='https://www.googletagmanager.com/gtm.js?id='+i+dl;
        f.parentNode.insertBefore(j,f);
    }
    
	
	function setCookie(cname, cvalue, exdays) {
  		const d = new Date();
  		d.setTime(d.getTime() + (exdays*24*60*60*1000));
  		let expires = "expires="+ d.toUTCString();
  		document.cookie = cname + "=" + cvalue + ";" + expires + ";path=/";
	}
	
    function getCookie(cname) {
      let name = cname + "=";
      let decodedCookie = decodeURIComponent(document.cookie);
      let ca = decodedCookie.split(';');
      for(let i = 0; i <ca.length; i++) {
        let c = ca[i];
        while (c.charAt(0) == ' ') {
          c = c.substring(1);
        }
        if (c.indexOf(name) == 0) {
          return c.substring(name.length, c.length);
        }
      }
      return "";
    }
    
    function buildConsentCookie(consent) {
		console.log('buildConsentCookie: consent=', consent);
	    const consentCookie = {
    	    'functionality_storage': consent.necessary ? 'granted' : 'denied',
        	'security_storage': consent.necessary ? 'granted' : 'denied',
        	'ad_storage': consent.marketing ? 'granted' : 'denied',
        	'analytics_storage': consent.analytics ? 'granted' : 'denied',
        	'personalization': consent.preferences ? 'granted' : 'denied',
    	};	
        
    	console.log('buildConsentCookie: consentCookie=', consentCookie);
    	return consentCookie
    }
    
    function setConsent(consent) {
    	console.log('setConsent: ', consent);
    	const consentCookie = buildConsentCookie(consent);
		gtag('consent', 'default', consentCookie);  
    
		console.log('store consentMode: ',consentCookie);
    	localStorage.setItem('consentMode', JSON.stringify(consentCookie));
    }
    
    if(localStorage.getItem('consentMode') === null){
    	const consent = {
    	    necessary: false,
    	    marketing: false,
    	    analytics: false,
    	    preferences: false,
    	};
        consentCookie = buildConsentCookie(consent);
    	gtag('consent', 'default', consentCookie);
    } else {
    	consentCookie = JSON.parse(localStorage.getItem('consentMode'));
    	gtag('consent', 'default', consentCookie);
    }
</script>

Add HTML Code to Cookies Section

const consent = {
	necessary: true,
	marketing: true,
	analytics: true,
	preferences: true,
};

setCookie('u-gdpr-cookie', true, 180);
setConsent(consent);
setupGoogleTagManager(window,document,'script','dataLayer','GTM-#######');