Daily AI: Analyse WebPages with AI
Introduction
Large Language Models (LLMs) have revolutionized the field of Natural Language Processing (NLP) by providing powerful capabilities for understanding and generating human language. Open-source LLMs have democratized access to these technologies, allowing developers and researchers to innovate and apply these models in various domains. In this blog post, we will explore Ollama, a framework for working with LLMs, and demonstrate how to load webpages, parse them, build embeddings, and query the content using Ollama.
Understanding Large Language Models (LLMs)
LLMs are neural networks trained on vast amounts of text data to understand and generate human language. They can perform tasks such as translation, summarization, question answering, and more. Popular LLMs include GPT-3, BERT, and their open-source counterparts like GPT-Neo and BERT variants. These models have diverse applications, from chatbots to automated content generation.
Introducing Ollama
Ollama is an open-source framework designed to simplify the use of LLMs in various applications. It provides tools for training, fine-tuning, and deploying LLMs, making it easier to integrate these powerful models into your projects. With Ollama, you can leverage the capabilities of LLMs to build intelligent applications that understand and generate human language.
Example
The following example from the ollama documentation demonstrates how to use the LangChain framework in conjunction with the Ollama library to load a web page, process its content, create embeddings, and perform a query on the processed data. Below is a detailed explanation of the script’s functionality and the technologies used.
Technologies Used
- LangChain: A framework for building applications powered by large language models (LLMs). It provides tools for loading documents, splitting text, creating embeddings, and querying data.
- Ollama: A library for working with LLMs and embeddings. In this script, it’s used to generate embeddings for text data.
- BeautifulSoup (bs4): A library used for parsing HTML and XML documents. It’s essential for loading and processing web content.
- ChromaDB: A vector database used for storing and querying embeddings. It allows efficient similarity searches.
Code Breakdown
Imports and Setup
The script starts by importing the necessary modules and libraries, including sys, Ollama, WebBaseLoader, RecursiveCharacterTextSplitter, OllamaEmbeddings, Chroma, and RetrievalQA.
from langchain_community.llms import Ollama

from langchain_community.document_loaders import WebBaseLoader
from langchain.text_splitter import RecursiveCharacterTextSplitter
from langchain_community.embeddings import OllamaEmbeddings
from langchain_community.vectorstores import Chroma
from langchain.chains import RetrievalQA
Loading the Web Page
The script uses WebBaseLoader to load the content of a webpage. In this case, it loads the text of “The Odyssey” by Homer from Project Gutenberg.
print("- get web page")

loader = WebBaseLoader("https://www.gutenberg.org/files/1727/1727-h/1727-h.htm")
data = loader.load()
Splitting the Document
Due to the large size of the document, it is split into smaller chunks using RecursiveCharacterTextSplitter. This ensures that the text can be processed more efficiently.
print("- split documents")

text_splitter=RecursiveCharacterTextSplitter(chunk_size=500, chunk_overlap=0)
all_splits = text_splitter.split_documents(data)
Creating Embeddings and Storing Them
The script creates embeddings for the text chunks using the Ollama library and stores them in ChromaDB, a vector database. This step involves instantiating an embedding model (nomic-embed-text) and using it to generate embeddings for each text chunk.
print("- create vectorstore")

oembed = OllamaEmbeddings(base_url="http://localhost:11434", model="nomic-embed-text")
vectorstore = Chroma.from_documents(documents=all_splits, embedding=oembed)
Performing a Similarity Search
A question is formulated, and the script uses the vector database to perform a similarity search. It retrieves chunks of text that are semantically similar to the question.
print("- ask for similarities")

question="Who is Neleus and who is in Neleus' family?"
docs = vectorstore.similarity_search(question)
nrofdocs=len(docs)
print(f"{question}: {nrofdocs}")
Creating an Ollama Instance and Defining a Retrieval Chain
The script initializes an instance of the Ollama model and sets up a retrieval-based question-answering (QA) chain. This chain is used to process the question and retrieve the relevant parts of the document.
print("- create ollama instance")
ollama = Ollama(
    base_url='http://localhost:11434',
    model="llama3"
)

print("- get qachain")
qachain=RetrievalQA.from_chain_type(ollama, retriever=vectorstore.as_retriever())
Running the Query
Finally, the script invokes the QA chain with the question and prints the result.
print("- run query")
res = qachain.invoke({"query": question})

print(res['result'])
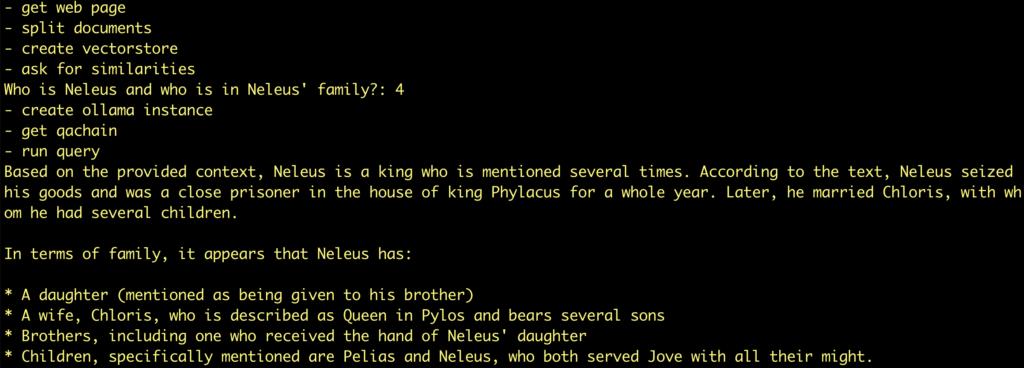
Result
Now lets look at the impresiv result:

Try another example: ask wikipedia page
In this example, we are going to use LangChain and Ollama to learn about something just a touch more recent. In August 2023, there was a series of wildfires on Maui. There is no way an LLM trained before that time can know about this, since their training data would not include anything as recent as that.
So we can find the Wikipedia article about the fires and ask questions about the contents.
url = "https://en.wikipedia.org/wiki/2023_Hawaii_wildfires"
question="When was Hawaii's request for a major disaster declaration approved?"


