Developer Blog

Tipps und Tricks für Entwickler und IT-Interessierte

Daily AI: Analyse WebPages with AI

Introduction

Large Language Models (LLMs) have revolutionized the field of Natural Language Processing (NLP) by providing powerful capabilities for understanding and generating human language. Open-source LLMs have democratized access to these technologies, allowing developers and researchers to innovate and apply these models in various domains. In this blog post, we will explore Ollama, a framework for working with LLMs, and demonstrate how to load webpages, parse them, build embeddings, and query the content using Ollama.

Understanding Large Language Models (LLMs)

LLMs are neural networks trained on vast amounts of text data to understand and generate human language. They can perform tasks such as translation, summarization, question answering, and more. Popular LLMs include GPT-3, BERT, and their open-source counterparts like GPT-Neo and BERT variants. These models have diverse applications, from chatbots to automated content generation.

Introducing Ollama

Ollama is an open-source framework designed to simplify the use of LLMs in various applications. It provides tools for training, fine-tuning, and deploying LLMs, making it easier to integrate these powerful models into your projects. With Ollama, you can leverage the capabilities of LLMs to build intelligent applications that understand and generate human language.

Example

The following example from the ollama documentation demonstrates how to use the LangChain framework in conjunction with the Ollama library to load a web page, process its content, create embeddings, and perform a query on the processed data. Below is a detailed explanation of the script’s functionality and the technologies used.

Technologies Used

  1. LangChain: A framework for building applications powered by large language models (LLMs). It provides tools for loading documents, splitting text, creating embeddings, and querying data.
  2. Ollama: A library for working with LLMs and embeddings. In this script, it’s used to generate embeddings for text data.
  3. BeautifulSoup (bs4): A library used for parsing HTML and XML documents. It’s essential for loading and processing web content.
  4. ChromaDB: A vector database used for storing and querying embeddings. It allows efficient similarity searches.

Code Breakdown

Imports and Setup

The script starts by importing the necessary modules and libraries, including sys, Ollama, WebBaseLoader, RecursiveCharacterTextSplitter, OllamaEmbeddings, Chroma, and RetrievalQA.

from langchain_community.llms import Ollama

from langchain_community.document_loaders import WebBaseLoader
from langchain.text_splitter import RecursiveCharacterTextSplitter
from langchain_community.embeddings import OllamaEmbeddings
from langchain_community.vectorstores import Chroma
from langchain.chains import RetrievalQA

Loading the Web Page

The script uses WebBaseLoader to load the content of a webpage. In this case, it loads the text of “The Odyssey” by Homer from Project Gutenberg.

print("- get web page")

loader = WebBaseLoader("https://www.gutenberg.org/files/1727/1727-h/1727-h.htm")
data = loader.load()

Splitting the Document

Due to the large size of the document, it is split into smaller chunks using RecursiveCharacterTextSplitter. This ensures that the text can be processed more efficiently.

print("- split documents")

text_splitter=RecursiveCharacterTextSplitter(chunk_size=500, chunk_overlap=0)
all_splits = text_splitter.split_documents(data)

Creating Embeddings and Storing Them

The script creates embeddings for the text chunks using the Ollama library and stores them in ChromaDB, a vector database. This step involves instantiating an embedding model (nomic-embed-text) and using it to generate embeddings for each text chunk.

print("- create vectorstore")

oembed = OllamaEmbeddings(base_url="http://localhost:11434", model="nomic-embed-text")
vectorstore = Chroma.from_documents(documents=all_splits, embedding=oembed)

Performing a Similarity Search

A question is formulated, and the script uses the vector database to perform a similarity search. It retrieves chunks of text that are semantically similar to the question.

print("- ask for similarities")

question="Who is Neleus and who is in Neleus' family?"
docs = vectorstore.similarity_search(question)
nrofdocs=len(docs)
print(f"{question}: {nrofdocs}")

Creating an Ollama Instance and Defining a Retrieval Chain

The script initializes an instance of the Ollama model and sets up a retrieval-based question-answering (QA) chain. This chain is used to process the question and retrieve the relevant parts of the document.

print("- create ollama instance")
ollama = Ollama(
    base_url='http://localhost:11434',
    model="llama3"
)

print("- get qachain")
qachain=RetrievalQA.from_chain_type(ollama, retriever=vectorstore.as_retriever())

Running the Query

Finally, the script invokes the QA chain with the question and prints the result.

print("- run query")
res = qachain.invoke({"query": question})

print(res['result'])

Result

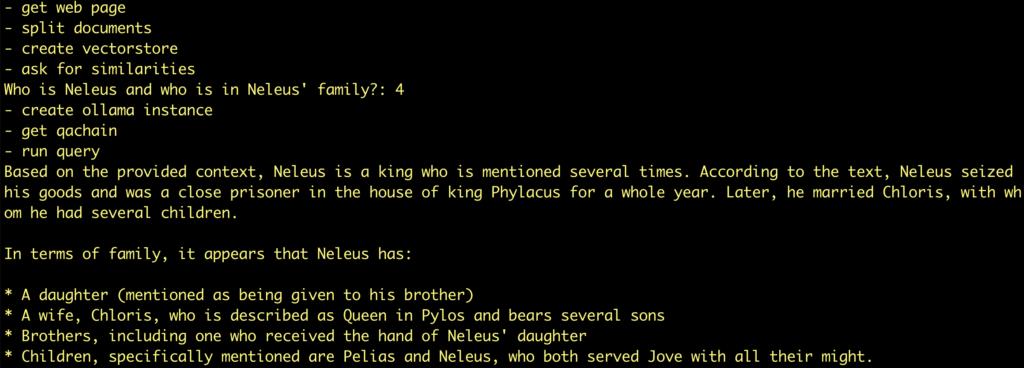
Now lets look at the impresiv result:

Try another example: ask wikipedia page

In this example, we are going to use LangChain and Ollama to learn about something just a touch more recent. In August 2023, there was a series of wildfires on Maui. There is no way an LLM trained before that time can know about this, since their training data would not include anything as recent as that.

So we can find the Wikipedia article about the fires and ask questions about the contents.

url = "https://en.wikipedia.org/wiki/2023_Hawaii_wildfires"
question="When was Hawaii's request for a major disaster declaration approved?"

Daily AI: Analyse Images with AI

General

With Open Source Toools, it is easy to analyse images.

Just install Ollama, download the llava image and run this command:

❯ ollama run llava:latest "Beschreibe das Bild <path to image>"

Try this image: Statue of LIberty

❯ ollama run llava:latest "Beschreibe das Bild /tmp/statue-liberty-liberty-island-new-york.jpg"
Added image '/tmp/statue-liberty-liberty-island-new-york.jpg'
The image shows the Statue of Liberty, an iconic landmark in New York Harbor. This neoclassical statue is a symbol of freedom and democracy, and it has become a universal symbol of the United States. The statue is situated on Liberty Island, which is accessible via ferries from Manhattan.

In the background, you can see a clear sky with some clouds, indicating good weather. The surrounding area appears to be lush with greenery, suggesting that the photo was taken in spring or summer when vegetation is abundant. There are also people visible at the base of the statue, which gives a sense of scale and demonstrates the size of the monument.

Ollama | Create a ChatGPT Clone with Ollama and HyperDiv

In this blog post, we’ll explore how to create a ChatGPT-like application using Hyperdiv and Ollama. Hyperdiv provides a flexible framework for building web applications, while Ollama offers powerful local machine learning capabilities.

We will start with the Hyperdiv GPT-chatbot app template and adapt it to leverage Ollama, which runs locally. This guide will walk you through the necessary steps and code changes to integrate these technologies effectively.

TL;DR

The complete code for this tutorial is here.

Step 1: Setting Up Your Environment

Install Ollama

Download Ollama from https://ollama.com/download.

Install (Windows) or unpack (macOS) the downloaded file. This gets you an Ollama app (which allows you to start the Ollama service) and a Ollama command line.

Start the Ollama service by starting the Ollama app.

On macOS, you will see an icon for the Ollama Servce at the top bar.

Then, open a terminal and type ollama list. This command displays the install models.

ollama list

To install a model, type

ollama pull llama3

For our ChatGPT Clone, we will use the llama3 model.

If you want to use another model, then search here: https://ollama.com/library

Clone the HyperDiv Examples Repository

Start by cloning or downloading the Hyperdiv GPT-chatbot app. This app provides a basic structure for a chatbot application, which we will modify to work with Ollama.

Go to your desired local folder to store the sources and type

git clone https://github.com/hyperdiv/hyperdiv-apps

Then, go to the folder hyperdiv-apps/gpt-chatbot

Adapt app to use Ollama backend

First, we will create an ollama client to process all request:

from openai import OpenAI

client = OpenAI(
    base_url="http://localhost:11434/v1",
    api_key="ollama",
)

Then we modify the request function to use this client

We change

response = openai.ChatCompletion.create(

to

response = client.chat.completions.create(

Next step is changing the accees to the response fields. With OpenAI, the response data is a dictionary, so the way to acess the fields is like

chunk["choices"]

With Ollama, we can access the field by name

chunk.choices

The changes are

 for chunk in response:
    message = chunk.choices[0].delta
    state.current_reply += message.content

And the last step would be the change to use the correct model:

model = form.select(
    options=("codellama", "llama2", "llama3", "mistral"),
        value="llama3",
        name="gpt-model",
)

Thats is! Save all changes

Prepare Python environment and run app

Install the required modules:

pip install openai hyperdiv

Run the app:

python start.py

Open the browser at http://localhost:8888

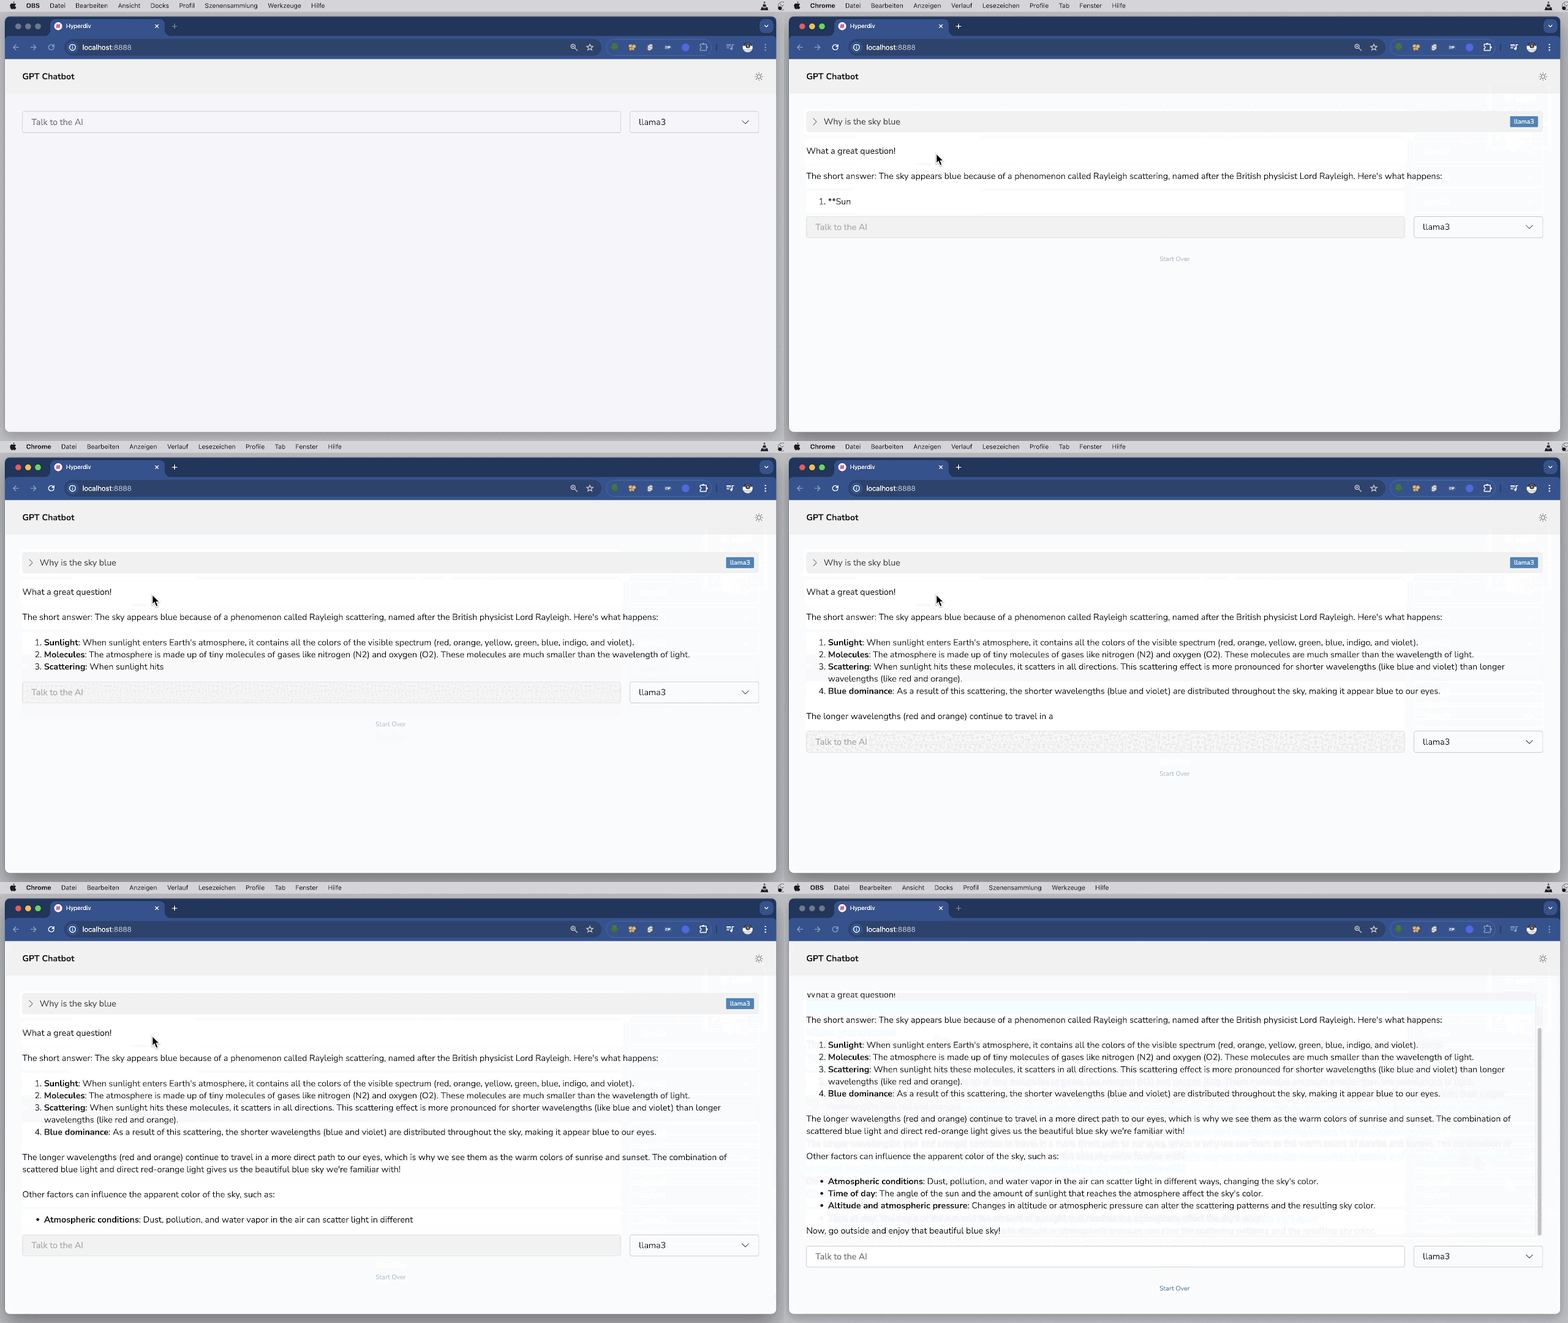
Final Result

The complete code for this tutorial is here.

BeautifulSoup | Complete Cheatsheet with Examples

Installation

pip install beautifulsoup4
from bs4 import BeautifulSoup

Creating a BeautifulSoup Object

Parse HTML string:

html = "<p>Example paragraph</p>"
soup = BeautifulSoup(html, 'html.parser')

Parse from file:

with open("index.html") as file:
  soup = BeautifulSoup(file, 'html.parser')

BeautifulSoup Object Types

When parsing documents and navigating the parse trees, you will encounter the following main object types:

Tag

A Tag corresponds to an HTML or XML tag in the original document:

soup = BeautifulSoup('<p>Hello World</p>')
p_tag = soup.p

p_tag.name # 'p'
p_tag.string # 'Hello World'

Tags contain nested Tags and NavigableStrings.

NavigableString

A NavigableString represents text content without tags:

soup = BeautifulSoup('Hello World')
text = soup.string

text # 'Hello World'
type(text) # bs4.element.NavigableString

BeautifulSoup

The BeautifulSoup object represents the parsed document as a whole. It is the root of the tree:

soup = BeautifulSoup('<html>...</html>')

soup.name # '[document]'
soup.head # <head> Tag element

Comment

Comments in HTML are also available as Comment objects:

<!-- This is a comment -->

Copy

comment = soup.find(text=re.compile('This is'))
type(comment) # bs4.element.Comment

Knowing these core object types helps when analyzing, searching, and navigating parsed documents.

Searching the Parse Tree

By Name

HTML:

<div>
  <p>Paragraph 1</p>
  <p>Paragraph 2</p>
</div>

Python:

paragraphs = soup.find_all('p')
# <p>Paragraph 1</p>, <p>Paragraph 2</p>

By Attributes

HTML:

<div id="content">
  <p>Paragraph 1</p>
</div>

Python:Copy

div = soup.find(id="content")
# <div id="content">...</div>

By Text

HTML:

<p>This is some text</p>

Python:

p = soup.find(text="This is some text")
# <p>This is some text</p>

Searching with CSS Selectors

CSS selectors provide a very powerful way to search for elements within a parsed document.

Some examples of CSS selector syntax:

By Tag Name

Select all

tags:

soup.select("p")

By ID

Select element with ID “main”:

soup.select("#main")

By Class Name

Select elements with class “article”:

soup.select(".article")

By Attribute

Select tags with a “data-category” attribute:

soup.select("[data-category]")

Descendant Combinator

Select paragraphs inside divs:

soup.select("div p")

Child Combinator

Select direct children paragraphs:

soup.select("div > p")

Adjacent Sibling

Select h2 after h1:

soup.select("h1 + h2")

General Sibling

Select h2 after any h1:

soup.select("h1 ~ h2")

By Text

Select elements containing text:

soup.select(":contains('Some text')")

By Attribute Value

Select input with type submit:

soup.select("input[type='submit']")

Pseudo-classes

Select first paragraph:

soup.select("p:first-of-type")

Chaining

Select first article paragraph:

soup.select("article > p:nth-of-type(1)")

Accessing Data

HTML:

<p class="content">Some text</p>

Python:

p = soup.find('p')
p.name # "p"
p.attrs # {"class": "content"}
p.string # "Some text"

The Power of find_all()

The find_all() method is one of the most useful and versatile searching methods in BeautifulSoup.

Returns All Matches

find_all() will find and return a list of all matching elements:

all_paras = soup.find_all('p')

This gives you all paragraphs on a page.

Flexible Queries

You can pass a wide range of queries to find_all():Name – find_all(‘p’)Attributes – find_all(‘a’, class_=’external’)Text – find_all(text=re.compile(‘summary’))Limit – find_all(‘p’, limit=2)And more!

Useful Features

Some useful things you can do with find_all():Get a count – len(soup.find_all(‘p’))Iterate through results – for p in soup.find_all(‘p’):Convert to text – [p.get_text() for p in soup.find_all(‘p’)]Extract attributes – [a[‘href’] for a in soup.find_all(‘a’)]

Why It’s Useful

In summary, find_all() is useful because:It returns all matching elementsIt supports diverse and powerful queriesIt enables easily extracting and processing result data

Whenever you need to get a collection of elements from a parsed document, find_all() will likely be your go-to tool.

Navigating Trees

Traverse up and sideways through related elements.

Modifying the Parse Tree

BeautifulSoup provides several methods for editing and modifying the parsed document tree.

HTML:

<p>Original text</p>

Python:

p = soup.find('p')
p.string = "New text"

Edit Tag Names

Change an existing tag name:

tag = soup.find('span')
tag.name = 'div'

Edit Attributes

Add, modify or delete attributes of a tag:

tag['class'] = 'header' # set attribute
tag['id'] = 'main'

del tag['class'] # delete attribute

Edit Text

Change text of a tag:

tag.string = "New text"

Append text to a tag:

tag.append("Additional text")

Insert Tags

Insert a new tag:

new_tag = soup.new_tag("h1")
tag.insert_before(new_tag)

Delete Tags

Remove a tag entirely:

tag.extract()

Wrap/Unwrap Tags

Wrap another tag around:

tag.wrap(soup.new_tag('div))

Unwrap its contents:

tag.unwrap()

Modifying the parse tree is very useful for cleaning up scraped data or extracting the parts you need.

Outputting HTML

Input HTML:

<p>Hello World</p>

Python:

print(soup.prettify())

# <p>
#  Hello World
# </p>

Integrating with Requests

Fetch a page:

import requests

res = requests.get("<https://example.com>")
soup = BeautifulSoup(res.text, 'html.parser')

Parsing Only Parts of a Document

When dealing with large documents, you may want to parse only a fragment rather than the whole thing. BeautifulSoup allows for this using SoupStrainers.

There are a few ways to parse only parts of a document:

By CSS Selector

Parse just a selection matching a CSS selector:

from bs4 import SoupStrainer

only_tables = SoupStrainer("table")
soup = BeautifulSoup(doc, parse_only=only_tables)

This will parse only the tags from the document.

By Tag Name

Parse only specific tags:

only_divs = SoupStrainer("div")
soup = BeautifulSoup(doc, parse_only=only_divs)

By Function

Pass a function to test if a tag should be parsed:

def is_short_string(string):
  return len(string) < 20

only_short_strings = SoupStrainer(string=is_short_string)
soup = BeautifulSoup(doc, parse_only=only_short_strings)

This parses tags based on their text content.

By Attributes

Parse tags that contain specific attributes:

has_data_attr = SoupStrainer(attrs={"data-category": True})
soup = BeautifulSoup(doc, parse_only=has_data_attr)

Multiple Conditions

You can combine multiple strainers:

strainer = SoupStrainer("div", id="main")
soup = BeautifulSoup(doc, parse_only=strainer)

This will parse only

.

Parsing only parts you need can help reduce memory usage and improve performance when scraping large documents.

Dealing with Encoding

When parsing documents, you may encounter encoding issues. Here are some ways to handle encoding:

Specify at Parse Time

Pass the from_encoding parameter when creating the BeautifulSoup object:

soup = BeautifulSoup(doc, from_encoding='utf-8')

This handles any decoding needed when initially parsing the document.

Encode Tag Contents

You can encode the contents of a tag:

tag.string.encode("utf-8")

Use this when outputting tag strings.

Encode Entire Document

To encode the entire BeautifulSoup document:

soup.encode("utf-8")

This returns a byte string with the encoded document.

Pretty Print with Encoding

Specify encoding when pretty printing

print(soup.prettify(encoder="utf-8"))

Unicode Dammit

BeautifulSoup’s UnicodeDammit class can detect and convert incoming documents to Unicode:

from bs4 import UnicodeDammit

dammit = UnicodeDammit(doc)
soup = dammit.unicode_markup

This converts even poorly encoded documents to Unicode.

Properly handling encoding ensures your scraped data is decoded and output correctly when using BeautifulSoup.

Django | Debugging Django-App in VS Code

See here how to configure VS Code:

  • Switch to Run view in VS Code (using the left-side activity bar or F5). You may see the message
    “To customize Run and Debug create a launch.json file”.
    This means that you don’t yet have a launch.json file containing debug configurations. VS Code can create that for you if you click on the create a launch.json file link:Django tutorial: initial view of the debug panel
  • Select the link and VS Code will prompt for a debug configuration. Select Django from the dropdown and VS Code will populate a new launch.json file with a Django run configuration.
    The launch.json file contains a number of debugging configurations, each of which is a separate JSON object within the configuration array.
  • Scroll down to and examine the configuration with the name “Python: Django”:
{
  "version": "0.2.0",
  "configurations": [
    {
      "name": "Python: Django",
      "type": "python",
      "request": "launch",
      "program": "${workspaceFolder}\\manage.py",
      "args": ["runserver"],
      "django": true,
      "justMyCode": true
    }
  ]
}
  • This configuration tells VS Code to run "${workspaceFolder}/manage.py" using the selected Python interpreter and the arguments in the args list.
    Launching the VS Code debugger with this configuration, then, is the same as running python manage.py runserver in the VS Code Terminal with your activated virtual environment. (You can add a port number like "5000" to args if desired.)
    The "django": true entry also tells VS Code to enable debugging of Django page templates, which you see later in this tutorial.
  • Test the configuration by selecting the Run > Start Debugging menu command, or selecting the green Start Debugging arrow next to the list (F5):Django tutorial: start debugging/continue arrow on the debug toolbar
  • Ctrl+click the http://127.0.0.1:8000/ URL in the terminal output window to open the browser and see that the app is running properly.
  • Close the browser and stop the debugger when you’re finished. To stop the debugger, use the Stop toolbar button (the red square) or the Run > Stop Debugging command (Shift+F5).
  • You can now use the Run > Start Debugging at any time to test the app, which also has the benefit of automatically saving all modified files.

Python | Cookbook

Pip

List all available versions of a packagepip install --use-deprecated=legacy-resolver <module>==
wget -q https://pypi.org/pypi/PyJWT/json -O - | python -m json.tool -

Show Pip Configuration

pip config list

Set Pip Cache Folder

pip config set global.cache-dir D:\Temp\Pip\Cache

Location of packages

pip show <module>

Installation

Update all Python Packages with Powershell

pip freeze |


Update Packages

requirements.txt aktualisieren und alle Versionsnummern als Minimalversionnummer setzen

sed -i '' 's/==/>=/g' requirements.txt
pip install -U -r requirements.txt
pip freeze > requirements.txt
pip install --upgrade --force-reinstall -r requirements.txt
pip install --ignore-installed -r requirements.txt

FastAPI| Arbeiten mit FastAPI

Installation

FastAPI basiert auf den nachfolgenden leistungsfähigen Paketen:

pip install fastapi

Oder die Installation von FastAPI mit allen Komponenten

pip install fastapi[all]
pip install uvicorn[standard]

Arbeiten mit Datenbanken

Alembic

Alembic ist ein leichtgewichtiges Datenbankmigrationstool zur Verwendung mit dem SQLAlchemy Database Toolkit für Python.

pip install alembic
alembic init alembic
alembic list_templates
alembic init --template generic ./scripts

Migrationsskript zur Erstellug der Tabelle ‘account’

alembic revision -m "create account table"

Migrationsskript bearbeiten

def upgrade():
    op.create_table(
        'account',
        sa.Column('id', sa.Integer, primary_key=True),
        sa.Column('name', sa.String(50), nullable=False),
        sa.Column('description', sa.Unicode(200)),
    )

def downgrade():
    op.drop_table('account')

Migration durchführen

alembic upgrade head

Migrationsskript erstellen für das Hinzufügen einer Spalte

alembic revision -m "Add a column"

Migrationsskript bearbeiten

def upgrade():
    op.add_column('account', sa.Column('last_transaction_date', sa.DateTime))

def downgrade():
    op.drop_column('account', 'last_transaction_date')

Migration durchführen

alembic upgrade head

SAS | Migrate from SAS to Python

Introduction

Cookbook

proc freq

proc freq data=mydata;
    tables myvar / nocol nopercent nocum;
run;
mydata.myvar.value_counts().sort_index()

sort by frequency

proc freq order=freq data=mydata;
	tables myvar / nocol nopercent nocum;
run;
mydata.myvar.value_counts()

with missing

proc freq order=freq data=mydata;
    tables myvar / nocol nopercent nocum missing;
run;
mydata.myvar.value_counts(dropna=False)

proc means

proc means data=mydata n mean std min max p25 median p75;
    var myvar;
run;
mydata.myvar.describe()

more percentiles

proc means data=mydata n mean std min max p1 p5 p10 p25 median p75 p90 p95 p99;
	var myvar;
run;
mydata.myvar.describe(percentiles=[.01, .05, .1, .25, .5, .75, .9, .95, .99])

data step

concatenate datasets

data concatenated;
    set mydata1 mydata2;
run;
concatenated = pandas.concat([mydata1, mydata2])

proc contents

proc contents data=mydata;
run;
mydata.info()

save output

proc contents noprint data=mydata out=contents;
run;
contents = mydata.info()  # check this is right

Misc

number of rows in a datastep

* Try this for size: http://www2.sas.com/proceedings/sugi26/p095-26.pdf;
len(mydata)

Django | Cookbook

Installation

Install current Version (3.2.8)

❯ pip install django==3.2.8

Install next Version (4.0)

❯ pip install --pre django

Check installed version

❯ python -m django --version
❯ django-admin.exe version

First steps

The following steps are based on a summary of the Django Tutorial

Create project

django-admin startproject main
cd working_with_django
python manage.py migrate
python manage.py runserver 8080
python manage.py startapp app_base

Create view

Create view in app_base/views.py

from django.http import HttpResponse

def index(request):
    return HttpResponse("Hello, world. You're at the polls index.")

Add view to app_base/urls.py

from django.urls import path
from . import views

urlpatterns = [
    path('', views.index, name='index'),
]

Add urls to project main/urls.py

from django.contrib import admin
from django.urls import include, path

urlpatterns = [
    path('admin/', admin.site.urls),
    path('app_base/', include('app_base.urls')),
]

Create admin user

$ python manage.py createsuperuser
Username (leave blank to use 'user'): admin
Email address: admin@localhost
Password: 
Password (again): 
Superuser created successfully.

Create data and database

Create database model in app_base/models.py

from django.db import models

class Question(models.Model):
    question_text = models.CharField(max_length=200)
    pub_date = models.DateTimeField('date published')

class Choice(models.Model):
    question = models.ForeignKey(Question, on_delete=models.CASCADE)
    choice_text = models.CharField(max_length=200)
    votes = models.IntegerField(default=0)

Activating models in main/settings.py

INSTALLED_APPS = [
    'app_base.apps.AppBaseConfig',

    'django.contrib.admin',
    'django.contrib.auth',
    'django.contrib.contenttypes',
    'django.contrib.sessions',
    'django.contrib.messages',
    'django.contrib.staticfiles',
]
$ python manage.py makemigrations app_base
$ python manage.py sqlmigrate app_base 0001

Make app modifiable in the admin (app_base/admin.py)

from django.contrib import admin
from .models import Question

admin.site.register(Question)

Writing more views

Create views in app_base/views.py

def detail(request, question_id):
    return HttpResponse("You're looking at question

def results(request, question_id):
    response = "You're looking at the results of question
    return HttpResponse(response

def vote(request, question_id):
    return HttpResponse("You're voting on question

Add new views into app_base/urls.py

from django.urls import path
from . import views

urlpatterns = [
    path('', views.index, name='index'),

    path('<int:question_id>/', views.detail, name='detail'),
    path('<int:question_id>/results/', views.results, name='results'),
    path('<int:question_id>/vote/', views.vote, name='vote'),
]

Add template in app_base/templates/polls/index.html

    <ul>
    
        <li><a href="/polls/{{ question.id }}/">{{ question.question_text }}</a></li>
    
    </ul>

    <p>No polls are available.</p>


Modify view in app_base/views.py

from django.shortcuts import render
...
def index(request):
    latest_question_list = Question.objects.order_by('-pub_date')[:5]
    context = {'latest_question_list': latest_question_list}
    return render(request, 'polls/index.html', context)

Raising a 404 error in app_base/views.py

from django.http import HttpResponse
from django.shortcuts import render, get_object_or_404

from .models import Question
# ...
def detail(request, question_id):
    question = get_object_or_404(Question, pk=question_id)
    return render(request, 'polls/detail.html', {'question': question})

Create template app_base/templates/polls/detail.html

<h1>{{ question.question_text }}</h1>
<ul>

    <li>{{ choice.choice_text }}</li>

</ul>

Removing hardcoded URLs in app_base/templates/polls/index.html

<li>
   <a href="
</li>

The way this works is by looking up the URL definition as specified in the app_base/urs.py

...
# the 'name' value as called by the 
path('<int:question_id>/', views.detail, name='detail'),
...

Namespacing URL names in app_base/urls.py

app_name = 'app_base'

urlpatterns = [
...

Then, modify link in app_base/templates/polls/index.html

from url ‘detail’ to url ‘app_base:detail’

<li>
    <a href="
</li>

Use generic views: Less code is better

Create class in app_views/views.py

class HomeView(generic.TemplateView):
    template_name = 'index.html'

Create template app_views/templates/index.html

<h1>App Views:</h1>
Welcome

Modify app_views/urls.py

urlpatterns = [
    path('', views.HomeView.as_view(), name='home'),
]

Add another app to main project

Create app

$ python manage.py startapp app_view

Modify main/urls.py

urlpatterns = [
    path('admin/',     admin.site.urls),
    path('app_base/',  include('app_base.urls')),
    path('app_views/', include('app_views.urls')),
]

Add data model in app_views/models.py

from django.db import models

class DataItem(models.Model):
    text = models.CharField(max_length=200)
    data = models.IntegerField(default=0)

    def __str__(self):
        return self.text

Register data in app_views/admin.py

from django.contrib import admin
from .models import DataItem

admin.site.register(DataItem)

Activate models

$ python manage.py makemigrations app_views
$ python manage.py sqlmigrate app_views 0001
$ python manage.py migrate app_views

Navigation / Redirection

Set root page of Django project

When accessing your Django project, the root page will normaly doesn’n show your app homepage.

To change this, you hate to modiy the url handling.

In the following sample, replace <appname> with the name of your app

Define a redirection view in your app (/<appname>/urls.py)

def redirect_to_home(request):
    return redirect('/<appname>')

Define path in the global urls.py (/main/urls.py)

from django.contrib import admin
from django.urls import include, path
from django.shortcuts import redirect

from <appname> import views

urlpatterns = [
    path('',            views.redirect_to_home, name='home'),
    path('<appname>/',  include('<appname>.urls')),
    path('admin/',      admin.site.urls)
]

Highlight current page in navigation menu

<div class="list-group">
    <a href="
            Basic Upload
    </a>
    <a href="
            Progress Bar Upload
    </a>
</div>

Using PostgresSQL Database

Install PostgresSQL

Create Superuser

createuser.exe --interactive --pwprompt

Logging

Additional reading

Tutorials

Testing

Blogs and Posts

Resolving problems

Wrong template is used

The template system is using a search approach to find the specified template file, e.g. ‘home.html’.

If you created more than one apps with the same filenames for templates, the first one will be used.

Change the template folders and add the app name, e.g.

template/
        app_base/
                home.html

Resolving error messages and erors

‘app_name’ is not a registered namespace

One reason for this error is the usage of a namespace in a link.

Back to <a href="


If you want to use this way of links, you have to define the namespace/appname in your <app>/urls.py file

app_name = 'app_views'
urlpatterns = [
    path('', views.HomeView.as_view(), name='home'),
]

dependencies reference nonexistent parent node

  • Recreate database and migration files
  • Remove all migration files under */migrations/00*.py
  • Remove all pycache folders under */__pycache__ and */*/__pycache__
  • Run migration again
$ python manage.py makemigrations
$ python manage migrate

ValueError: Dependency on app with no migrations: customuser

$ python manage.py makemigrations

Project Structure

Running tasks with Makefile

PREFIX_PKG := app

default:
	grep -E ':\s+#' Makefile

clearcache:	# Clear Cache
	python3 manage.py clearcache

run:		# Run Server
	python3 manage.py runserver 8000

deploy:		# Deploy
	rm -rf dist $(PREFIX_PKG)*
	rm -rf polls.dist
	cd polls && python3 setup.py sdist
	mkdir polls.dist && mv polls/dist/* polls/$(PREFIX_PKG)* polls.dist

install_bootstrap:	# Install Bootstrap Library
	cd .. && yarn add bootstrap
	rm -rf  polls/static/bootstrap
	mkdir   polls/static/bootstrap
	cp -R ../node_modules/bootstrap/dist/* polls/static/bootstrap

install_jquery:		# Install jQuery Library
	cd .. && yarn add jquery
	rm -rf polls/static/jquery
	mkdir  polls/static/jquery
	cp ../node_modules/jquery/dist/* polls/static/jquery

install_bootstrap_from_source:	# Install Bootstrap from Source
	mkdir -p install && \
	wget https://github.com/twbs/bootstrap/releases/download/v4.1.3/bootstrap-4.1.3-dist.zip -O install/bootstrap-4.1.3-dist.zip && \
	unzip install/bootstrap-4.1.3-dist.zip -d polls/static/bootstrap/4.1.3