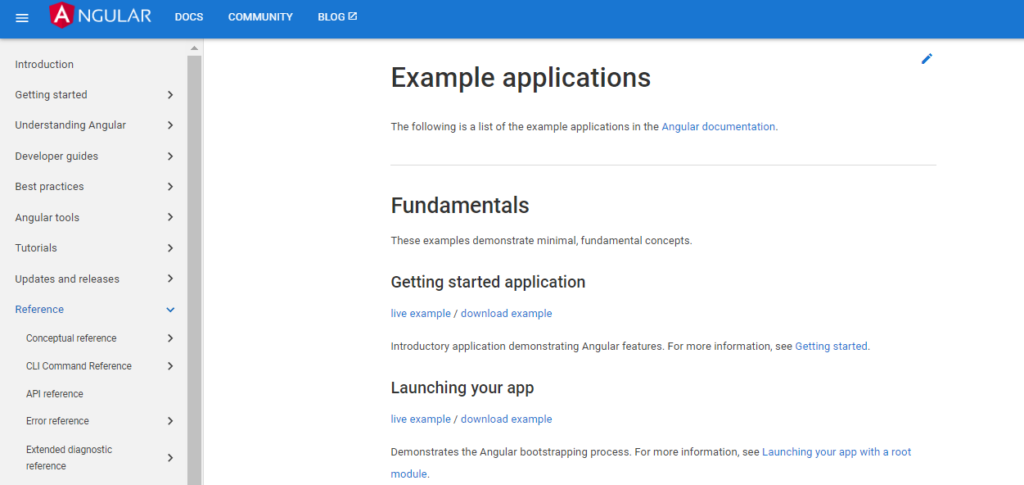
You could download each of them and look around. In this post, i will show you to do this at once for all examples.
So, we will
get list of all examples
download zip files of examples
extract examples
Preparation
First, we define some variables for the Chrom Browser and the resulting output files.
# Mac OS
CHROME=/Applications/Chromium.app/Contents/MacOS/Chromium

# Windows WSL
CHROME='/mnt/c/Program Files/Google/Chrome/Application/chrome.exe'

LISTOFZIPS=listofzips
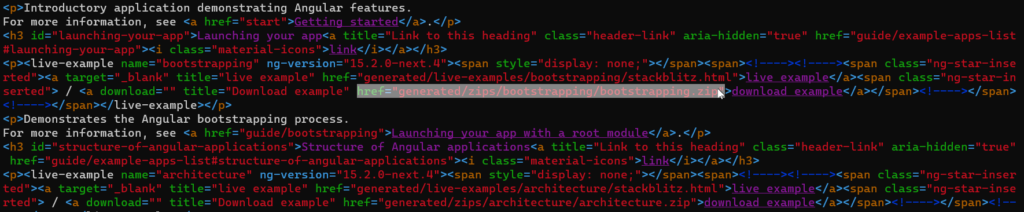
This is not a static html file. The list will be created dynamically when viewing the page. So, only download the page with wget or curl does not help, because we need to run the JavaScript code in the browser to create the list.
Therefore, we will use Chrome in headless mode: Load the page and dump the contents of the page (dom) into a file
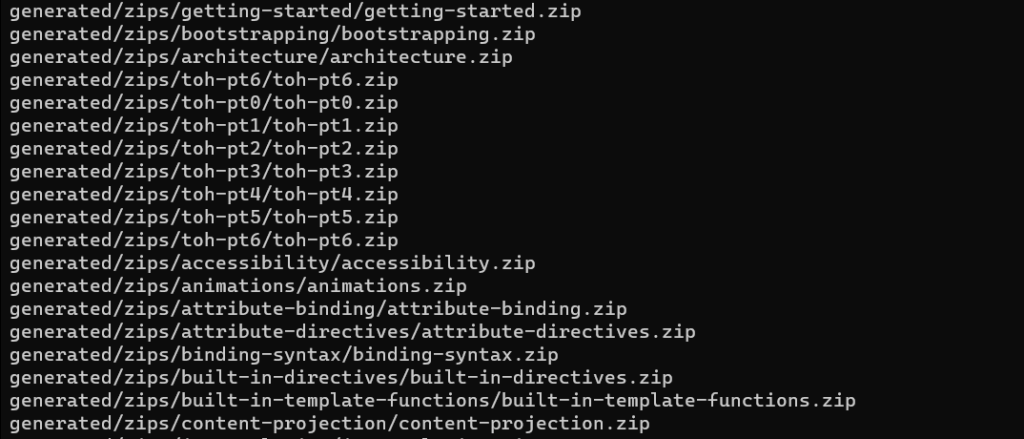
The result will be the list of URL’s for each example.
Download Examples
Next, for each of these example $ZIP, we will download the zip from the Angular Website with wget -q https://angular.io/$ZIP
do_download() {
        echo "##. Download Zips"

        (
                rm    -rf zip
                mkdir -p  zip
                cd        zip

                cat ../$LISTOFZIPS | while read ZIP
                do
                        echo "Download $ZIP"
                        if [ ! -f $ZIP ]; then
                                wget -q https://angular.io/$ZIP
                        fi
                done

                rm *.zip.1
        )
}
Extract ZIP Files
do_unzip() {
        echo "##. Unzip"

        rm    -rf src
        mkdir -p  src

        find zip -type f -exec basename {} \; | \
        while read FILE
        do
                FLDR=${FILE/.zip/}
                echo unzip zip/$FILE -d src/$FLDR
                unzip zip/$FILE -d src/$FLDR
        done
}
Upgrade all node modules to current version
We will need toe tool npm-check-updates for this.
Install it with
npm install -g npm-check-updates
ncu updates all packages to the latest version. Some Angular Examples require an earlier version of Typescript, so, after upgrade i changes the Typescript Version to 4.9.5
do_upgrade() {
	echo "##. Upgrade"

	(
		cd src
		ls | \
		while read FLDR
		do
			echo "     $FLDR"
			(
				cd $FLDR
				ncu -u
				#     "typescript": "~4.9.3"
				sed -i '1,$s/"typescript": ".*"/"typescript": "~4.9.5"/' package.json
				# pnpm install
			)
		done
	)
}
In this post, you will learn how to get started with Angular I18n using ngx-translate, the internationalization (i18n) library for Angular. We will cover the following topics:
setup new angular app
install required dependencies
add bootstrap as ui framework
create app with demo page and translation services
This will be the final result (click to show video). Source code for this post is on GitHub.
import { NgModule } from '@angular/core';
import { BrowserModule } from '@angular/platform-browser';
import { HttpClient, HttpClientModule } from '@angular/common/http';
import { AppRoutingModule } from './app-routing.module';
import { AppComponent } from './app.component';
import { TranslateLoader, TranslateModule } from '@ngx-translate/core';
import { TranslateHttpLoader } from '@ngx-translate/http-loader';
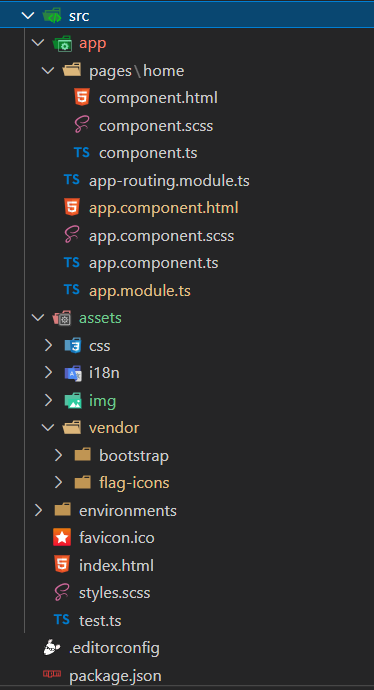
import { HomePageComponent } from './pages/home/component';
import { DemoPageComponent } from './pages/demo/component';
@NgModule({
declarations: [AppComponent, HomePageComponent, DemoPageComponent],
imports: [
BrowserModule,
AppRoutingModule,
HttpClientModule,
TranslateModule.forRoot({
loader: {
provide: TranslateLoader,
useFactory: HttpLoaderFactory,
deps: [HttpClient],
},
}),
],
providers: [],
bootstrap: [AppComponent],
})
export class AppModule {}
// required for AOT compilation
export function HttpLoaderFactory(http: HttpClient): TranslateHttpLoader {
return new TranslateHttpLoader(http);
}
How the app works
The translation is done with the ngx-translate component.
Translation works with different JSON files (for each language a separate file), containing the required translation for each text to be displayed. Each text is addressed with a name within the JSON file.
So, the base structure of each JSON file is the following:
Translation files
assets/i18n/de.json
{
  "i18n-demo-header": "I18N Demo",
  "header": "I18N Funktionalität in Angular"
}
assets/i18n/us.json
{
  "i18n-demo-header": "I18N Example",
  "header": "I18N Functionality in Angular"
}
These translations could be used in a html file by using the translate pipe:
❯ ng new app-starter
? Do you want to enforce stricter type checking and stricter bundle budgets in the workspace?
  This setting helps improve maintainability and catch bugs ahead of time.
  For more information, see https://angular.io/strict Yes
? Would you like to add Angular routing? Yes
? Which stylesheet format would you like to use? SCSS
cd app-starter
Add matter.js
Matter.js is a javascript library, so we have to add the corresponding files to our angular app. We will use the npm module matter-js.
npm install matter-js
We also add the type definitions, so that Visual Studio code knows how to check our code.
npm install @types/matter-js --save-dev
Clear content of app.component.html
To keep out demopage clean, we will remove unnecessary code from app.component.html.
Remove all of the content and just keep the last line
<router-outlet></router-outlet>
Create pager for MatterJS democode
We will use a seperate Angular component/page for our matter.js demo
One of the most challenging things in software development is state management.
Motivation
What is a state (or application state)? Theoretically, it is the entire memory of the application, but, typically, it is the data received via API calls, user inputs, presentation UI State, app preferences, etc.
It is the data that can differentiate two instances of the same application.
One example of application state would be a list of customers or products maintained in an application.
Problem (we’re trying to solve)
Think of an application using a list of data (products, customers, …). This list is the state that we are trying to manage.
Some API calls and user inputs could change the state ( i.e. the list ) by adding or removing items/entries. The state change should be reflected in the UI and other dependent components.
We could solve this with a global variable to hold the list and then add/remove customers from/to it and then write the code to update the UI and dependencies. But, there are many pitfalls in that design which are not the focus of this article.
Solutions
Currently there are several state management libraries for Angular apps: NGRX, NGXS or Akita.
RxJS is a library for reactive programming using Observables, to make it easier to compose asynchronous or callback-based code. This project is a rewrite of Reactive-Extensions/RxJS with better performance, better modularity, better debuggable call stacks, while staying mostly backwards compatible, with some breaking changes that reduce the API surface
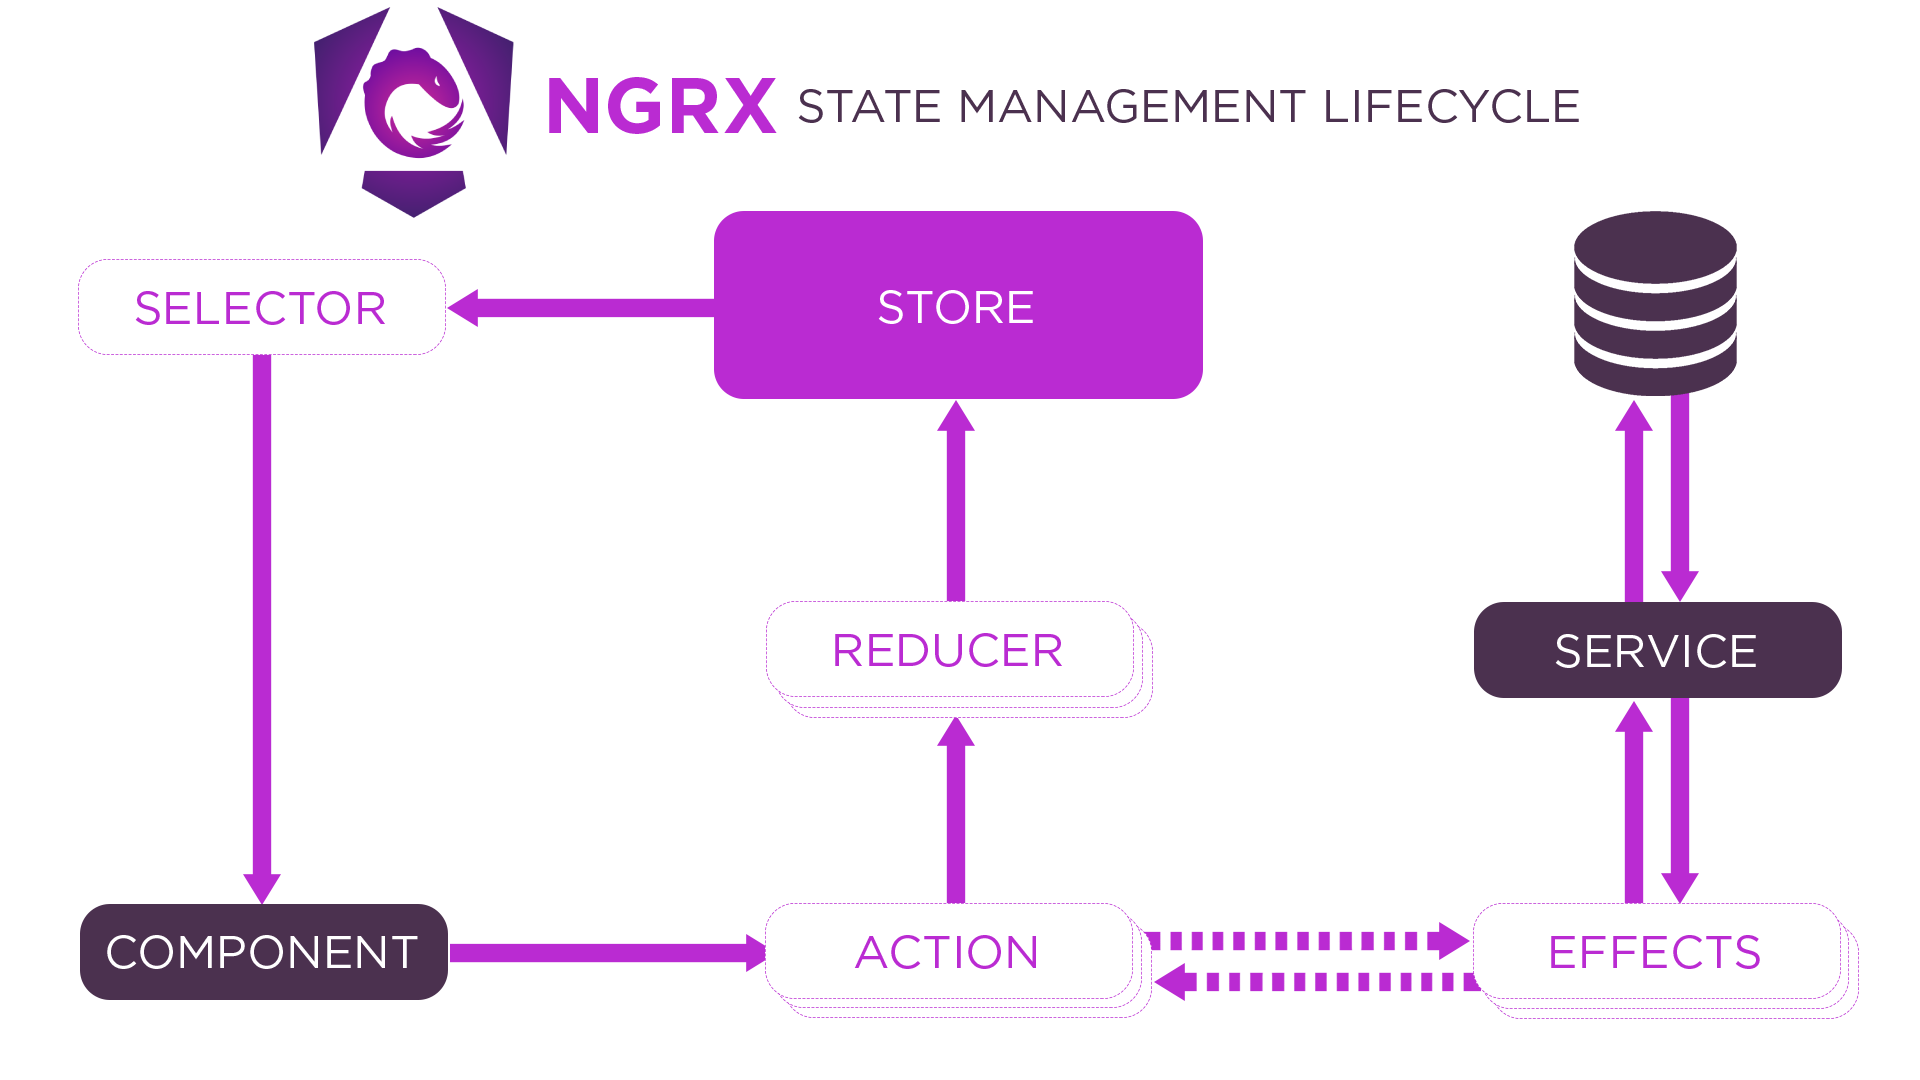
Store is RxJS powered state management for Angular applications, inspired by Redux. Store is a controlled state container designed to help write performant, consistent applications on top of Angular.
Key concepts
Actions describe unique events that are dispatched from components and services.
State changes are handled by pure functions called reducers that take the current state and the latest action to compute a new state.
Selectors are pure functions used to select, derive and compose pieces of state.
State is accessed with the Store, an observable of state and an observer of actions
Akita is a state management pattern, built on top of RxJS, which takes the idea of multiple data stores from Flux and the immutable updates from Redux, along with the concept of streaming data, to create the Observable Data Stores model.
Akita encourages simplicity. It saves you the hassle of creating boilerplate code and offers powerful tools with a moderate learning curve, suitable for both experienced and inexperienced developers alike.
Akita is based on object-oriented design principles instead of functional programming, so developers with OOP experience should feel right at home. Its opinionated structure provides your team with a fixed pattern that cannot be deviated from.
NGXS is a state management pattern + library for Angular. It acts as a single source of truth for your application’s state, providing simple rules for predictable state mutations.
NGXS is modeled after the CQRS pattern popularly implemented in libraries like Redux and NgRx but reduces boilerplate by using modern TypeScript features such as classes and decorators.
State is basically everything that will define the UI that our user will be using. State could be whether a button should be visible or not, it could be the result of that button click and it could also be an Array of users that is coming from an API. State can live in different places throughout our entire application. Some state is very specific to a certain component where other state might be shared in different parts of our application. One piece of state could be a singleton instance, where a another piece of state could share the limited lifespan of a component that can be destroyed at any time.
This big variety of what state could be, how long it lives and where it comes from results in complexity that we need to manage.
What is state management?
State management is the concept of adding, updating, removing and reading pieces of state in an application. When we have deeply nested data structures and we want to update a specific part deep down in the tree, it might become complex. In that case we have state management libraries that contain a Store which helps us with state management to get rid of that complexity. A quick note, we have to be careful that these libraries don’t add complexity by overusing them.
Reactive state
Combining state management together with reactive programming can be a really nice way to develop single-page-applications. Whether our focus lies on Angular, Vue or React, combining these two principles will result in more predictable applications.
Now what has state to do with reactive programming? A piece of state can change over time, so in a way we are waiting for new state changes. That makes it asynchronous.
The sidebarCollapsed$ stream starts out with false, later on it becomes true and so on. This stream keeps on living. In Angular this state can be consumed with the async pipe as easy as:
The async pipe will subscribe to the sidebarCollapsed$ pass it to the component, mark it for check and will automatically unsubscribe when the component gets destroyed. Keeping state in an observer pattern is nice because we can subscribe to the changes. Oh, and did I mention it plays super nice with Angular?
We can either use a BehaviorSubject or state management frameworks that support Observables. Here are some really great ones with Observable support:
Before we dive deeper in state, there are 2 important principles that we should follow when managing state. The first principle is immutability, which means that we should never mutate data directly without creating a new reference of that object. If we mutate data directly, our application becomes unpredictable and it’s really hard to trace bugs. When we work in an immutable fashion we can also take advantage of performance strategies like the ChangeDetection.OnPush from Angular or React its PureComponent.
When we use typescript we can enforce the typescript compiler to complain when we mutate data
type Foo = {
    readonly bar: string;
    readonly baz: number;
}

let first = {bar: 'test', baz: 1};
first.bar = 'test2'; // compilation error
first = {...first, bar: 'test2'}; // success
In the previous example we have overwritten the first instance with an entire new instance that has an updated bar property.
Arrays can be handled like this:
let arr = ['Brecht', 'Kwinten'];
arr.push('John'); // BAD: arr is mutated
arr = [...arr, 'John']; // Good, arr gets new reference
the Array prototype also has some great helper functions that we can use to enforce immutability like map() and filter() but this is not in scope for this article.
The second principle is Unidirectional data flow. In a nutshell, this means that we should never use two-way data binding on state. It is the absolute owner of that specific piece of state that is in charge of updating it (immutable of course).
Both of these principles are highly enforced by the Redux pattern.
What kind of states are there?
Router state
Often forgotten, but one of the most important pieces of state a web application can have. Putting state in the route gives us the following advantages:
We can use the browser navigation buttons
We can bookmark the state
We can can copy and paste the url with the state to other users
We don’t have to manage it, it’s always there in the route
Tip: Instead of handling modals with a userDetailModalVisible property, why not enjoy all the benefits mentioned above and bind it to a users/:userId route? Using a child router-outlet in Angular makes this a piece of cake as we can see in this snippet.
<table>
<!--contains users -->
</table>
<router-outlet>
<!-- user detail modal rendered in here -->
</router-outlet>
Component state
Every component could contain state. That state could be shared with its dumb components or could be used in the component itself. Eg: When an ItemComponent has a property selectedItems which is an array of ids, and that array is never used in other components (that aren’t children of that component), we can consider it component state. It belongs to that component, therefore the component should be responsible for it. Child components can consume that state but should never mutate it. Those components can notify their parent that is responsible for it, which could update it in an immutable way. For more information about smart and dumb components look here.
Personally, I try to avoid state management frameworks for managing component state because it’s the responsibility of that component to manage that state. There are however good reasons to use state management frameworks to manage component state:
If the state management of the component becomes a bit too complex and we don’t want to use a state management framework just yet, we could use a state reducer in the component itself.
Persisted state
Persisted state, is state that is being remembered when the user navigates between different pages. This could be whether a sidebar was collapsed or not, or when the user returns to a grid with a lot of filters and he wants them to be remembered and reapplied when he returns. Another example is a wizard with different steps, and every step needs to be persisted so the user can navigate back and forth and the last page is a result of all these steps.
Persisted state is the type of state where we typically use a state management framework for, that being said, if we don’t want to rely on an external dependency we can also manage it in a Angular service which can be a singleton that is shared throughout the entire application. If that service becomes too complex or there is a lot of state to manage, I would consider to put that state into a state management framework.
Shared state
When we are talking about shared state, we are talking about state that needs to be shared between different parts of our application. State that is being shared throughout different smart components. This means that the instance of this piece of state should live on a higher level, than the components that want to consume it.
Shared state can be managed in a state management framework like Redux, Ngrx, Akita, Ngxs and so on, but if that state is small and simple we can also manage it manually. Let’s say that we want an Observable of an Array of countries that we need to share throughout the entire application. In Angular we could have a CountryService that fetches the countries from the API once, and then shares it throughout the entire application. For that we can use the shareReplay operator from RxJS.
export class CountryService {
    ...
    countries$ = this.httpClient.get('countries').pipe(shareReplay(1));
}
Simple right, one line of code?! For this we don’t need a state management framework, although it can also have its benefits. Some developers like to keep all their master data in a Redux store, and that’s fine. Just know that we don’t have to. I like to develop by the KISS principle (Keep It Simple Stupid) as much as possible, so I favor this approach many times. Think about the amount of lines of code we saved by this approach. Beware that every line of code we write, not only needs to be written but also maintained.
Which state needs to be managed?
Now that we know what state is, we have to ask ourselves which state needs to be managed, and where do we manage that state? In a component, singleton service or a framework (Store)?
This is the part where the strong opinions surface. I would suggest to use what works for you and your team and really think about, but here are my personal opinionated guidelines:
I try to avoid state management frameworks where possible. RxJS already leverages us with a lot already and I like to think KISS.
I try to avoid using state management frameworks to communicate with different parts in my application, I believe state is unrelated to communication.
When my component can handle the state and it’s not too complex, I let my component in charge of managing that state.
Master data like countries are exposed in a service which uses the shareReplay operator.
I don’t put the result of a getById API call into a store if there is no one consuming that state except for the component requesting it
I use a facade between my smart components and my store/services to make refactoring easier in the future.
However, there is also a popular opinion out there to put literally everything in the store which has the following advantages:
We can see the flow of the code in devtools
Consistent pattern
We can leverage selectors with memoization
Easier for realtime applications
Optimistic updates are easier
However, there are a few downsides as well:
A gigantic amount of bloat code: Bigger bundle size, more maintenance and dev time. Eg: If we would use the complete Ngrx pattern for the countries$ example we would have to write an: action, actiontype, effect and a reducer.
Tightly coupled to a strong dependency that is hard to get rid of in the future
Generally more complex
The user his screen can get out of sync with the backend
Cache invalidation: if we add a currentUserToEdit in the store, we have to get it out when we navigate away
We can’t use the async pipe to cancel pending XHR requests
p5.js is a JavaScript library for creative coding, with a focus on making coding accessible and inclusive for artists, designers, educators, beginners, and anyone else.
In this Post, you will learn how to create an ionic app using p5.js to create an amazing demo of the Lissajous Curve (de/en).
If you want to learn more about this amazing graphs, take a look at some examples at codepen.io. Some amazing examples are here, here and here.
As always, you will find the final project on Github.
Preparation
You will need to install Node.Js, Ionic and p5.js.
First step is, to install Node.Js. I will refer to the installation pages on Node JS.
After installing Node.js, you will also have the Node Package manager, npm. We will use this tool to install the other requirements.
Install Ionic
$ npm -g install ionic
Create base app structure
$ ionic start working-with-p5js blank --type angular
$ cd working-with-p5js
The below code snippet we can view the result of using .map versus .switchMap
//user.service.ts
import { Injectable } from '@angular/core';
import { Http } from '@angular/http';
import { Observable } from "rxjs";
import 'rxjs/add/operator/map';
import 'rxjs/add/operator/do';
import 'rxjs/add/operator/switchMap';
import 'rxjs/add/operator/filter';
import 'rxjs/add/operator/catch';
import 'rxjs/add/operator/debounceTime';
import 'rxjs/add/operator/distinctUntilChanged';

@Injectable()
export class UserService {

  constructor(private http: Http) { }

  getUsers(): Observable<any> {
    return this.http.get('http://jsonplaceholder.typicode.com/users')
        //.map(v => v.json());
        .switchMap(v => v.json());
  }

}
//app.component.ts
import { Component } from '@angular/core';
import { UserService } from "./user.service";

@Component({
  selector: 'app-root',
  templateUrl: './app.component.html',
  styleUrls: ['./app.component.css']
})
export class AppComponent {
  title = 'app works!';

  constructor(private userService: UserService) {

  }

  search(term: string) {
    this.userService.getUsers()
        .subscribe(v => console.log(v));

    /*
    //we can do this with .switchMap
    this.userService.getUsers()
        .subscribe(v => {if (v.email != "Sincere@april.biz") {
          console.log(v.email);
        }});
     */
  }
}
Solving the multiple Async Pipe in Angular ≥ 2.0.0 with share operator
Remember to import import "rxjs/add/operator/share"; See reference here.
squareData$: Observable<string> = Observable.range(0, 10)
        .map(x => x * x)
        .do(x => console.log(`CalculationResult: ${x}`)
        .toArray()
        .map(squares => squares.join(", "))
        .share();  // remove this line: console will log every result 3 times instead of 1
Managing Cold and Hot Observables using publish().refCount() which is similar to .share()
ngOnInit() {
    // in angular 2 and above component.ts file add these    this.coldObservable();
    this.hotObservable();
}
/*
* cold observable is like a recast of video
* */
coldObservable() {
    let incrementalObs = Observable.interval(1000).take(10).map(x => x + 1);
    incrementalObs.subscribe(val => console.log('a: ' + val));
    setTimeout(function() {
        incrementalObs.subscribe(val => console.log('      b: ' + val));
    }, 4500);
}


/*
* hot observable is like watching a live video
* */
hotObservable() {
    let incrementalObs = Observable.interval(1000).take(10).map(x => x + 1).publish().refCount(); //can also use .share()
    incrementalObs.subscribe(val => console.log('a: ' + val));
    setTimeout(function() {
        incrementalObs.subscribe(val => console.log('      b: ' + val));
    }, 4500);
}
@Component({
    selector: 'app-root',
    templateUrl: './app.component.html',
    styleUrls: [ './app.component.css' ]
})
export class AppComponent implements OnInit {
    title = 'app works!';
    obs = Observable.of(1, 2, 3, 4);

    ngOnInit() {
        this.howToHandleErrorV1();
        this.howToHandleErrorV2();
        this.howToUseRetry();
        this.mergeObservableAndThrowError();
        this.mergeObservableAndErrorResumeNext();
        this.mergeObservableAndErrorCatch();
    }


    /*
     * This uses Catch for V1. This introduces Closure. It is effectively the same as V2.
     * */
    howToHandleErrorV1() {
        this.obs
            .map(x => {
                if ( x === 3 ) {
                    throw 'I hate threes'; // When it hitted error it actually unsubscribe itself at x === 3 of throw error
                }
                return x;
            })
            .catch(err => Observable.throw('Caught error here Observable.throw')) // continue go down the error path use Observable.throw
            .catch(err => Observable.of('Caught error here Observable.of')) // catch just use Observable.of
            .subscribe(
                x => console.log(x),
                err => console.error(err), // If not catch any where, the I hate threes errors will be propagated to here
                () => console.log('done completed')
            );
    }


    /*
     * There is a difference between V1 and V2. For V2 it is using onErrorResumeNext which
     * */
    howToHandleErrorV2() {
        let good = Observable.of('Caught error here Observable.of');

        this.obs
            .map(x => {
                if ( x === 3 ) {
                    throw 'I hate threes'; // When it hit error it actually unsubscribe itself at x === 3 of throw error
                }
                return x;
            })
            .onErrorResumeNext(good) // To catch just use Observable.of
            .subscribe(
                x => console.log(x),
                err => console.error(err), // If not catch any where, the I hate threes errors will be propagated to here
                () => console.log('done completed')
            );
    }


    /*
     * For this we use see it retries three times then console.error(err);
     * So retryWhen is for trying network connection websocket
     * */
    howToUseRetry() {
        this.obs
            .map(x => {
                if ( x === 3 ) {
                    throw 'I hate threes'; // When it hitted error it actually unsubscribe itself at x === 3 of throw error
                }
                return x;
            })
            .retry(3) // retry three times
            .retryWhen(err => err.delay(2000).take(3)) // similar but with 2 seconds delay and the error is not propagated.
            .retryWhen(err => err.delay(2000).take(3).concat(Observable.throw('bad'))) // this it would throw an error.
            .subscribe(
                x => console.log(x),
                err => console.error(err), // If not catch any where, the I hate threes errors will be propagated to here
                () => console.log('done completed')
            );
    }
/*
 * Using observable merge operator
 * */
mergeObservableAndThrowError() {
    let mergedObs = Observable.merge(
        this.obs, //1, 2, 3, 4
        Observable.throw('Stop Error'),
        Observable.from(this.array), //0, 1, 2, 3, 4, 5
        Observable.of(999) //999,
    );

    mergedObs.subscribe(
        val => console.log(val), //this should show 1, 2, 3, 4, Stop Error
        error => console.log(error),
        () => console.log("completed")
    );
}

/* Using observable onErrorResumeNext just like merge operator
 * */
mergeObservableAndErrorResumeNext() {
    let mergedObs = Observable.onErrorResumeNext(
        this.obs, //1, 2, 3, 4
        Observable.throw('Stop Error'),
        Observable.from(this.array), //0, 1, 2, 3, 4, 5
        Observable.of(999) //999,
    );

    mergedObs.subscribe(
        val => console.log(val), //this should show 1, 2, 3, 4, 0, 1, 2, 3, 4, 5, 999
        error => console.log(error),
        () => console.log("completed")
    );
}
/*
 * Using observable merge operator and catch
 * */
mergeObservableAndErrorCatch() {
    let mergedObs = Observable.merge(
        this.obs, //1, 2, 3, 4
        Observable.throw('Stop Error'),
        Observable.from(this.array), //0, 1, 2, 3, 4, 5
        Observable.of(999) //999,
    ).catch(e => {
        console.log(e);
        return Observable.of('catch error here');
    });

    mergedObs.subscribe(
        val => console.log(val), //this should show 1, 2, 3, 4, Stop Error, Catch Error Here
        error => console.log(error),
        () => console.log("completed")
    );
}
}
map vs flatMap in RxJS
Transform the items emitted by an Observable into Observables, then flatten the emissions from those into a single Observable. See my GitHub repo.
obs = Observable.of(1, 2, 3, 4);

ngOnInit() {
    this.usingMap();
    this.usingMapToMakeInnerObservable();
    this.usingMapAndMergeAll();
    this.usingFlatMap();
}usingMap() {
    this.obs
        .map(x => x * 2) // transform the input by multiple of 2
        .subscribe(
            x => console.log(x),
            err => console.error(err),
            () => console.log('done completed')
        );
}
usingMapToMakeInnerObservable() {
    this.obs
        .map(x => Observable.timer(500).map(() => x + 3)) // transform the input wrapping it with another observable and addition of 3
        //.map(x => Observable.timer(500).map((x) => x + 3)) // !!! REMEMBER Not the same as the immediate above
        .subscribe(
            x => console.log(x),
            err => console.error(err),
            () => console.log('done completed')
        );
}
// Map and Merge all is the same as just one FlatMap
usingMapAndMergeAll() {
    this.obs
        .map(x => Observable.timer(500).map(() => x + 3)) // transform the input wrapping it with another observable and addition of 3
        .mergeAll()
        .subscribe(
            x => console.log(x),
            err => console.error(err),
            () => console.log('done completed')
        );
}
// Flat map is the same as map then merge all
// transform the items emitted by an Observable into Observables, then flatten the emissions from those into a single Observable
usingFlatMap() {
    this.obs
        .flatMap(x => Observable.timer(500).map(() => x + 10)) // transform the input wrapping it with another observable and addition of 10
        .subscribe(
            x => console.log(x),
            err => console.error(err),
            () => console.log('done completed')
        );
}
Transforming pure Javascript array vs. Observable from array
array = [0, 1, 2, 3, 4, 5];

ngOnInit() {
    this.setArrayToObservableThenTransform();
}/*
* This keeps creating new array. It is good that it creates new array of arr for immutability.
* But it's bad because there is clean up and resource intensive for mobile
* */
transformArray() {
    let result = this.array
        .filter(( x, i, arr ) => {
            console.log('filtering ' + x);
            console.log('is the source array ' + (arr === this.array));
            return x
        })
        .map(( x, i, arr ) => {
            console.log('mapping ' + x);
            console.log('is the source array ' + (arr === this.array));
            return x + '!';
        })
        .reduce(( r, x, i, arr ) => {
            console.log('reducing ' + x);
            return r + x;
        }, '--');

    console.log(result);
}

/*
* This is more efficient for resource management because it linearly scans and discard when not right
* */
setArrayToObservableThenTransform() {    let obsArray = Observable.from(this.array); // Use Observable.from() instead of Observable.of(). There is diff.    obsArray
        .filter(( x: any ) => {
            console.log('filtering ' + x);
            return x
        })
        .map(( x ) => {
            console.log('mapping ' + x);
            return x + '!';
        })
        .reduce(( r, x ) => {
            console.log('reducing ' + x);
            return r + x;
        }, '--')
        .subscribe(
            x => console.log(x)
        );
}
array = [0, 1, 2, 3, 4, 5];ngOnInit() {
    this.reduceArray();
    this.reduceObservableArray();
    this.reduceObservableArray_Abstract2();
    this.scanObservableArray();
}
/*
* This is the same as reduceObservableArray()
* */
reduceArray() {
    let result = this.array.reduce(
        (accumulator, currentValue) => accumulator + currentValue, 3
    ); // 3 is the init value.
    console.log('reduceArray ' + result); // output 18 => 3 + (0 ... 5)
}
/*
* This is the same as reduceArray()
* But this waits for all the arrays to finish emitting before reducing them to one single number
* See the next method to understand better
* */
reduceObservableArray() {
    let obsArray = Observable.from(this.array);
    obsArray.reduce(
        (accumulator, currentValue) => accumulator + currentValue, 3
    ).subscribe(
        val => console.log('reduceObservableArray ' + val)
    );
}
/*
* The exact same reduce function/method as of reduceObserableArray() above
* This proves that it waits for all 6 numbers to come in then reduce them
* */
reduceObservableArray_Abstract2() {
    let obsArray = Observable.interval(1000).take(6); //emits 6 times of 0, 1, 2, 3, 4, 5
    obsArray.reduce(
        (accumulator, currentValue) => accumulator + currentValue, 3
    ).subscribe(
        val => console.log('reduceObservableArray_Abstract2 ' + val)
    );
}
/*
* This is the same as the above reduceObserableArray_Abstract2()
* except this is using scan instead of reduce
* */
scanObservableArray() {
    let obsArray = Observable.interval(1000).take(6); //emits 6 times of 0, 1, 2, 3, 4, 5
    obsArray.scan(
        (accumulator, currentValue) => accumulator + currentValue, 3
    ).subscribe(
        val => console.log('scanObservableArray() ' + val)
    );
}
Create, next, and subscribe to Subject and BehaviorSubject
There is a Stack Overflow thread which discussed about the difference between Subject and BehaviorSubject. It’s worth understanding.
import { Subject } from 'rxjs/Subject';
import { BehaviorSubject } from "rxjs/BehaviorSubject";
// create subject
// there is no need for initial value
subject = new Subject<boolean>();

// create behaviorSubject which require initial value
// true is an initial value. if there is a subscription
// after this, it would get true value immediately
behaviorSubject = new BehaviorSubject<boolean>(true);
ngOnInit() {
    this.subject.next(false); /* Subject subscription wont get anything at this point before the subscribeSubject() */    this.subscribeSubject();
    this.subscribeBehaviorSubject();
}
/*
* Push the next val into the behavior subject
* */
nextSubject(val: boolean) {
    this.subject.next(val);
}

/*
* Any values push into the subject would not be can shown
* before this subscribeSubject() is called
* */
subscribeSubject() {
    this.subject
        //.take(1) //when we include .take(1) we will have a complete. Without this it will continue subscribing
        .subscribe(
            val => console.log(val),
            err => console.error(err),
            () => console.log('completed')
        );
}

/*
* This is the proper way to return a subject as observable
* */
getSubject(): Observable<boolean> {
    return this.subject.asObservable();
}

/*
 * Push the next val into the behavior subject
 * */
nextBehaviorSubject(val: boolean) {
    this.behaviorSubject.next(val);
}

/*
* For angular Behavior subject for a data service as a angular service often initializes
* before component and behavior subject ensures that the component consuming the
* service receives the last updated data even if there are no new
* updates since the component's subscription to this data.
* */
subscribeBehaviorSubject() {
    this.behaviorSubject
        // .first()
        .subscribe(
            val => console.log(val),
            err => console.error(err),
            () => console.log('completed')
        );
}
usingFinallyOperator() {
    Observable
        .interval(500)
        .take(4)
        .finally(() => console.log('End of the observable, Hello World'))
        .subscribe(
            val => console.log('count taker ' + val)
        );
}
Stopping / Intercepting Observable
Imagine using Gmail where it allows you to undo email sent? We can produce similar experience with Observable
// subscription is created when an observable is being subscribed
subscription: Subscription;

// boolean variable for showing stop observable using takeWhile operator
isTrue: boolean = true;
/*
* basic interval can be used as delay too
* Imagine Gmail allows you to send and undo send within 4 seconds of sending
* Use Case: Perform an action 8 seconds later then intercept if user choose to undo the action
* */basicInterval() {
    let undoInSeconds: number = 8;
    this.subscription = Observable
            .interval(1000)
            .take(undoInSeconds)
            .takeWhile(() => this.isTrue)
            .subscribe(
                (val: number) => {
                    console.log(`${val + 1} seconds...         UNDO`);
                    ( val === (undoInSeconds - 1) ) ? console.log('Email sent / Action performed') : null;
                }
            );
}
/*
* This is to stop observable from continuing performance
* Use Case: Stop observable from running like how Gmail could undo email being sent
* */stopObservableUsingUnsubscribe() {
    if (!!this.subscription) {
        this.subscription.unsubscribe();
        console.log('subscription: Subscription is unsubscribed');
    }
}

/*
* This is also to stop observable from continuing performance
* This method is more preferable than subscribing method then unsubscribe
 * Use Case: Stop observable from running like how Gmail could undo email being sent
* */stopObservableUsingTakeWhile() {
    this.isTrue = false;
}
Perform conditional Reactive Form validation
This is my approach to performing conditional validation when using Angular. We will minimally manipulate the Observable of RxJS in this example. Let’s try by creating or using app.component.ts.
1 . Create a form that has two form controls reason and otherReason.
/* * Refer to angular official guide at https://angular.io/guide/reactive-forms on how to create reactive form with form controls * */createForm() {
    this.form = this.formBuilder.group({      reason: ['', Validators.required ],
      otherReason: [''],    });
}
2 . Create two methods addValidator and removeValidator.
/*  * For conditional form validation use  * */
private addValidator( control: AbstractControl, newValidator ){
    let existingValidators = control.validator;
    control.setValidators(Validators.compose([ existingValidators, newValidator ]));
    control.updateValueAndValidity();
}

/*  * For conditional form validation use  * */
private removeValidator( control: AbstractControl ){
    control.clearValidators();
    control.updateValueAndValidity();
}
3 . Create third method called conditionalFormValidation.
The outcome should illustrate that if we select ‘Others’ option in the dropdown list of reason, it should make otherReason form control field as required.
Drop-down selection for reason e.g. reason for absent from workOn selecting Others, the conditional form validation would make otherReason field turn into a required field
Perform manual operations after reading from Firebase database
When using AngularFire2 with Angular + Firebase, in getting a list of data from Firebase, we will get one observable instance but within that one observable is an array of N size. We can manually filter the array inside that one observable instance using arr.filter. It is different from RxJS .filter operator. Of course we can also flatten what is inside an array using .flatMap() operator. However, we’re going use JavaScript array filtering, instead of non-observable filtering, right after getting an observable object.
We can also reverse an array using JavaScript array reverse function. See reference. On a side note, using negative timestamp to reverse Firebase display is also another option.
Besides those above, we can also use the response returned from AngularFire2 to perform “local filter/search”. This result can be valuable for autocomplete filtered list or searches. However, this approach below suffers severely in performance issue where at the magnitude of the size of the returned response from AngularFire2. E.g. if the list has N items. It has to iterate at least 1N. Perhaps an average of 2N.
In the following steps, we will create a main application and 2 sub-applications.
Each Sub-Application consists of 2 Views (Pages) and a common navigation bar.
As a result, we will get the following directory structure:
$ ng new workspace --routing --style scss
$ cd workspace
Create additional apps
$ ng generate application --routing app1 --style scss
$ ng generate application --routing app2 --style scss
Generate a component
For each application, we create the 3 components: View 1, View 2 and a NavBar.
The parameter --project defines the application, where we will add the component.
The Parameter --module defines the application module class, where we add the definition the the newly creates components, in this case app#/src/app/app.modules.ts
ng generate component components/view1 --project=app1 --module=app.module.ts
ng generate component components/view2 --project=app1 --module=app.module.ts
ng generate component components/nav   --project=app1 --module=app.module.ts

ng generate component components/view1 --project=app2 --module=app.module.ts
ng generate component components/view2 --project=app2 --module=app.module.ts
ng generate component components/nav   --project=app2 --module=app.module.ts

ng generate component components/nav
Customize Components: Main App
Edit src/app/app.module.ts
import { BrowserModule } from '@angular/platform-browser';
import { NgModule } from '@angular/core';

import { AppRoutingModule } from './app-routing.module';
import { AppComponent } from './app.component';

import { App1SharedModule } from 'projects/app1/src/app/app.shared.module';
import { App2SharedModule } from 'projects/app2/src/app/app.shared.module';
import { NavComponent } from './components/nav/nav.component';

@NgModule({
    declarations: [AppComponent, NavComponent],
    imports: [
        BrowserModule,
        AppRoutingModule,
        App1SharedModule.forRoot(),
        App2SharedModule.forRoot()
    ],
    providers: [],
    bootstrap: [AppComponent]
})
export class AppModule {}
❯ ng new app-capacitor
? Would you like to add Angular routing? Yes
? Which stylesheet format would you like to use? SCSS   [ https://sass-lang.com/documentation/syntax#scss]

❯ cd app-capacitor
❯ ng add @capacitor/angular
ℹ Using package manager: npm
✖ Unable to find compatible package.  Using 'latest'.
✖ Package has unmet peer dependencies. Adding the package may not succeed.

The package @capacitor/angular will be installed and executed.
Would you like to proceed? Yes
Capacitor initialisieren
❯ npx cap init
[?] What is the name of your app?
    This should be a human-friendly app name, like what you'd see in the App Store.
√ Name ... app-capacitor
[?] What should be the Package ID for your app?
    Package IDs (aka Bundle ID in iOS and Application ID in Android) are unique identifiers for apps. They must be in
    reverse domain name notation, generally representing a domain name that you or your company owns.
√ Package ID ... com.example.app
√ Creating capacitor.config.ts in D:\CLOUD\Online-Seminare\Kurse\Angular\Einsteiger\App_Capacitor in 5.31ms
[success] capacitor.config.ts created!

Next steps:
https://capacitorjs.com/docs/v3/getting-started#where-to-go-next
[?] Join the Ionic Community! 💙
    Connect with millions of developers on the Ionic Forum and get access to live events, news updates, and more.
√ Create free Ionic account? ... no
[?] Would you like to help improve Capacitor by sharing anonymous usage data? 💖
    Read more about what is being collected and why here: https://capacitorjs.com/telemetry. You can change your mind at
    any time by using the npx cap telemetry command.
√ Share anonymous usage data? ... no
Build your app
We will need the dist directory with the web files
❯ ng build --prod
Option "--prod" is deprecated: No need to use this option as this builder defaults to configuration "production".
✔ Browser application bundle generation complete.
✔ Copying assets complete.
✔ Index html generation complete.

Initial Chunk Files               | Names         |      Size
main.b633c9096acdb457c421.js      | main          | 212.34 kB
polyfills.e4574352eda6eb439793.js | polyfills     |  35.95 kB
runtime.d66bb6fe709ae891f100.js   | runtime       |   1.01 kB
styles.31d6cfe0d16ae931b73c.css   | styles        |   0 bytes

                                  | Initial Total | 249.29 kB

Build at: 2021-05-28T09:32:28.905Z - Hash: ed2ed2d661b0d58b48f2 - Time: 28225ms
❯ npm install @capacitor/ios @capacitor/android
npm WARN @capacitor/angular@1.0.3 requires a peer of rxjs@~6.4.0 but none is installed. You must install peer dependencies yourself.
npm WARN @capacitor/angular@1.0.3 requires a peer of typescript@~3.4.3 but none is installed. You must install peer dependencies yourself.
npm WARN ajv-keywords@3.5.2 requires a peer of ajv@^6.9.1 but none is installed. You must install peer dependencies yourself.
npm WARN optional SKIPPING OPTIONAL DEPENDENCY: fsevents@2.3.2 (node_modules\fsevents):
npm WARN notsup SKIPPING OPTIONAL DEPENDENCY: Unsupported platform for fsevents@2.3.2: wanted {"os":"darwin","arch":"any"} (current: {"os":"win32","arch":"x64"})
npm WARN optional SKIPPING OPTIONAL DEPENDENCY: fsevents@1.2.13 (node_modules\webpack-dev-server\node_modules\fsevents):
npm WARN notsup SKIPPING OPTIONAL DEPENDENCY: Unsupported platform for fsevents@1.2.13: wanted {"os":"darwin","arch":"any"} (current: {"os":"win32","arch":"x64"})

+ @capacitor/ios@3.0.0
+ @capacitor/android@3.0.0
added 2 packages from 1 contributor, removed 1 package and audited 1375 packages in 7.385s

88 packages are looking for funding
  run `npm fund` for details

found 35 moderate severity vulnerabilities
  run `npm audit fix` to fix them, or `npm audit` for details
Add Platform Android
❯ npx cap add android
√ Adding native android project in android in 167.07ms
√ Syncing Gradle in 1.45ms
√ add in 169.83ms
[success] android platform added!
Follow the Developer Workflow guide to get building:
https://capacitorjs.com/docs/v3/basics/workflow
√ Copying web assets from dist to android\app\src\main\assets\public in 55.26ms
√ Creating capacitor.config.json in android\app\src\main\assets in 3.50ms
√ copy android in 164.93ms
√ Updating Android plugins in 7.76ms
√ update android in 75.79ms
Open Android Studio to build App
❯ npx cap open android
[info] Opening Android project at: android.
We use cookies on our website to give you the most relevant experience by remembering your preferences and repeat visits. By clicking “Accept All”, you consent to the use of ALL the cookies. However, you may visit "Cookie Settings" to provide a controlled consent.
This website uses cookies to improve your experience while you navigate through the website. Out of these, the cookies that are categorized as necessary are stored on your browser as they are essential for the working of basic functionalities of the website. We also use third-party cookies that help us analyze and understand how you use this website. These cookies will be stored in your browser only with your consent. You also have the option to opt-out of these cookies. But opting out of some of these cookies may affect your browsing experience.
Necessary cookies are absolutely essential for the website to function properly. These cookies ensure basic functionalities and security features of the website, anonymously.
Cookie
Duration
Description
cookielawinfo-checkbox-analytics
11 months
This cookie is set by GDPR Cookie Consent plugin. The cookie is used to store the user consent for the cookies in the category "Analytics".
cookielawinfo-checkbox-functional
11 months
The cookie is set by GDPR cookie consent to record the user consent for the cookies in the category "Functional".
cookielawinfo-checkbox-necessary
11 months
This cookie is set by GDPR Cookie Consent plugin. The cookies is used to store the user consent for the cookies in the category "Necessary".
cookielawinfo-checkbox-others
11 months
This cookie is set by GDPR Cookie Consent plugin. The cookie is used to store the user consent for the cookies in the category "Other.
cookielawinfo-checkbox-performance
11 months
This cookie is set by GDPR Cookie Consent plugin. The cookie is used to store the user consent for the cookies in the category "Performance".
viewed_cookie_policy
11 months
The cookie is set by the GDPR Cookie Consent plugin and is used to store whether or not user has consented to the use of cookies. It does not store any personal data.
Functional cookies help to perform certain functionalities like sharing the content of the website on social media platforms, collect feedbacks, and other third-party features.
Performance cookies are used to understand and analyze the key performance indexes of the website which helps in delivering a better user experience for the visitors.
Analytical cookies are used to understand how visitors interact with the website. These cookies help provide information on metrics the number of visitors, bounce rate, traffic source, etc.
Advertisement cookies are used to provide visitors with relevant ads and marketing campaigns. These cookies track visitors across websites and collect information to provide customized ads.