Add these lines to the /etc/wsl.conf (note you will need to run your editor with sudo privileges, e.g: sudo nano /etc/wsl.conf):
[boot]
systemd=true
And close out of the nano editor using CTRL+O to save and CTRL+X to exit. Now close your WSL distro windows and run wsl.exe --shutdown from PowerShell, then restart your WSL instance. Upon launch you should have systemd running.
Hinweis: der Befehl startproject erstellt einen Ordner project, indem er einen weiteren Ordner project erstellt. Der erste Ordner dient dazu, sowohl das Django-Projekt, als auch die erstellten Anwendungen an einer gemeinsame Stelle zu speichern.
Der zweite Ordner project ist das Django-Projekt, in dem sich alle für das Projekt notwendigen Dateien befinden.
Wird in den nachfolgenden Beschreibungen vom dem Ordner project gesprochen, so ist immer der zweite gemeint (project/project)
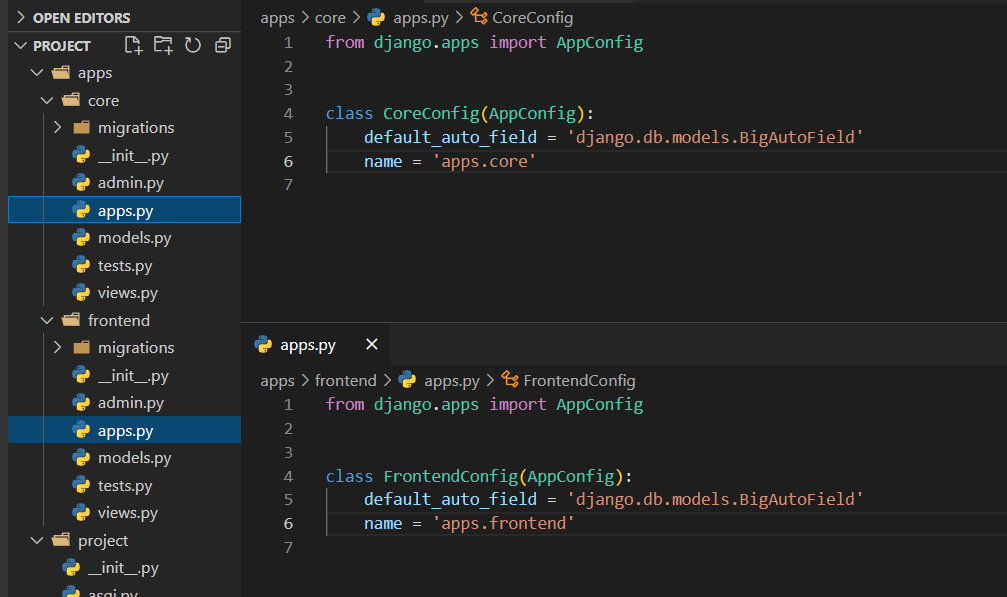
Im nächsten Schritt werden die beiden erstellten Anwendungen (Core und Frontend) dem Django-Projekt hinzugefügt. Da sie in einem Unterverzeichnis (apps) liegen, muss ihre Konfiguration angepasst werden.
In dere Datei apps.py der jeweiligen Anwendung (apps/core/apps.py und apps/frontend/apps.py) wirr der Name angepasst:
Hinweis: Ohne diese Anpassung würde beim Start des Servers eine Fehlermeldung angezeigt
django.core.exceptions.ImproperlyConfigured: Cannot import 'frontend'. Check that 'apps.frontend.apps.FrontendConfig.name' is correct.
Im Anschluss daran werden die beiden Anwendungen dem Projekt hinzugefügt. Dies erfolgt in der Datei project/settings.py:
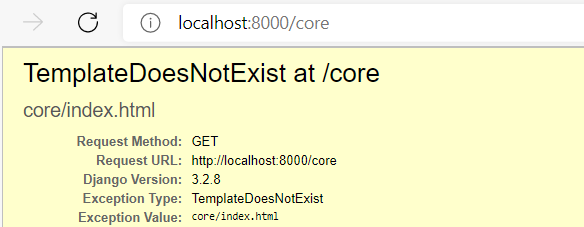
Im unteren Teil der Fehlermeldung findet sich aber eine hilfreiche Information:
Als erstes wir uns mitgeteilt, das ein gewünschtes Template in der nachfolgenden Reihenfolge gesucht wird. Es werden als (wir oben bereits erwähnt) mehrere Verzeichnisse durchsucht, um ein passendes Template zu finden.
Template-loader postmortem
Django tried loading these templates, in this order:

Using engine django:
Als erstes werden Verzeichnisse der Django-Installation durchsucht. Hierunter liegen z. B. die Templates für die Administration oder die Anmeldung.
django.template.loaders.app_directories.Loader:
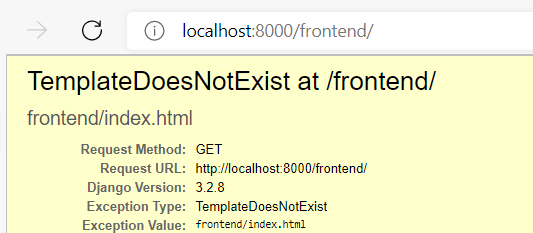
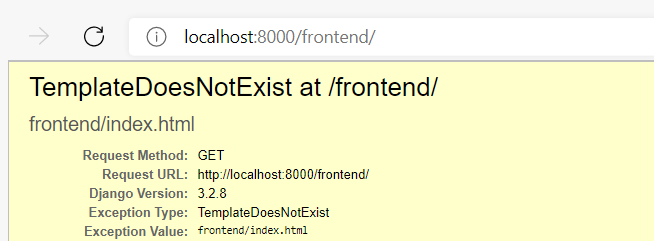
...\lib\site-packages\django\contrib\admin\templates\frontend\index.html (Source does not exist)
django.template.loaders.app_directories.Loader:
...\lib\site-packages\django\contrib\auth\templates\frontend\index.html (Source does not exist)
Im Anschluss werden dann die Verzeichnisse unserer Anwendungen durchsucht.
django.template.loaders.app_directories.Loader: ...\project\apps\core\templates\frontend\index.html (Source does not exist)

django.template.loaders.app_directories.Loader: ...\project\apps\frontend\templates\frontend\index.html (Source does not exist)
Um nun ein gewünschtes Template zu finden, werden zwei Informationen benötigt:
der Name des Template
das Verzeichnis
Name des Templates
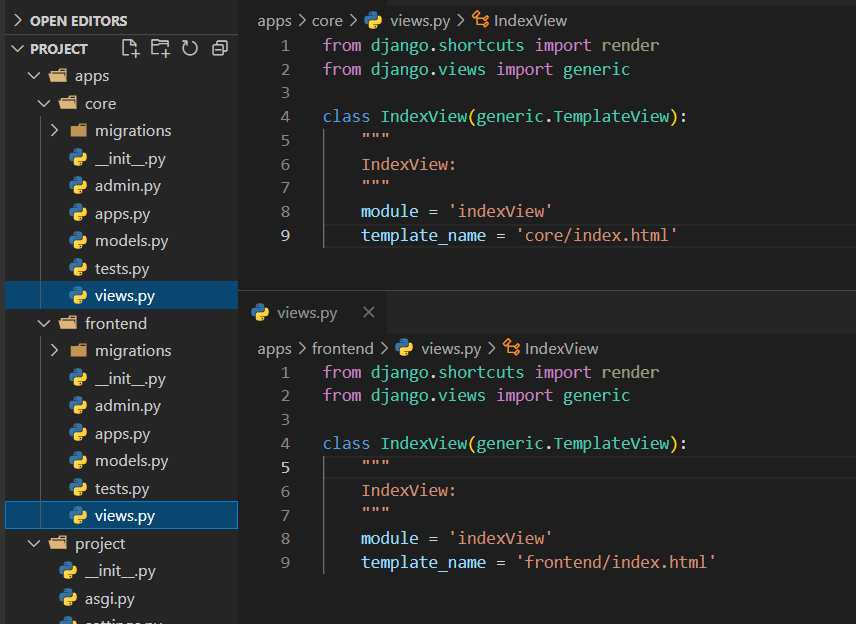
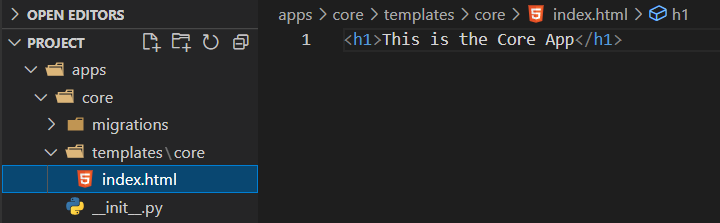
Der Name des Templates wird im View angegeben: apps/core/views.py:
class IndexView(generic.TemplateView):
    module = 'indexView'
    template_name = 'core/index.html'
Verzeichnis
Das Verzeichnis selbst wird über die Suchreihenfolge der zu verwendenden Template-Verzeichnisse ermittelt. Das erste Verzeichnis, dass das gewünschte Template beinhaltet, wird verwendet.
Ermitteln des Verzeichnisses
Im Falle unserer Anwendung frontend werden die nachfolgenden Verzeichnisse durchsucht, ob sie das Template core/index.html beinhalten:
Umgebung
Verzeichnis
Template gefunden
DJANGO
lib\site-packages\django\contrib\admin\templates
DJANGO
lib\site-packages\django\contrib\auth\templates
PROJEKT
project\apps\core\templates
core/index.html
PROJEKT
project\apps\frontend\templates
Template hinzufügen
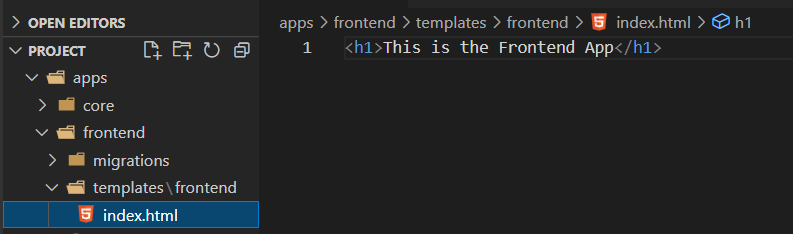
Erstellen eines Templates für die Anwendung frontend: apps/frontend/templates/frontend/index.html
Weiteres Beispiel: Suchen des passenden Templates
Richten sie einen Neuen View in der Anwendung frontend ein: apps/frontend/views.py
class BaseView(generic.TemplateView):
    module = 'baseView'
    template_name = 'base.html'
Erstellen Sie eine URL für diesen View in project/urls.py
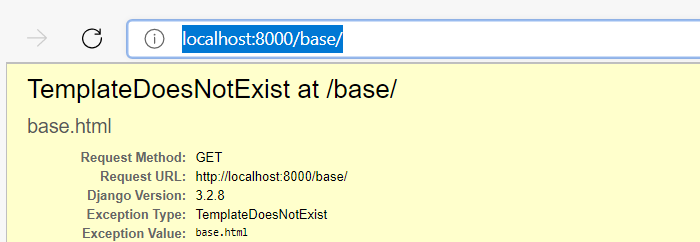
Wie zu erwarten war, wird das Template nicht gefunden:
In keinem der bekannten Verzeichnisse gibt es ein Template base.html.
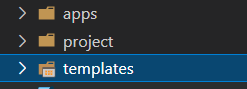
Gemeinsame Templates für alle Anwendungen
Um Templates einzurichten, die von mehreren Anwendungen verwendet werden, empfiehlt es sich, ein Verzeichnis templates auf der gleichen Ebene, wie die Anwendungen, einzurichten
In der Datei project/settings.py wird dieses Verzeichnis dem Django-Projekt hinzugefügt.
Das zusätzliche Verzeichnis wird nun auch durchsucht:
Template-loader postmortem
Django tried loading these templates, in this order:

Using engine django:
django.template.loaders.filesystem.Loader: ...\project\templates\base.html (Source does not exist)
django.template.loaders.app_directories.Loader: ...\.venv\lib\site-packages\django\contrib\admin\templates\base.html (Source does not exist)
django.template.loaders.app_directories.Loader: ...\.venv\lib\site-packages\django\contrib\auth\templates\base.html (Source does not exist)
django.template.loaders.app_directories.Loader: ...\project\apps\core\templates\base.html (Source does not exist)
django.template.loaders.app_directories.Loader: ...\project\apps\frontend\templates\base.html (Source does not exist)
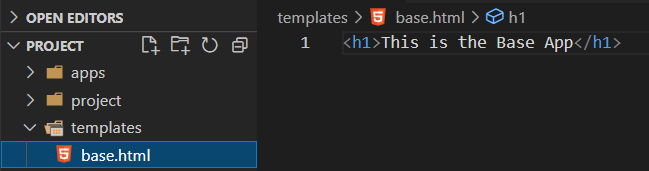
Erstellen Sie nun in diesem Verzeichnis (templates) das Template base.html
We use cookies on our website to give you the most relevant experience by remembering your preferences and repeat visits. By clicking “Accept All”, you consent to the use of ALL the cookies. However, you may visit "Cookie Settings" to provide a controlled consent.
This website uses cookies to improve your experience while you navigate through the website. Out of these, the cookies that are categorized as necessary are stored on your browser as they are essential for the working of basic functionalities of the website. We also use third-party cookies that help us analyze and understand how you use this website. These cookies will be stored in your browser only with your consent. You also have the option to opt-out of these cookies. But opting out of some of these cookies may affect your browsing experience.
Necessary cookies are absolutely essential for the website to function properly. These cookies ensure basic functionalities and security features of the website, anonymously.
Cookie
Duration
Description
cookielawinfo-checkbox-analytics
11 months
This cookie is set by GDPR Cookie Consent plugin. The cookie is used to store the user consent for the cookies in the category "Analytics".
cookielawinfo-checkbox-functional
11 months
The cookie is set by GDPR cookie consent to record the user consent for the cookies in the category "Functional".
cookielawinfo-checkbox-necessary
11 months
This cookie is set by GDPR Cookie Consent plugin. The cookies is used to store the user consent for the cookies in the category "Necessary".
cookielawinfo-checkbox-others
11 months
This cookie is set by GDPR Cookie Consent plugin. The cookie is used to store the user consent for the cookies in the category "Other.
cookielawinfo-checkbox-performance
11 months
This cookie is set by GDPR Cookie Consent plugin. The cookie is used to store the user consent for the cookies in the category "Performance".
viewed_cookie_policy
11 months
The cookie is set by the GDPR Cookie Consent plugin and is used to store whether or not user has consented to the use of cookies. It does not store any personal data.
Functional cookies help to perform certain functionalities like sharing the content of the website on social media platforms, collect feedbacks, and other third-party features.
Performance cookies are used to understand and analyze the key performance indexes of the website which helps in delivering a better user experience for the visitors.
Analytical cookies are used to understand how visitors interact with the website. These cookies help provide information on metrics the number of visitors, bounce rate, traffic source, etc.
Advertisement cookies are used to provide visitors with relevant ads and marketing campaigns. These cookies track visitors across websites and collect information to provide customized ads.