What PHPMD does is: It takes a given PHP source code base and look for several potential problems within that source. These problems can be things like:
Possible bugs
Suboptimal code
Overcomplicated expressions
Unused parameters, methods, properties
PHPMD is a mature project and provides a diverse set of pre defined rules (though may be not as many its Java brother PMD) to detect code smells and possible errors within the analyzed source code. Checkout the rules section to learn more about all implemented rules.
Sick and tired of defending code quality over and over again? GrumPHP will do it for you! This composer plugin will register some git hooks in your package repository. When somebody commits changes, GrumPHP will run some tests on the committed code. If the tests fail, you won’t be able to commit your changes. This handy tool will not only improve your codebase, it will also teach your co-workers to write better code following the best practices you’ve determined as a team.
Ersetzen Sie your-api-project durch den gewünschten Projektnamen.
Schritt 2: Installieren Sie die Swagger-PHP-Bibliothek
Sie benötigen die Swagger-PHP-Bibliothek, um Swagger-Dokumentation zu generieren. Installieren Sie diese mit Composer:
composer require zircote/swagger-php
Schritt 3: Erstellen Sie API-Routen
In Laravel definieren Sie Ihre API-Routen in der Datei routes/api.php. Sie können Routen erstellen, wie Sie es normalerweise für Ihre API tun würden.
routes/api.php

use Illuminate\Support\Facades\Route;

Route::get('/users', 'UserController@index');
Route::post('/users', 'UserController@store');
Route::get('/users/{id}', 'UserController@show');
Schritt 4: Generieren Sie Swagger-Annotationen
In Ihren Controller-Methoden verwenden Sie Swagger-Annotationen, um Ihre API zu dokumentieren. Hier ist ein Beispiel, wie man eine Controller-Methode annotiert:
/**
 * @SWG\Get(
 *     path="/users",
 *     summary="Holt eine Liste von Benutzern",
 *     tags={"Users"},
 *     @SWG\Response(response=200, description="Erfolgreiche Operation"),
 *     @SWG\Response(response=400, description="Ungültige Anfrage")
 * )
 */
public function index()
{
    // Ihre API-Logik hier
}
Weitere Informationen zu Swagger-Annotationen finden Sie in der Swagger-PHP-Dokumentation.
Schritt 5: Generieren Sie Swagger-Dokumentation
Nachdem Sie Ihre Controller annotiert haben, müssen Sie die Swagger-Dokumentation generieren. Dies können Sie mit dem artisan Befehl tun, der vom darkaonline/l5-swagger Paket bereitgestellt wird.
Zuerst installieren Sie das Paket:
composer require darkaonline/l5-swagger
Veröffentlichen Sie nun die Swagger-Konfiguration:
❯ npm create astro@latest
.../21.6.2/pnpm/store/v3/tmp/dlx-5990    |  +39 ++++
.../21.6.2/pnpm/store/v3/tmp/dlx-5990    | Progress: resolved 39, reused 39, downloaded 0, added 39, done

 astro   Launch sequence initiated.

   dir   Where should we create your new project?
         ./Tutorial - Add TOC to PostLayout

  tmpl   How would you like to start your new project?
         Use blog template

    ts   Do you plan to write TypeScript?
         Yes

   use   How strict should TypeScript be?
         Strict

  deps   Install dependencies?
         Yes

   git   Initialize a new git repository?
         Yes

      ✔  Project initialized!
         ■ Template copied
         ■ TypeScript customized
         ■ Dependencies installed
         ■ Git initialized

  next   Liftoff confirmed. Explore your project!

         Enter your project directory using cd "./Tutorial - Add TOC to PostLayout"
         Run pnpm dev to start the dev server. CTRL+C to stop.
         Add frameworks like react or tailwind using astro add.

         Stuck? Join us at https://astro.build/chat

╭─────╮  Houston:
│ ◠ ◡ ◠  Good luck out there, astronaut! 🚀
╰─────╯
Run Starter
❯ cd Tutorial\ -\ Add\ TOC\ to\ PostLayout/
Tutorial - Add TOC to PostLayout on master [+] is 📦 v0.0.1 via v21.6.2 via 🐍 v3.12.2 (3.12)
❯ npm run dev
> tutorial---add-toc-to-postlayout@0.0.1 dev /Users/Shared/CLOUD/Programmier-Workshops/Kurse/Astro/Einsteiger/Tutorial - Add TOC to PostLayout
> astro dev
astro v4.5.12 ready in 300 ms
┃ Local http://localhost:4321/
┃ Network use --host to expose
12:18:45 watching for file changes...
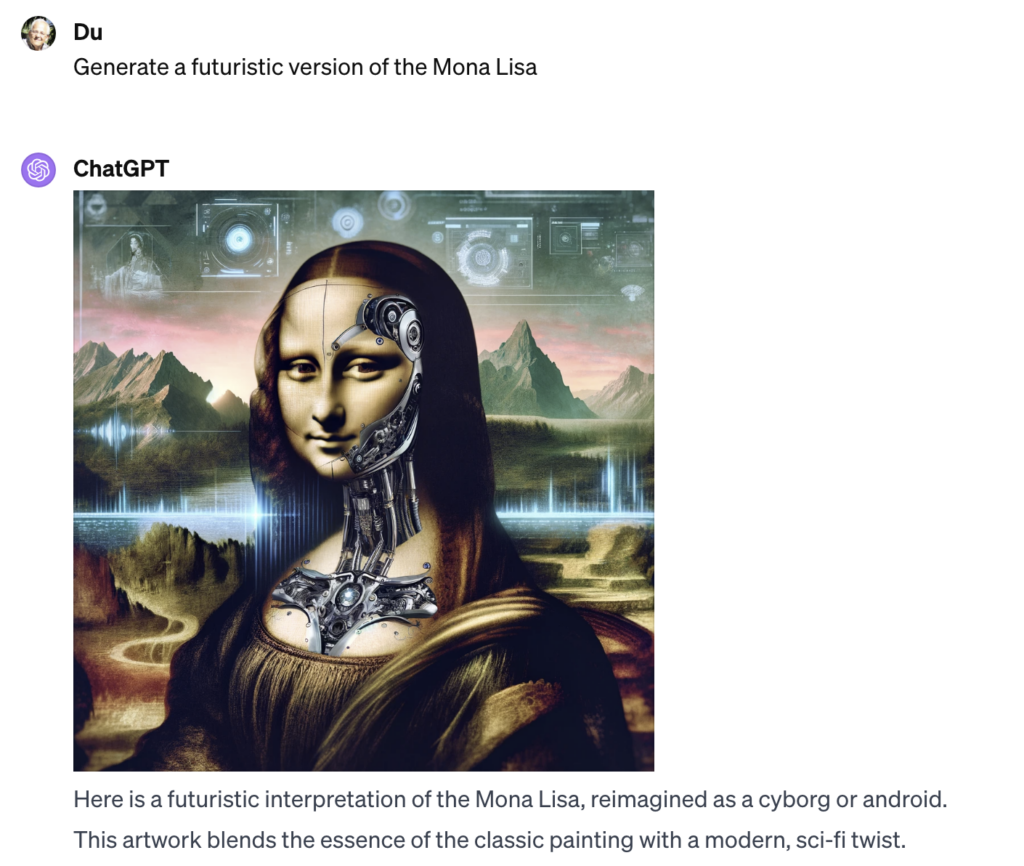
Today, i want to find out, how to create / recreating images with ChatGPT.
Challenge: I found an image and want to recreate the image:
Write a Prompt that creates this Image
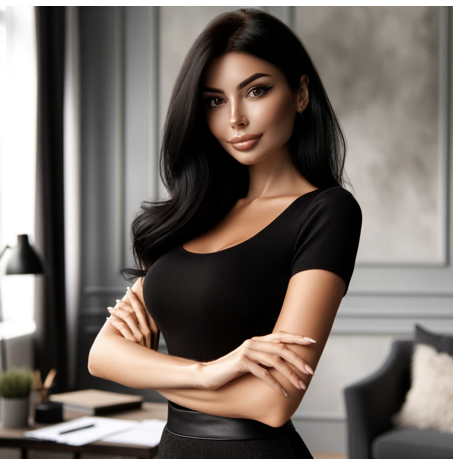
Create an image of a woman with long, sleek black hair and striking features. She should have a strong, confident posture with her arms crossed. She's wearing a simple, elegant black dress with a round neckline. The background is a modern, minimalist office with a hint of sophistication. The color palette should be neutral, with emphasis on shades of grey and black to match her attire. The lighting is soft and diffused, highlighting her from the front and casting a gentle shadow behind her. The overall aesthetic is chic and polished with a touch of corporate professionalism.
Write a Prompt that creates this Image
Create an image of a poised and professional woman with long, sleek black hair and prominent, striking features. She stands with a sense of authority, her arms confidently crossed in front of her. She is dressed in a simple yet sophisticated black dress with a modest round neckline. The setting is a contemporary, minimalist office space that exudes a refined elegance. The color scheme is a harmonious blend of neutral tones, dominated by greys and blacks that complement her attire. Soft, ambient lighting bathes the scene, casting a gentle illumination that accentuates her silhouette against the muted sophistication of the office backdrop. The composition should convey an atmosphere of chic professionalism and understated luxury.
Write a Prompt that creates this Image
Create an image of an elegant and professional woman with long, black hair and defined, striking features. She exhibits a posture of confidence and composure with her arms crossed. Her attire is a chic, form-fitting black dress with a modest neckline. The environment is a stylish, minimalist office setting with sophisticated furnishings and a neutral color scheme emphasizing grays and blacks. The scene is illuminated with soft, ambient lighting that casts a gentle glow on the woman, highlighting her assertive stance against the contemporary backdrop, evoking a sense of refined grace and corporate elegance.
Notes:
Mostly, after running the same prompt the second time, ChatGPT responded with something like that:
So, i ask ChatGPT nicely to do it again:
Create the image again, because each time the image looks different
Next Step: find the precise prompt
As we see, using the same prompt results in different images. So i asked ChatGPT how to create a prompt that produces the same image each time:
Me
Using one prompt multiple times, each image is different from another. How can a state the prompt more clearly so that the prompt creates each time exactly the same imageChatGPT
ChatGPT
Creating exactly the same image multiple times using a text-to-image AI model like DALL-E is challenging due to the inherent variability in how these models interpret and render prompts. Each time a prompt is processed, the model generates a unique interpretation based on its training and algorithms, which can lead to variations in the resulting images. However, there are some strategies you can use to minimize these differences: Be Highly Specific: Provide as many details as possible in your prompt, including specifics about posture, facial expression, clothing, and background elements. The more detailed your description, the less room there is for the AI to interpret differently. Use Precise Descriptors: Instead of using general terms, use precise descriptors. For example, instead of saying “long, black hair,” specify the style, such as “long, straight, black hair that falls to mid-back.” Define the Scene Layout: Be explicit about the composition of the image, like where the subject is positioned in the frame, how much of the background is visible, and the perspective or angle of the view. Describe Colors and Lighting: Clearly state the colors you want to be used, including shades and tones, and describe the lighting (e.g., “soft, diffused lighting from the front left”). Include Comparable Examples: If possible, reference a similar existing image or style to guide the AI’s interpretation. Consistency in Format: If you’re looking for a portrait, landscape, or specific aspect ratio, mention this explicitly. Even with these strategies, it’s important to remember that AI models like DALL-E are probabilistic and may still produce variations with each rendering. The nature of these models means they interpret prompts creatively, so exact replication of images is not always possible.
Ok, lets try:
Me
Using your suggestions, create a precise prompt that create this image. Use all 6 strategies in your prompt
ChatGPT
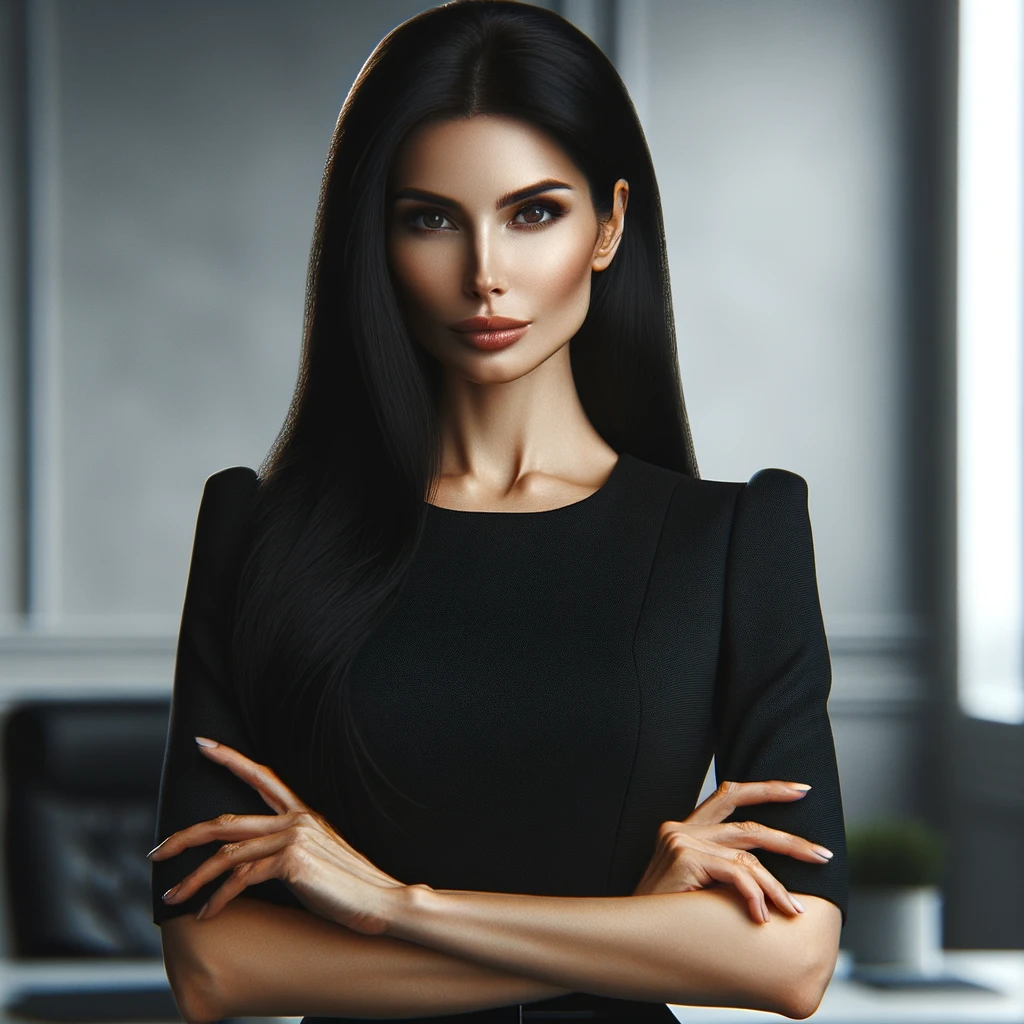
Create a digital portrait of a woman who embodies elegance and professionalism. She should have long, straight, jet-black hair with a glossy sheen, cascading down to mid-back. Her facial features are sharply defined, with high cheekbones, almond-shaped hazel eyes, meticulously groomed eyebrows, and full, neutral-colored lips. Her skin has a matte finish with a porcelain-like quality. Her stance is assertive; she stands straight with her shoulders back and arms crossed at the waist, showcasing a silver bracelet on her right wrist and a matching ring on her left middle finger. She wears a tailored, form-fitting black sheath dress with three-quarter sleeves and a boat neckline, ending just above the knees. The setting is an upscale, minimalist office: to her right is a steel-gray filing cabinet with a potted green succulent on top; to her left, a sleek, black office chair behind a dark walnut desk, on which rests a closed silver laptop and a white ceramic mug. The background comprises floor-to-ceiling windows with thin, vertical blinds casting soft shadows, and the walls are a light gray. The lighting is soft and directional, coming from the top left, creating a subtle highlight on her left cheek and a soft shadow to her right, enhancing her features without harshness. The overall color palette is monochrome, with a focus on blacks, whites, and grays, providing contrast against her black dress and the lighter office environment. The composition is centered and balanced, with the woman placed in the middle of the frame, allowing for an equal amount of office space on either side of her. The camera angle is at eye level, ensuring a direct and engaging connection with the viewer. The image should convey a narrative of confidence, sophistication, and modern professional elegance.
Wow, impresiv. Ok, here are the image created by this prompt:
The results looks more the same, but still lacking these “unique” factor.
So i asked ChatGPT again:
Me
The images still looks different. Is there a deterministic way to uniquely generate an imageChatGPT
ChatGPT
AI image generation models like DALL-E are designed to introduce variation and creativity into their outputs. Even with highly detailed prompts, they are not deterministic in the traditional sense — you won’t get the exact same image with each generation because the model incorporates an element of randomness or “seed” into each creation process. This randomness is a core feature, as it enables the generation of unique images from the same prompt. However, in some advanced implementations of these models, you can specify a “seed” value, which can help in producing the same image across multiple runs if the seed is kept constant. The “seed” is essentially a starting point for the random number generator used in the generation process. By using the same seed, you tell the AI to start from the same random point, leading to the same sequence of “random” numbers, which can result in the same output. At the moment, the system you are interacting with does not provide an option to control the seed value manually for each request. Each new image generation is treated as a fresh instance, without a way to replicate the exact randomness of a previous run. Therefore, while you can guide the AI with very specific and detailed prompts to achieve close approximations, there is currently no way to ensure that a publicly available AI image generation model like DALL-E will produce the exact same image twice.
Ok, so we wont get 100
Me
Could you suggest the general structure of an image creating prompt, so that this prompt will create nearly the same images, each time i run the pr
To achieve the most consistent results with an AI image generation model like DALL-E, you should craft a prompt that is detailed and specific, reducing the room for interpretation as much as possible. Here’s a general structure you can follow:
Subject Description: Start with a detailed description of the main subject, including physical characteristics, expressions, and attire.
Example: “Create an image of a woman in her 30s with shoulder-length curly brown hair, green eyes, wearing a navy blue blazer and white shirt.”
Posture and Expression: Clearly describe the subject’s posture, facial expression, and any gestures.
Example: “She has a friendly smile, direct eye contact with the viewer, and her hands are folded in her lap.”
Setting and Background: Detail the setting, including specific objects, colors, and the overall atmosphere.
Example: “She is seated on a red armchair in a well-lit room with bookshelves filled with colorful books in the background.”
Lighting and Shadows: Describe the lighting direction and intensity, as well as the resulting shadows.
Example: “There is soft lighting coming from the left, creating a gentle shadow on the right side of her face.”
Color Palette: Specify the colors you want to be dominant in the image.
Example: “The color palette is warm, with rich browns and creams, accentuating the wooden elements of the furniture and books.”
Camera Angle and Composition: Mention the perspective of the image, such as the angle and framing.
Example: “The viewpoint is at eye level, capturing the upper body of the woman, centered in the frame with equal space on both sides.”
Additional Details: Add any other specific details that you want to include.
Example: “She wears a silver pendant necklace and has a small mole on her right cheek.”
Here’s how it would look put together:
“Create an image of a woman in her 30s with shoulder-length curly brown hair and green eyes, smiling friendly at the viewer, seated on a red armchair with hands folded in her lap. She is wearing a navy blue blazer and white shirt. The room is well-lit, with soft lighting coming from the left creating a gentle shadow on the right side of her face. The background is filled with bookshelves with colorful books. The color palette is warm, with rich browns and creams. The viewpoint is eye level, framing the woman in the center with equal space on both sides. She wears a silver pendant necklace and has a small mole on her right cheek.”
Even with this structure, slight variations can occur due to the stochastic nature of AI image generation. However, providing a highly structured and detailed prompt like the one above can significantly increase the consistency of the images produced.
Ok, let’s try i out
Me
Create an image of a woman in her 30s with shoulder-length curly brown hair and green eyes, smiling friendly at the viewer, seated on a red armchair with hands folded in her lap. She is wearing a navy blue blazer and white shirt. The room is well-lit, with soft lighting coming from the left creating a gentle shadow on the right side of her face. The background is filled with bookshelves with colorful books. The color palette is warm, with rich browns and creams. The viewpoint is eye level, framing the woman in the center with equal space on both sides. She wears a silver pendant necklace and has a small mole on her right cheek.
Basics of Programming: Python is a great starting point due to its simplicity and extensive support in the AI field. Familiarize yourself with variables, data types, loops, conditionals, functions, and object-oriented programming. Resources: Codecademy, LeetCode, HackerRank.
Understanding of AI and Machine Learning: Learn about foundational concepts like supervised learning, unsupervised learning, reinforcement learning, regression, classification, clustering, neural networks. Resources: Andrew Ng’s course on Coursera, “Hands-On Machine Learning with Scikit-Learn, Keras, and TensorFlow” by Aurélien Géron.
Study Deep Learning: Deep learning is a special kind of machine learning involving artificial neural networks with several layers (“deep” structures). Study convolutional networks (used in image recognition), recurrent networks (used in sequence data), and the concept of deep reinforcement learning. Resources: Deep Learning Specialization by Andrew Ng on Coursera, “Deep Learning” by Ian Goodfellow, Yoshua Bengio and Aaron Courville.
Learn about Microsoft Azure: Azure is a cloud platform offering services like compute power, storage options, and AI models. Learn how to navigate the Azure portal, create/manage resources, and understand core services (Azure Compute, Azure Storage, Azure Data Services). Resources: Microsoft Learn, Azure documentation.
Microsoft’s AI Services: Azure AI services include Azure Machine Learning for building, training, and deploying machine learning models, and Azure Cognitive Services for pre-trained AI services like vision, speech, and language processing. Resources: Microsoft Learn’s path for AI Engineer, Azure AI documentation.
Azure OpenAI: Azure OpenAI offers access to powerful models like GPT-3 for tasks like text generation, translation, summarization, etc. Learn how to call these APIs from your application and how to use the results effectively. Resources: Azure OpenAI documentation, OpenAI’s GPT-3 playground.
Projects: Practical projects could include building a chatbot using Azure Bot Service and QnA Maker, creating a text summarizer using GPT-3, or developing a computer vision application using Azure Cognitive Services.
Stay Updated: AI is an ever-evolving field. Blogs like Towards Data Science, Medium, the Microsoft Azure blog, and arXiv for research papers can keep you updated. Webinars and online forums like AI Saturdays, AI Fest, and Stack Overflow also help.
Certifications: Certifications like the Microsoft Certified: Azure AI Engineer Associate or Microsoft Certified: Azure Data Scientist Associate validate your skills and knowledge. They require a solid understanding of Azure services and machine learning concepts.
Contribute to the Community: Sharing your knowledge and experience helps solidify your understanding and establishes your expertise. Write blogs or make YouTube videos explaining concepts, give talks at local meetups or conferences, contribute to open-source projects on GitHub, or answer questions on forums like Stack Overflow.
Understanding of AI and Machine Learning
Mathematical Foundations: Brush up on your knowledge of Linear Algebra, Calculus, Probability, and Statistics. These are essential for understanding machine learning algorithms.
Programming Skills: Python is the most used language in the field of machine learning. Familiarize yourself with Python, its libraries like NumPy, Pandas, and Matplotlib, and an IDE such as Jupyter Notebook.
Data Preprocessing: Learn how to clean and preprocess data, handle missing data, and perform feature scaling. Understand the importance of data visualization for exploring your dataset.
Supervised Learning: Start with simple linear regression and then move on to multiple linear regression, logistic regression, k-nearest neighbors, support vector machines, and decision trees. Understand the concept of overfitting and underfitting, and techniques to combat them like regularization.
Unsupervised Learning: Learn about clustering techniques like K-means and hierarchical clustering. Understand dimensionality reduction techniques like Principal Component Analysis (PCA).
Advanced Topics: Once you’re comfortable with the basics, move onto more advanced topics like ensemble methods, neural networks, and deep learning. Learn about different types of neural networks like Convolutional Neural Networks (CNNs), Recurrent Neural Networks (RNNs), and transformers.
Tools and Libraries for Machine Learning: Get hands-on experience with Scikit-Learn, TensorFlow, and Keras. Learn how to build, train, and evaluate models with these libraries.
Validation and Evaluation Metrics: Understand validation techniques like k-fold cross-validation. Learn about different evaluation metrics like accuracy, precision, recall, F1 score, ROC AUC, mean squared error, etc.
Special Topics: Study special topics like natural language processing, reinforcement learning, generative adversarial networks, transfer learning, etc.
Projects: Apply your knowledge to real-world projects. This could be anything from predicting house prices to building a chatbot.
Stay Updated and Keep Learning: Machine learning is a rapidly evolving field. Read research papers, follow relevant blogs, participate in Kaggle competitions, and take online courses to keep your knowledge up-to-date.
Deep Learning
Mathematical Foundations: Make sure you have a good understanding of Linear Algebra, Calculus, Probability, and Statistics. These are crucial for understanding how deep learning algorithms work.
Programming Skills: Python is the most common language in the field of deep learning. Make sure you’re comfortable with it. Libraries like NumPy and Matplotlib will also be useful.
Understanding of Machine Learning: Before delving into deep learning, you should have a solid understanding of basic machine learning concepts and algorithms. This includes concepts like overfitting, underfitting, bias-variance tradeoff, and understanding of algorithms like linear regression, logistic regression, and more.
Introduction to Neural Networks: Start with understanding what neural networks are and how they work. Learn about the architecture of neural networks, activation functions, and the backpropagation algorithm for training neural networks.
Frameworks for Deep Learning: Get hands-on experience with deep learning frameworks like TensorFlow and PyTorch. Learn how to define, train, and evaluate neural networks with these libraries.
Convolutional Neural Networks (CNNs): These are used primarily for image processing, object detection, and recognition tasks. Understand the architecture of CNNs and concepts like convolutional layers, pooling layers, and filters.
Recurrent Neural Networks (RNNs): Used for sequence data like time series and natural language. Learn about the structure of RNNs, the problem of long-term dependencies, and solutions like LSTM (Long Short-Term Memory) and GRU (Gated Recurrent Units).
Advanced Topics in Deep Learning: Explore advanced topics like autoencoders, generative adversarial networks (GANs), transfer learning, reinforcement learning, etc.
Deep Learning for Natural Language Processing: Understand how deep learning is used in NLP. Learn about Word2Vec, GloVe, RNNs, LSTMs, GRUs, and Transformer models like BERT.
Projects: Apply your knowledge to real-world projects. This could be anything from image recognition tasks, text generation, sentiment analysis, etc.
Stay Updated and Keep Learning: Deep learning is a rapidly evolving field. Follow the latest research papers, participate in online courses and challenges like those on Kaggle.
Book on Machine Learning
Introduction to Machine Learning
Definition and Importance
Applications of Machine Learning
Types of Machine Learning: Supervised, Unsupervised, Reinforcement Learning
Welcome to the fascinating world of Whisper AI, OpenAI’s groundbreaking speech recognition system. As we delve deeper into the digital age, the ability to accurately transcribe and understand human speech has become invaluable. From powering virtual assistants to enhancing accessibility in technology, speech-to-text solutions are reshaping our interaction with devices.
This article will explore the intricate architecture of Whisper AI, guide you through its usage via command line, Python, and even demonstrate how to integrate it into a Flask application.
Whether you’re a developer, a tech enthusiast, or simply curious, join me in unraveling the capabilities of this remarkable technology.
Section 1: Understanding Whisper AI
Whisper AI stands as a testament to the advancements in artificial intelligence, specifically in speech recognition. Developed by OpenAI, this system is designed not just to transcribe speech but to understand it, accommodating various accents, dialects, and even noisy backgrounds.
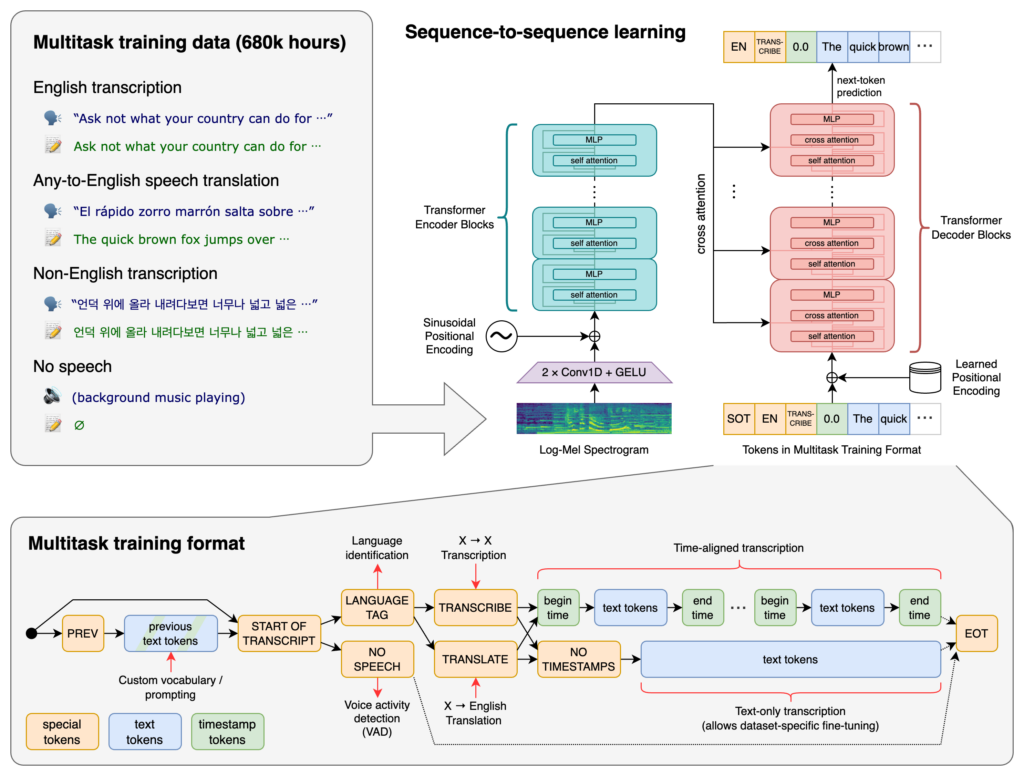
Whisper is a general-purpose speech recognition model. It is trained on a large dataset of diverse audio and is also a multi-task model that can perform multilingual speech recognition as well as speech translation and language identification.
The development of Whisper AI marks a significant milestone, showcasing OpenAI’s commitment to pushing the boundaries of AI and machine learning. In a world where effective communication is key, Whisper AI is a step towards bridging gaps and making technology more accessible to all.
Section 2: The Architecture of Whisper AI
At the heart of Whisper AI lies a sophisticated neural network, likely based on the Transformer model, renowned for its effectiveness in processing sequential data like speech.
These models are trained on vast datasets, enabling the system to recognize and interpret a wide array of speech patterns. What sets Whisper AI apart is its multilingual capabilities, proficiently handling different languages and dialects.
This architectural marvel not only enhances accuracy but also ensures inclusivity in speech recognition technology.
Section 3: Getting Started with Whisper AI
To embark on your journey with Whisper AI, a Python environment is a prerequisite. The system’s robustness requires adequate hardware specifications to function optimally.
Installation is straightforward: Whisper AI’s official documentation or https://github.com/openai/whisper provides comprehensive guides to get you started.
So, first: setup a python. virtual environment:
$ python -m venv venv
$ . venv/bin/activate
$ which python
<Your current directoy>/venv/bin/python
Whisper AI shines in its simplicity of use, particularly via the command line. After a basic setup, transcribing an audio file is as simple as running a command
For instance, whisper youraudiofile.mp3 could yield a text transcription of the recorded speech. This ease of use makes Whisper AI an attractive option for quick transcription tasks, and the command line interface provides a straightforward way for anyone to harness its power.
Run the following commmand to transcribe your audio file:
$ whisper <your audio file> --model medium --threads 16
See some samples in the following Section and in Section 9.
Section 5: Integrating Whisper AI with Python
Python enthusiasts can rejoice in the seamless integration of Whisper AI with Python scripts.
Imagine a script that takes an audio file and uses Whisper AI to transcribe it – this can be as concise as a few lines of code.
import whisper

model = whisper.load_model("base")
result = model.transcribe("audio.mp3")
print(result["text"])
The API’s intuitive design means that with basic Python knowledge, you can create scripts to automate transcription tasks, analyze speech data, or even build more complex speech-to-text applications.
import whisper

model = whisper.load_model("base")

# load audio and pad/trim it to fit 30 seconds
audio = whisper.load_audio("audio.mp3")
audio = whisper.pad_or_trim(audio)

# make log-Mel spectrogram and move to the same device as the model
mel = whisper.log_mel_spectrogram(audio).to(model.device)

# detect the spoken language
_, probs = model.detect_language(mel)
print(f"Detected language: {max(probs, key=probs.get)}")

# decode the audio
options = whisper.DecodingOptions()
result = whisper.decode(model, mel, options)

# print the recognized text
print(result.text)
Section 6: Building a Flask Application with Whisper AI
Integrating Whisper AI into a Flask application opens a realm of possibilities. A simple Flask server can receive audio files and return transcriptions, all powered by Whisper AI.
This setup is ideal for creating web applications that require speech-to-text capabilities. From voice-commanded actions to uploading and transcribing audio files, the combination of Flask and Whisper AI paves the way for innovative web-based speech recognition solutions.
Here is a short code for a flask app:
from flask import Flask, abort, request
from flask_cors import CORS
from tempfile import NamedTemporaryFile
import whisper
import torch

torch.cuda.is_available()
DEVICE = "cuda" if torch.cuda.is_available() else "cpu"

model = whisper.load_model("base", device=DEVICE)

app = Flask(__name__)
CORS(app)

@app.route("/")
def hello():
    return "Whisper Hello World!"

@app.route('/whisper', methods=['POST'])
def handler():
    if not request.files:
        abort(400)

    results = []

    for filename, handle in request.files.items():
        temp = NamedTemporaryFile()
        handle.save(temp)
        result = model.transcribe(temp.name)
        results.append({
            'filename': filename,
            'transcript': result['text'],
        })

    return {'results': results}
Section 7: Advanced Features and Customization
For those looking to push the boundaries, Whisper AI offers advanced features and customization options.
Adapting the system to recognize specific terminologies or accent nuances can significantly enhance its utility in specialized fields. This level of customization ensures that Whisper AI remains a versatile tool, adaptable to various professional and personal needs.
Section 8: Ethical Considerations and Limitations
As with any AI technology, Whisper AI brings with it ethical considerations.
The paramount concern is privacy and the security of data processed by the system. Additionally, while Whisper AI is a remarkable technology, it is not without limitations. Potential biases in language models and challenges in understanding heavily accented or distorted speech are areas that require ongoing refinement.
Addressing these concerns is crucial for the responsible development and deployment of speech recognition technologies.
Section 9: Samples
First, get your audio file to transcribed. I choose a famous speech from Abraham Lincoln and get it from Youtube.
$ whisper Abraham-Lincoln_Gettysburg-Address.mp4  --model medium --threads 16  --output_dir .
.../.venv/python/3.11/lib/python3.11/site-packages/whisper/transcribe.py:115: UserWarning: FP16 is not supported on CPU; using FP32 instead
  warnings.warn("FP16 is not supported on CPU; using FP32 instead")
Detecting language using up to the first 30 seconds. Use `--language` to specify the language
Detected language: English
[00:00.000 --> 00:19.660]  4 score and 7 years ago, our fathers brought forth on this continent a new nation, conceived
[00:19.660 --> 00:28.280]  in liberty and dedicated to the proposition that all men are created equal.
[00:28.280 --> 00:37.600]  Now we are engaged in a great civil war, testing whether that nation, or any nation so conceived
[00:37.600 --> 00:43.680]  and so dedicated, can long endure.
[00:43.680 --> 00:48.660]  We are met on a great battlefield of that war.
[00:48.660 --> 00:54.800]  We have come to dedicate a portion of that field as a final resting place for those who
[00:54.800 --> 00:59.840]  here gave their lives that that nation might live.
[00:59.840 --> 01:09.600]  It is altogether fitting and proper that we should do this, but in a larger sense, we
[01:09.600 --> 01:18.440]  cannot dedicate, we cannot consecrate, we cannot hallow this ground.
[01:18.440 --> 01:25.720]  The brave men, living and dead, who struggled here, have consecrated it, far above our
[01:25.720 --> 01:30.640]  poor power to add or detract.
[01:30.640 --> 01:37.280]  The world will little note, nor long remember what we say here, but it can never forget
[01:37.280 --> 01:40.040]  what they did here.
[01:40.040 --> 01:47.440]  It is for us, the living rather, to be dedicated here, to the unfinished work which they who
[01:47.440 --> 01:52.360]  fought here have thus far so nobly advanced.
[01:52.360 --> 01:59.680]  It is rather for us to be here dedicated to the great task remaining before us, that from
[01:59.680 --> 02:06.220]  these honored dead we take increased devotion to that cause for which they gave the last
[02:06.220 --> 02:13.960]  full measure of devotion, that we here highly resolve that these dead shall not have died
[02:13.960 --> 02:23.520]  in vain, that this nation, under God, shall have a new birth of freedom, and that government
[02:23.520 --> 02:31.000]  of the people, by the people, for the people, shall not perish from the earth.
Conclusion
Whisper AI represents a significant leap in speech recognition technology. Its implications for the future of human-computer interaction are profound. As we continue to explore and expand the capabilities of AI, tools like Whisper AI not only enhance our present but also shape our future in technology.
I encourage you to explore Whisper AI, experiment with its features, and share your experiences. The journey of discovery is just beginning.
Just image, if AI is helping you in daily tasks, you have more free time for other things:
Additional Resources
For those eager to dive deeper, the Whisper AI documentation, available on OpenAI’s official website and GitHub, offers extensive information and tutorials. Community forums and discussions provide valuable insights and practical advice for both novice and experienced users.
When the WebM file contains VP8 or VP9 video, you have no choice but to transcode both the video and audio.
Video conversion can be a lengthy and CPU intensive process, depending on file size, video and audio quality, video resolution, etc. but FFmpeg provides a series of presets and controls to help you optimize for quality or faster conversions.
A note on video quality
When encoding video with H.264, the video quality can be controlled using a quantizer scale (crf value, crf stands for Constant Rate Factor) which can take values from 0 to 51: 0 being lossless, 23 the default and 51 the worst possible. So the lower the value the better the quality. You can leave the default value or, for a smaller bitrate, you can raise the value:
ffmpeg -i video.webm -crf 26 video.mp4
Video presets
FFmpeg also provides several quality presets which are calibrated for a certain encoding speed to compression ratio. A slower preset will provide a better compression. The following presets are available in descending order: ultrafast, superfast, veryfast, faster, fast, medium, slow, slower and veryslow. The default preset is medium but you can choose a faster preset:
ffmpeg -i video.webm -preset veryfast video.mp4
Placing the MOOV atom at the beginning
All MP4 files contain a moov atom. The moov atom contains information about the length of the video. If it’s at the beginning it immediately enables a streaming video player to play and scrub the MP4 file. By default FFmpeg places the moov atom at the end of the MP4 file but it can place the mov atom at the beginning with the -movflags faststart option like this:
Using Levels and Profiles when encoding H.264 video with FFmpeg
To ensure the highest compatibility with older iOS or Android devices you will need to use certain encoding profiles and levels. For example a video encoded with the High Profile and Level 4.2 will work on iPhone 5S and newer but not on older iOS devices.
ffmpeg -i video.webm -movflags faststart -profile:v high -level 4.2 video.mp4
Converting WebM with H.264 video to MP4
In some rare cases the .webm file will contain H.264 video and Vorbis or Opus audio(for example .webm files created using the MediaRecorder API on Chrome 52+ ). In such cases you don’t have to re-encode the video data since it’s already in the desired H.264 format (re-encoding is also not recommended since you’ll be loosing some quality in the process while consuming CPU cycles) so we’re just going to copy over the data
To copy the video data and transcode the audio in FFmpeg you use the -c:v copy option:
We use cookies on our website to give you the most relevant experience by remembering your preferences and repeat visits. By clicking “Accept All”, you consent to the use of ALL the cookies. However, you may visit "Cookie Settings" to provide a controlled consent.
This website uses cookies to improve your experience while you navigate through the website. Out of these, the cookies that are categorized as necessary are stored on your browser as they are essential for the working of basic functionalities of the website. We also use third-party cookies that help us analyze and understand how you use this website. These cookies will be stored in your browser only with your consent. You also have the option to opt-out of these cookies. But opting out of some of these cookies may affect your browsing experience.
Necessary cookies are absolutely essential for the website to function properly. These cookies ensure basic functionalities and security features of the website, anonymously.
Cookie
Duration
Description
cookielawinfo-checkbox-analytics
11 months
This cookie is set by GDPR Cookie Consent plugin. The cookie is used to store the user consent for the cookies in the category "Analytics".
cookielawinfo-checkbox-functional
11 months
The cookie is set by GDPR cookie consent to record the user consent for the cookies in the category "Functional".
cookielawinfo-checkbox-necessary
11 months
This cookie is set by GDPR Cookie Consent plugin. The cookies is used to store the user consent for the cookies in the category "Necessary".
cookielawinfo-checkbox-others
11 months
This cookie is set by GDPR Cookie Consent plugin. The cookie is used to store the user consent for the cookies in the category "Other.
cookielawinfo-checkbox-performance
11 months
This cookie is set by GDPR Cookie Consent plugin. The cookie is used to store the user consent for the cookies in the category "Performance".
viewed_cookie_policy
11 months
The cookie is set by the GDPR Cookie Consent plugin and is used to store whether or not user has consented to the use of cookies. It does not store any personal data.
Functional cookies help to perform certain functionalities like sharing the content of the website on social media platforms, collect feedbacks, and other third-party features.
Performance cookies are used to understand and analyze the key performance indexes of the website which helps in delivering a better user experience for the visitors.
Analytical cookies are used to understand how visitors interact with the website. These cookies help provide information on metrics the number of visitors, bounce rate, traffic source, etc.
Advertisement cookies are used to provide visitors with relevant ads and marketing campaigns. These cookies track visitors across websites and collect information to provide customized ads.