Perl: One liner
File
Remove lines with special pattern
$ perl -ni -e 'print unless /pattern/' /path/to/filename

Tipps und Tricks für Entwickler und IT-Interessierte
Remove lines with special pattern
$ perl -ni -e 'print unless /pattern/' /path/to/filename
Inhaltsverzeichnis
exec sudo -i
killall -u [oldname]
id [oldname]
usermod -l [newname] [oldname]
groupmod -n [newname] [oldname]
usermod -d /home/[newname] -m [newname]
usermod -c "[full name (new)]" [newname]
id [newname]
The systemctl isolate is temporary way. To make it permanent you have to use systemctl set-default as shown below:
sudo systemctl set-default multi-user.target
and reboot.
To revert graphical session use
sudo systemctl set-default graphical.target
| apt-get update | refresh available updates |
| apt-get upgrade | upgrade with package replacements; |
| apt-get dist-upgrade | upgrade Ubuntu version |
| apt-get install pkg | install pkg |
| apt-get purge pkg | uninstall pkg |
| apt-get autoremove | Remove obsolete packages |
apt-get -f install | try to fix broken packages |
| dpkg -i pkg.deb | install file pkg.deb (file) |
dpkg --configure -a | try to fix broken packages |
ls_release -a | Find out used version |
Inhaltsverzeichnis
Virtuelle Umgebung stellen eigenständige Umgebungen dar, in denen Programme und Pakete installiert/modifiziert werden können ohne die Betriebssystemumgebung zu verändern.
Dadurch können zum Beispiel andere Versionen von Python oder von Python-Modulen getestet werden.
Technisch gesehen ist eine virtuelle Umgebung ein Verzeichnis, in dem die gewünschten Pakete und Programme bzw. die gewünschte Python-Version installiert ist. Entsprechend werden die notwendigen Umgebungsvariablen modifiziert: PATH, PYTHONLIB, …
Zur Unterstützung von virtuellen Umgebungen gibt es mehrere Programme/Pakete
➜ python -m venv .venv


➜ pip -V
pip 21.2.4 from D:\python\venv\lib\site-packages\pip (python 3.9)

➜ & .\.venv\Scripts\Activate.ps1

➜ pip -V
pip 21.1.3 from d:\venv\.venv\lib\site-packages\pip (python 3.9)
Installation
$ pip install poetry
$ poetry new app
Created package app in app
$ cd app
$ tree .
.
├── README.rst
├── app
│   └── __init__.py
├── pyproject.toml
└── tests
    ├── __init__.py
    └── test_app.py

2 directories, 5 files
$ poetry config virtualenvs.create true --local $ poetry config virtualenvs.in-project true --local
$ tree .
.
├── README.rst
├── app
│   └── __init__.py
├── poetry.toml
├── pyproject.toml
└── tests
    ├── __init__.py
    └── test_app.py

2 directories, 6 files
Inhalt der Projektdatei poetry.toml
[virtualenvs]
create = true
in-project = true
➜ poetry install
Updating dependencies
Resolving dependencies...

Writing lock file

Package operations: 10 installs, 0 updates, 0 removals

  • Installing pyparsing (2.4.7)
  • Installing atomicwrites (1.4.0)
  • Installing attrs (21.2.0)
  • Installing colorama (0.4.4)
  • Installing more-itertools (8.8.0)
  • Installing packaging (21.0)
  • Installing pluggy (0.13.1)
  • Installing py (1.10.0)
  • Installing wcwidth (0.2.5)
  • Installing pytest (5.4.3)

Installing the current project: app (0.1.0)
$ tree .
.
├── README.rst
├── app
│   └── __init__.py
├── poetry.lock
├── poetry.toml
├── pyproject.toml
└── tests
    ├── __init__.py
└── test_app.py$ brew install pyenv-virtualenv
Anpassen der Bash Startdatei .bashrc
 if which pyenv-virtualenv-init > /dev/null; then
     eval "$(pyenv virtualenv-init -)"
fiAuflisten aller zur Verfügung stehenden Python Versionsn
$ pyenv install --list
Installation einer Python Version
pyenv install 3.7.2
Auflisten aller installierten Versionen
$ pyenv versions
* system (set by /Users/<your username>/.pyenv/version)
  2.7.14
  3.7.1
  3.7.2
# Python 2
$ pyenv virtualenv 2.7.14 venv
# Python 3
$ pyenv virtualenv 3.7.2 venv
Umgebungen anzeigen: die letzen beiden Zeilen zeigen die soeben eingerichtete Umgebung an
$ pyenv versions
* system (set by /Users/RalphG/.pyenv/version)
  2.7.14
  3.7.1
  3.7.2
  3.7.2/envs/venv
  venv
Alternativ: nur die virtuellen Umgebungen anzeigen
$ pyenv virtualenvs
Umgebung aktivieren / deaktivieren
$ pyenv activate <name>
$ pyenv deactivate
$ which python
~/pkg.virtualenv/bin/python
$ pip install virtualenv
Feststellen des Pfades der gewünschten Python Version
Python 2
$ which python2
/usr/local/bin/python2
Python 3
$ which python3
/usr/local/bin/python3
Einrichten der virtuellen Umgebung
Python 2
$ virtualenv venv2 --python /usr/local/bin/python2
Python 3
$ virtualenv venv3 --python /usr/local/bin/python3

Update all Python packages
pip3 list| cut -f1 -d' '|xargs -I {} pip3 install {} --upgradedef tracefunc(frame, event, arg, indent=[0]):
if event == "call":
indent[0] += 2
print "-" * indent[0] + "> call function", frame.f_code.co_name
elif event == "return":
print "<" + "-" * indent[0], "exit function", frame.f_code.co_name
indent[0] -= 2
return tracefunc
import sys
sys.settrace(tracefunc)
main()
Inhaltsverzeichnis

I just want to learn and work with a new technology, so I bought a 3D printer based on an Arduino Mega 2560. (More on this in the following Blog entry)
To be prepared with the Arduino, I want to play with it. So I started with a starter kit and a sensor kit from elegoo.com

Set / Kit for Arduino MEGA2560
Most complete Ultimate Starter Kit with German tutorial, MEGA2560 R3 Microcontroller and many additional for the Arduino Mega2560 R3

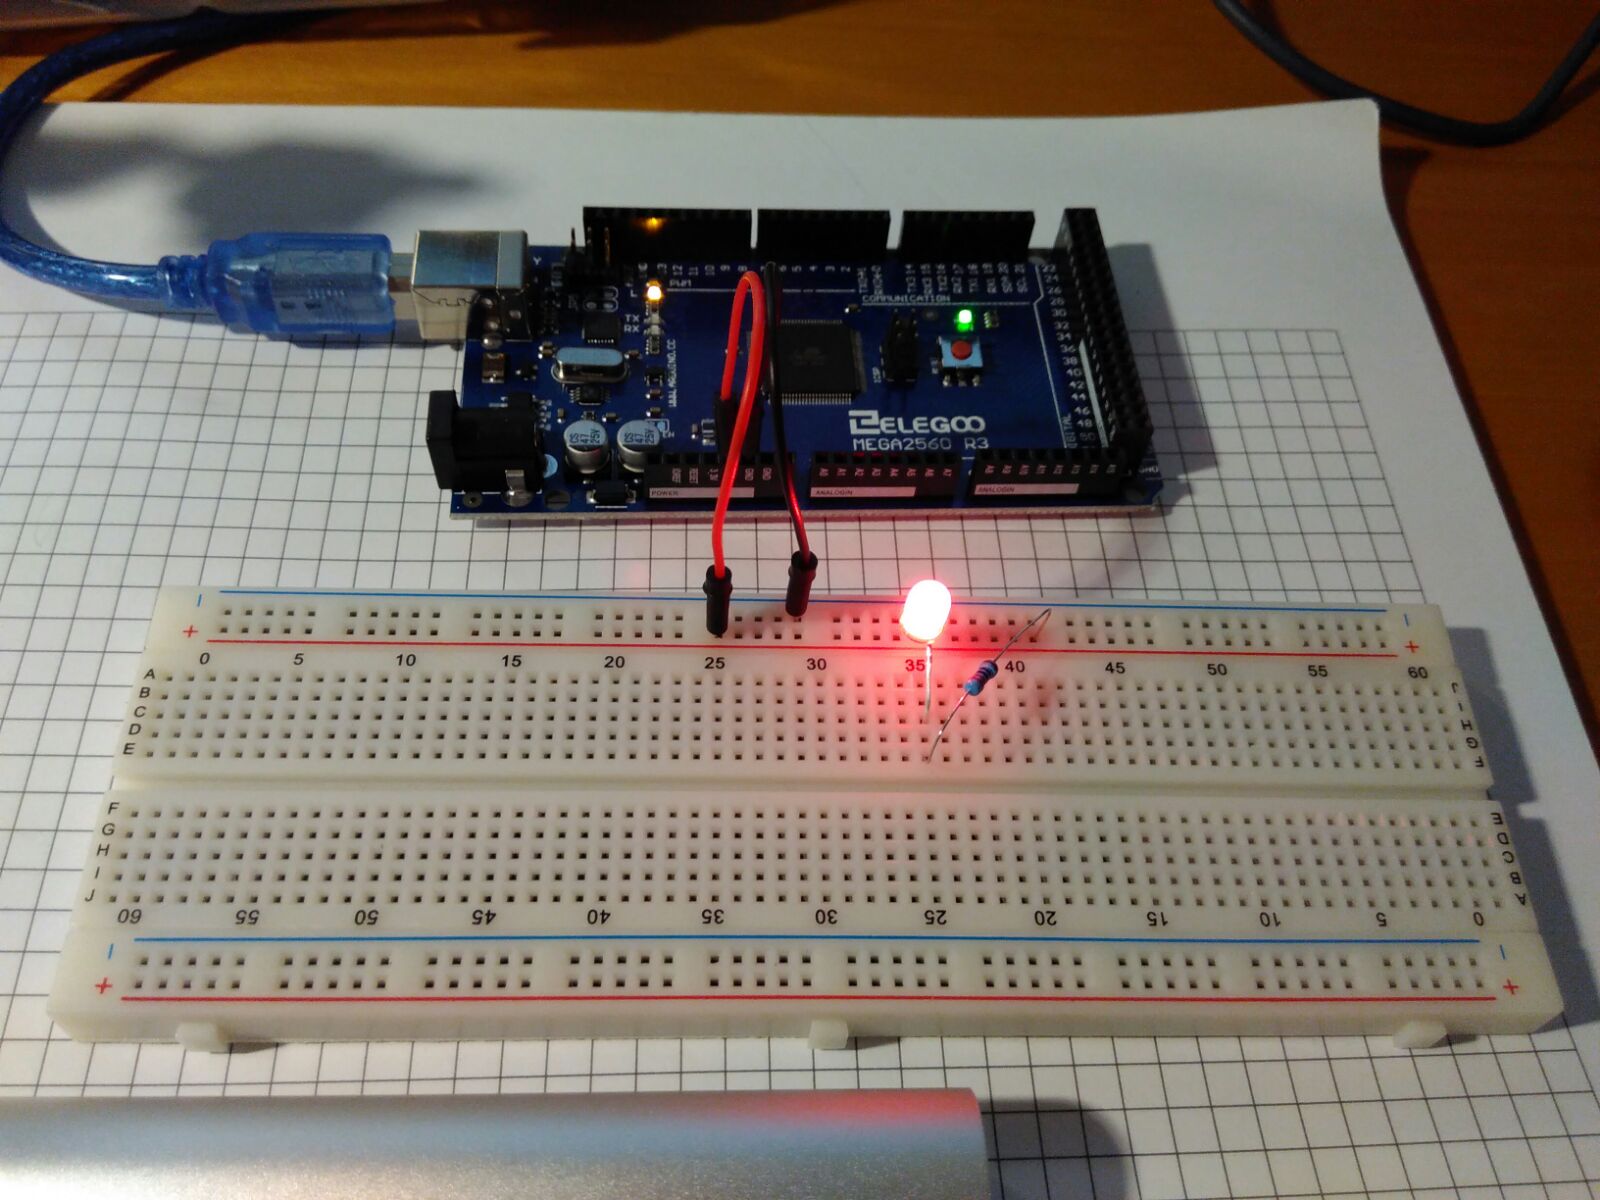

After installing and setting up everything, I started with my first small project: Measure the distance with a sonic sensor and display it through an LCD panel:
1 x MEGA2560 R3 Mikrocontroller
1 x MB-102 Versuchsaufbau
1 x Prototyp-Erweiterungsplatine
1 x LCD1602 Anzeige(mit Pin Header)
1 x DHT11 Modul
1 x Joystick-Modul
1 x 5V Relais
1 x Schallsensor-Modul
1 x DS3231 Echtzeituhren-Modul
1 x Drehgeber modul
1 x Membranschalter-Modul
1 x Versuchsaufbau
1 x HC-SR501 PIR-Modul
1 x ADXL335 Modul
1 x MAX7219 Modul
1 x Wasserfüllstanderkennung-Sensormodul
1 x RC522 RFID-Modul
1 x Servomechanismus (SG90)
1 x Schrittmotor
1 x ULN2003 Schrittmotor-Treibermodul
1 x Power Supply Module
1 x Ultraschall-Sensor-Modul
1 x IR-Empfängermodul
1 x IR-Fernbedienung
1 x 3V Gleichstrommotor
1 x USB Kabel
1 x 65 M-M Kabel
1 x 10 Female-to-Male Kabel
1 x 9 V Akku mit DC
1 x 9 V 1 A Netzteil
1 x Kugelschalter
1 x Segmentanzeige
1 x 4-stellige 7-Segmentanzeige
1 x IC L293D
1 x IC 74HC595
1 x Aktiver Summer
1 x Passiver Summer
2 x Potentiometer
1 x Thermistoren
5 x Diode Rectifier (1N4007)
5 x NPN Transistor (pn2222)
5 x NPN Transistor (S8050)
2 x Fotozelle
5 x 22pF Keramikkondensator
5 x 10⁴pF Keramikkondensator
2 x Elektrolytkondensator (10uF 50 V)
2 x elektrolytischen Kondensator (100uF 50 V)
1 x RGB LED
5 LEDs, jeweils in weiß, gelb, blau, grün, rot
5 x Druckschalter
10 Widerstände (Ohm): 10, 100, 220, 330, 1k, 2k, 5k1, 10k, 100k, 1m
1 x JoystickModule
1 x RelayModule
1 x Rotary EncoderModule
1 x DS-3231 RTC Module
1 x Ultrasonic SensorModule
1 x HC-SR501 PIR sensor Module
1 x Flame SensorModule
1 x Linear HallModule
1 x Metal TouchModule
1 x Digital TemperatureModule
1 x Big SoundModule
1 x Small SoundModule
1 x RGB LEDModule
1 x SMD RGBModule
1 x Two-tone ColorModule
1 x 7 Color FlashModule
1 x Laser EmitModule
1 x ShockModule
1 x IR ReceiverModule
1 x IR EmissionModule
1 x Tilt SwitchModule
1 x ButtonModule
1 x Active BuzzerModule
1 x Passive BuzzerModule
1 x 18B20 tempModule
1 x Photo-resistorModule
1 x Temperature and HumidityModule
1 x GY-521 Module
1 x Photo-interrupterModule
1 x Tap ModuleModule
1 x Membrane SwitchModule
1 x AvoidanceModule
1 x TrackingModule
1 x Magnetic SpringModule
1 x Water Lever Sensor
1 x Power Supply Module
1 x LCD1602 Module (with pin header)

Inhaltsverzeichnis
$
$ npm install --save-dev @ionic/app-scripts@latest
$ npm install --save-dev @ionic/app-scripts@latest
$ npm install --save-dev @angular/tsc-wrapped@latest
$ npm install --save-dev @angular/compiler-cli@latest
Read here for details
$ npm install ios-sim@latest
Or edit line 283 in file lib.js and follow https://github.com/phonegap/ios-sim/pull/213/files
vi platforms/ios/cordova/node_modules/ios-sim/src/lib.js
Change to
list.push(util.format(How to fix Error: spawn EACCES
$ ionic hooks add

Inhaltsverzeichnis
An important dependency before Homebrew can work is the Command Line Tools for Xcode. These include compilers that will allow you to build things from source.
ruby -e "$(curl -fsSL https://raw.githubusercontent.com/Homebrew/install/master/install)"
echo 'export PATH="/usr/local/bin:$PATH"' >> ~/.bash_profile
brew doctor
To install a package (or Formula in Homebrew vocabulary) simply type:
brew install <formula>
To update Homebrew’s directory of formula, run:
brew update
To see if any of your packages need to be updated:
brew outdated
To update a package:
brew upgrade <formula>
Homebrew keeps older versions of packages installed, in case you want to roll back. That rarely is necessary, so you can do some cleanup to get rid of those old versions:
brew cleanup
To see what you have installed (with their version numbers):
brew list --versions
Let’s see if we can get the elegance, simplicity, and speed of Homebrew for the installation and management of GUI Mac applications such as Google Chrome and Adium.
brew cask install google-chrome
If you want to use tools such as ruby or gem, you can configure brew to use this tools without the need of superuser permissions: Use environment variable:
export RBENV_ROOT="$(brew --prefix rbenv)"
export GEM_HOME="$(brew --prefix)/opt/gems"
export GEM_PATH="$(brew --prefix)/opt/gems"
Look here
brew update
brew install rbenv
brew install ruby-build
Once you have rbenv and ruby-build installed, you can run the following command to get Ruby 2.3.0 installed.
rbenv install 2.3.0
Now if you’d like to use 2.3.0 by default, you can run the following command:
rbenv global 2.3.0
Finally, add this to your .bashrc
eval "$(rbenv init -)"
Inhaltsverzeichnis
brew install bash-completion
brew cask install docker
brew install kubectl
brew cask install minikube
After Installation, check versions
docker version
docker-compose version
docker-machine --version
kubectl version --client
$ docker run --interactive --tty --name ubuntu ubuntu /bin/bash
Unable to find image 'ubuntu:latest' locally
latest: Pulling from library/ubuntu
af49a5ceb2a5: Pull complete
8f9757b472e7: Pull complete
e931b117db38: Pull complete
47b5e16c0811: Pull complete
9332eaf1a55b: Pull complete
Digest: sha256:3b64c309deae7ab0f7dbdd42b6b326261ccd6261da5d88396439353162703fb5
Status: Downloaded newer image for ubuntu:latest
root@a5b411d609f0:/#
root@a5b411d609f0:/# uname -a
Linux a5b411d609f0 4.4.27-moby #1 SMP Wed Oct 26 14:21:29 UTC 2016 x86_64 x86_64 x86_64 GNU/Linux
root@a5b411d609f0:/# id
uid=0(root) gid=0(root) groups=0(root)
root@a5b411d609f0:/# hostname
a5b411d609f0
root@a5b411d609f0:/#
root@a5b411d609f0:/# exit
exit
$
$ docker ps -a
CONTAINER ID  IMAGE   COMMAND      CREATED        STATUS                   PORTS  NAMES
b01ba9bfef78  ubuntu  "/bin/bash"  41 seconds ago Exited (0) 2 seconds ago        ubuntu
$ docker start ubuntu
ubuntu
$ docker ps -a
CONTAINER ID  IMAGE   COMMAND      CREATED        STATUS                 PORTS   NAMES
b01ba9bfef78  ubuntu  "/bin/bash"  2 minutes ago  Up 1 seconds                   ubuntu
Don’t forget to press enter after you entered the command do display the shell in the image again
$ docker attach ubuntu
root@b01ba9bfef78:/#
$ docker run -it --name ubuntu ubuntu bash
You are in a terminal with ubuntu and can do whatever you like.
To start again after a reboot:
$ docker start ubuntu
$ docker exec -it ubuntu bash
If you want save your changes:
$ docker commit ubuntu
$ docker images
See the unnamed image and:
$ docker tag <imageid> myubuntu
Then you can run another container using your new image.
$ docker run -it --name myubuntu myubuntu bash
Or replace the former
$ docker stop ubuntu
$ docker rm ubuntu
$ docker run -it --name ubuntu myubuntu bash
$ docker-machine create --driver=virtualbox default
$ docker-machine ls
NAME         ACTIVE   DRIVER       STATE     URL                         SWARM   DOCKER    ERRORS
default      -        virtualbox   Running   tcp://192.168.99.100:2376           v1.12.2
virtualbox   -        virtualbox   Stopped                                       Unknown
$ docker-machine env
export DOCKER_TLS_VERIFY="1"
export DOCKER_HOST="tcp://192.168.99.100:2376"
export DOCKER_CERT_PATH="/Users/docker/.docker/machine/machines/default"
export DOCKER_MACHINE_NAME="default"
# Run this command to configure your shell:
# eval $(docker-machine env)
$ docker-machine stop default
Stopping "default"...
docker-Machine "default" was stopped.
$ docker-machine start default
Starting "default"...
(default) Check network to re-create if needed...
(default) Waiting for an IP...
Machine "default" was started.
Waiting for SSH to be available...
Detecting the provisioner...
Started machines may have new IP addresses. You may need to re-run the docker-machine env command.
$ eval "$(docker-machine env default)"
$ docker-machine create -d virtualbox --virtualbox-boot2docker-url https://releases.rancher.com/os/latest/rancheros.iso <MACHINE-NAME>
$ docker-machine env rancheros
Images are just templates for docker containers.
$ docker images
REPOSITORY          TAG                 IMAGE ID            CREATED             SIZE
ubuntu              latest              f753707788c5        5 days ago          127.2 MB
$ docker rmi <IMAGE ID>
$ docker rmi $(docker images -q)
$ docker ps -a
$ docker run -it ubuntu bash
Unable to find image 'ubuntu:latest' locally
latest: Pulling from library/ubuntu
6bbedd9b76a4: Pull complete
fc19d60a83f1: Pull complete
de413bb911fd: Pull complete
2879a7ad3144: Pull complete
668604fde02e: Pull complete
Digest: sha256:2d44ae143feeb36f4c898d32ed2ab2dffeb3a573d2d8928646dfc9cb7deb1315
Status: Downloaded newer image for ubuntu:latest
$ docker run -it --rm ubuntu hostname
$ docker run -it ubuntu bash
# hostname
c26fc567f552
root@c26fc567f552:/# uname -a
Linux c26fc567f552 4.4.24-boot2docker #1 SMP Fri Oct 7 20:54:27 UTC 2016 x86_64 x86_64 x86_64 GNU/Linux
$ docker rm $(docker ps -a -q)
$ docker ps -a
CONTAINER ID        IMAGE                  COMMAND                  CREATED             STATUS                     PORTS               NAMES
e4a50905aa9c        continuumio/anaconda   "/usr/bin/tini -- /bi"   22 minutes ago      Exited (0) 5 minutes ago                       pedantic_kirch
164daaac2349        4f3b088e1307           "/bin/sh -c 'apt-get "   4 hours ago         Exited (100) 4 hours ago                       happy_jang
817bb15d3171        i_electron             "/bin/bash"              2 weeks ago         Exited (0) 2 weeks ago                         cranky_wilson
$ docker commit e4a50905aa9c r14r_anaconda
$ npm init --yes
{
  "name": "development",
   ...
  "license": "ISC",
  "scripts":  {
    "build": "docker build -t development .",
    "ssh": "docker run -i -t development /bin/bash"
}FROM ubuntu RUN apt-get update && apt-get install -y firefox
Now you can build the image with
$ npm run build
$ npm run ssh
$ brew install socat
$ brew cask install xquartz
$ open -a XQuartz
Expose local xquartz socket via socat on a TCP port.
Run this in another terminal window
$ socat TCP-LISTEN:6000,reuseaddr,fork UNIX-CLIENT:\"$DISPLAY\"
The masking of the characters ” is VERY important
$ docker run -it -e DISPLAY=server:0.0 i_firefox firefox
Available Linux OS’s
Inhaltsverzeichnis
Use npm to install Protractor globally with
npm install -g protractor
The webdriver-manager is a helper tool to easily get an instance of a Selenium Server running. Use it to download the necessary binaries with:
webdriver-manager update
Now start up a server with:
webdriver-manager start
Install a demo repository:
git clone https://github.com/juliemr/protractor-demo.git
npm install
Update selenium driver
node_modules/protractor/bin/webdriver-manager update
Run server in background:
node app/expressserver.js &
Now run the tests
npm test
