Developer Blog

Tipps und Tricks für Entwickler und IT-Interessierte

Docker

Docker | Create an extensible build environment

Inhaltsverzeichnis

TL;DR

The complete code for the post is here.

General Information

Building a Docker image mainly means creating a Dockefile and specifying all the required components to install and configure.

So a Dockerfile contains at least many operating system commands for installing and configuring software and packages.

Keeping all commands in one file (Dockerfile) can lead to a confusing structure.

In this post I describe and explain an extensible structure for a Docker project so that you can reuse components for other components.

General Structure

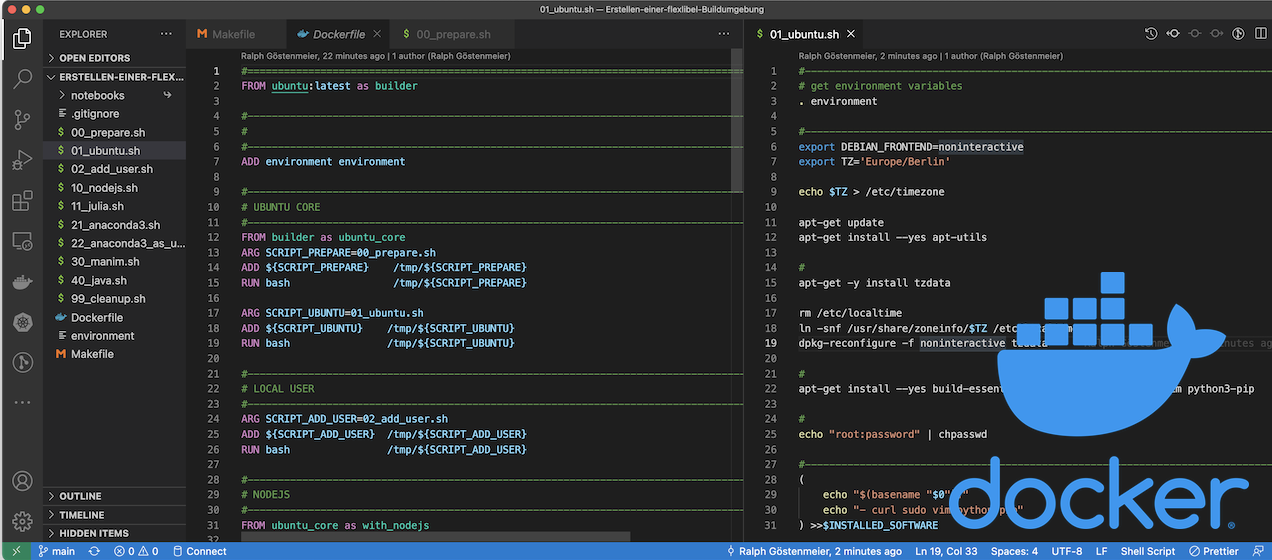
The basic idea behind the structure is: split all installation instructions into separate installation scripts and call them individually in the dockerfile.

In the end the structure will look something like this (with some additional collaborators to be added and described later)

RUN bash /tmp/${SCRIPT_UBUNTU}
RUN bash /tmp/${SCRIPT_ADD_USER}
RUN bash /tmp/${SCRIPT_NODEJS}
RUN bash /tmp/${SCRIPT_JULIA}
RUN bash /tmp/${SCRIPT_ANACONDA}
RUN cat ${SCRIPT_ANACONDA_USER} | su user
RUN bash /tmp/${SCRIPT_CLEANUP}

For example, preparing the Ubuntu image by installing basic commands is transfered into the script 01_ubuntu_sh

Hint: There are hardly any restrictions on the choice of names (variables and files/scripts). For the scripts, I use numbering to express order.

The script contains this code:

apt-get update                                       
apt-get install --yes apt-utils
apt-get install --yes build-essential lsb-release curl sudo vim python3-pip

echo "root:root" | chpasswd

Since we will be working with several scripts, an exchange of information is necessary. For example, one script installs a package and the other needs the installation folder.

We will therefore store information needed by multiple scripts in a separate file: the environment file environment

#--------------------------------------------------------------------------------------
USR_NAME=user
USR_HOME=/home/user

GRP_NAME=work

#--------------------------------------------------------------------------------------
ANACONDA=anaconda3
ANACONDA_HOME=/opt/$ANACONDA
ANACONDA_INSTALLER=/tmp/installer_${ANACONDA}.sh

JULIA=julia
JULIA_HOME=/opt/${JULIA}-1.7.2
JULIA_INSTALLER=/tmp/installer_${JULIA}.tgz

And each installation script must start with a preamble to use this environment file:

#--------------------------------------------------------------------------------------
# get environment variables
. environment

Preparing Dockerfile and Build Environment

When building an image, Docker needs all files and scripts to run inside the image. Since we created the installation scripts outside of the image, we need to copy them into the image (run run them). This also applies to the environment file environment.

File copying is done by the Docker ADD statement.

First we need our environment file in the image, so let’s copy this:

#======================================================================================
FROM ubuntu:latest as builder

#--------------------------------------------------------------------------------------
ADD environment environment

Each block to install one required software looks like this. To be flexible, we use variable for the script names.

ARG SCRIPT_UBUNTU=01_ubuntu.sh
ADD ${SCRIPT_UBUNTU}    /tmp/${SCRIPT_UBUNTU}
RUN bash tmp/${SCRIPT_UBUNTU}

Note: We can’t run the script directly because the run bit may not be set. So we will use bash to run the text file as a script.

As an add-on, we will be using Docker’s multi-stage builds. So here is the final code:

#--------------------------------------------------------------------------------------
# UBUNTU CORE
#--------------------------------------------------------------------------------------
FROM builder as ubuntu_core
ARG SCRIPT_UBUNTU=01_ubuntu.sh
ADD ${SCRIPT_UBUNTU}    /tmp/${SCRIPT_UBUNTU}
RUN bash 

Final results

Dockerfile

Here is the final Dockerfile:

#==========================================================================================
FROM ubuntu:latest as builder

#------------------------------------------------------------------------------------------
# 
#------------------------------------------------------------------------------------------
ADD environment environment
#------------------------------------------------------------------------------------------
# UBUNTU CORE
#------------------------------------------------------------------------------------------
FROM builder as ubuntu_core
ARG SCRIPT_UBUNTU=01_ubuntu.sh
ADD ${SCRIPT_UBUNTU}    /tmp/${SCRIPT_UBUNTU}
RUN bash                /tmp/${SCRIPT_UBUNTU}

#------------------------------------------------------------------------------------------
# LOCAL USER
#------------------------------------------------------------------------------------------
ARG SCRIPT_ADD_USER=02_add_user.sh
ADD ${SCRIPT_ADD_USER}  /tmp/${SCRIPT_ADD_USER}
RUN bash /tmp/${SCRIPT_ADD_USER}

#------------------------------------------------------------------------------------------
# NODEJS
#-----------------------------------------------------------------------------------------
FROM ubuntu_core as with_nodejs

ARG SCRIPT_NODEJS=10_nodejs.sh
ADD ${SCRIPT_NODEJS}    /tmp/${SCRIPT_NODEJS}
RUN bash                /tmp/${SCRIPT_NODEJS}

#--------------------------------------------------------------------------------------------------
# JULIA
#--------------------------------------------------------------------------------------------------
FROM with_nodejs as with_julia

ARG SCRIPT_JULIA=11_julia.sh
ADD ${SCRIPT_JULIA} /tmp/${SCRIPT_JULIA}
RUN bash /tmp/${SCRIPT_JULIA}

#---------------------------------------------------------------------------------------------
# ANACONDA3  with Julia Extensions
#---------------------------------------------------------------------------------------------
FROM with_julia as with_anaconda

ARG SCRIPT_ANACONDA=21_anaconda3.sh
ADD ${SCRIPT_ANACONDA} /tmp/${SCRIPT_ANACONDA}
RUN bash /tmp/${SCRIPT_ANACONDA}

#---------------------------------------------------------------------------------------------
#
#---------------------------------------------------------------------------------------------
FROM with_anaconda as with_anaconda_user
ARG SCRIPT_ANACONDA_USER=22_anaconda3_as_user.sh
ADD ${SCRIPT_ANACONDA_USER} /tmp/${SCRIPT_ANACONDA_USER}
#RUN cat ${SCRIPT_ANACONDA_USER} | su user

#---------------------------------------------------------------------------------------------
#
#---------------------------------------------------------------------------------------------
FROM with_anaconda_user as with_cleanup

ARG SCRIPT_CLEANUP=99_cleanup.sh
ADD ${SCRIPT_CLEANUP} /tmp/${SCRIPT_CLEANUP}
RUN bash /tmp/${SCRIPT_CLEANUP}

#=============================================================================================
USER    user
WORKDIR /home/user

#
CMD ["bash"]

Makefile

HERE := ${CURDIR}

CONTAINER := playground_docker

default:
	cat Makefile

build:
	docker build -t ${CONTAINER} .

clean:
	docker_rmi_all
	
run:
	docker run  -it --rm  -p 127.0.0.1:8888:8888 -v ${HERE}:/src:rw -v ${HERE}/notebooks:/notebooks:rw --name ${CONTAINER} ${CONTAINER}

notebook:
	docker run  -it --rm  -p 127.0.0.1:8888:8888 -v ${HERE}:/src:rw -v ${HERE}/notebooks:/notebooks:rw --name ${CONTAINER} ${CONTAINER} bash .local/bin/run_jupyter

Installation scripts

01_ubuntu.sh

#--------------------------------------------------------------------------------------------------
# get environment variables
. environment

#--------------------------------------------------------------------------------------------------
export DEBIAN_FRONTEND=noninteractive
export TZ='Europe/Berlin'

echo $TZ > /etc/timezone 

apt-get update                                       
apt-get install --yes apt-utils

#
apt-get -y install tzdata

rm /etc/localtime
ln -snf /usr/share/zoneinfo/$TZ /etc/localtime
dpkg-reconfigure -f noninteractive tzdata

#
apt-get install --yes build-essential lsb-release curl sudo vim python3-pip

#
echo "root:password" | chpasswd

Angular | Starting with Capacitor

Inhaltsverzeichnis

Introduction

Install Angular

$ npm -g install @angular/cli

Create sample app

❯ ng new app-capacitor
? Would you like to add Angular routing? Yes
? Which stylesheet format would you like to use? SCSS   [ https://sass-lang.com/documentation/syntax#scss]

❯ cd app-capacitor

Change output path to capacitor defaults

Change line in angular.json

      "architect": {
        "build": {
          "builder": "@angular-devkit/build-angular:browser",
          "options": {
            "outputPath": "dist",

 Add capacitor support

❯ ng add @capacitor/angular
ℹ Using package manager: npm
✖ Unable to find compatible package.  Using 'latest'.
✖ Package has unmet peer dependencies. Adding the package may not succeed.

The package @capacitor/angular will be installed and executed.
Would you like to proceed? Yes

Capacitor initialisieren

❯ npx cap init
[?] What is the name of your app?
    This should be a human-friendly app name, like what you'd see in the App Store.
√ Name ... app-capacitor
[?] What should be the Package ID for your app?
    Package IDs (aka Bundle ID in iOS and Application ID in Android) are unique identifiers for apps. They must be in
    reverse domain name notation, generally representing a domain name that you or your company owns.
√ Package ID ... com.example.app
√ Creating capacitor.config.ts in D:\CLOUD\Online-Seminare\Kurse\Angular\Einsteiger\App_Capacitor in 5.31ms
[success] capacitor.config.ts created!

Next steps:
https://capacitorjs.com/docs/v3/getting-started#where-to-go-next
[?] Join the Ionic Community! 💙
    Connect with millions of developers on the Ionic Forum and get access to live events, news updates, and more.
√ Create free Ionic account? ... no
[?] Would you like to help improve Capacitor by sharing anonymous usage data? 💖
    Read more about what is being collected and why here: https://capacitorjs.com/telemetry. You can change your mind at
    any time by using the npx cap telemetry command.
√ Share anonymous usage data? ... no

Build your app

We will need the dist directory with the web files

❯ ng build --prod
Option "--prod" is deprecated: No need to use this option as this builder defaults to configuration "production".
✔ Browser application bundle generation complete.
✔ Copying assets complete.
✔ Index html generation complete.

Initial Chunk Files               | Names         |      Size
main.b633c9096acdb457c421.js      | main          | 212.34 kB
polyfills.e4574352eda6eb439793.js | polyfills     |  35.95 kB
runtime.d66bb6fe709ae891f100.js   | runtime       |   1.01 kB
styles.31d6cfe0d16ae931b73c.css   | styles        |   0 bytes

                                  | Initial Total | 249.29 kB

Build at: 2021-05-28T09:32:28.905Z - Hash: ed2ed2d661b0d58b48f2 - Time: 28225ms
❯ npm install @capacitor/ios @capacitor/android
npm WARN @capacitor/angular@1.0.3 requires a peer of rxjs@~6.4.0 but none is installed. You must install peer dependencies yourself.
npm WARN @capacitor/angular@1.0.3 requires a peer of typescript@~3.4.3 but none is installed. You must install peer dependencies yourself.
npm WARN ajv-keywords@3.5.2 requires a peer of ajv@^6.9.1 but none is installed. You must install peer dependencies yourself.
npm WARN optional SKIPPING OPTIONAL DEPENDENCY: fsevents@2.3.2 (node_modules\fsevents):
npm WARN notsup SKIPPING OPTIONAL DEPENDENCY: Unsupported platform for fsevents@2.3.2: wanted {"os":"darwin","arch":"any"} (current: {"os":"win32","arch":"x64"})
npm WARN optional SKIPPING OPTIONAL DEPENDENCY: fsevents@1.2.13 (node_modules\webpack-dev-server\node_modules\fsevents):
npm WARN notsup SKIPPING OPTIONAL DEPENDENCY: Unsupported platform for fsevents@1.2.13: wanted {"os":"darwin","arch":"any"} (current: {"os":"win32","arch":"x64"})

+ @capacitor/ios@3.0.0
+ @capacitor/android@3.0.0
added 2 packages from 1 contributor, removed 1 package and audited 1375 packages in 7.385s

88 packages are looking for funding
  run `npm fund` for details

found 35 moderate severity vulnerabilities
  run `npm audit fix` to fix them, or `npm audit` for details

Add Platform Android

❯ npx cap add android
√ Adding native android project in android in 167.07ms
√ Syncing Gradle in 1.45ms
√ add in 169.83ms
[success] android platform added!
Follow the Developer Workflow guide to get building:
https://capacitorjs.com/docs/v3/basics/workflow
√ Copying web assets from dist to android\app\src\main\assets\public in 55.26ms
√ Creating capacitor.config.json in android\app\src\main\assets in 3.50ms
√ copy android in 164.93ms
√ Updating Android plugins in 7.76ms
√ update android in 75.79ms

Open Android Studio to build App

❯ npx cap open android
[info] Opening Android project at: android.

Django-Docker-Builds optimieren mit uv

Inhaltsverzeichnis

Wer in Docker-Containern Python-Abhängigkeiten mit pip verwaltet, sollte einen Blick auf uv von Astral werfen. Dieses Tool bietet deutlich schnellere Installationen und robustere Verwaltung der Abhängigkeiten. Besonders für Django-Projekte in der CI oder Produktion kann das Build-Tempo spürbar verbessert werden. Auch die Pflege und das Aktualisieren der Abhängigkeiten werden einfacher.

uv im Dockerfile einbinden

Die empfohlene Methode nutzt ein Multi-Stage-Build, um das aktuelle uv-Binary direkt ins Image zu kopieren:

COPY --from=ghcr.io/astral-sh/uv:latest /uv /usr/local/bin/uv

So spart man sich die Installation via pip oder Paketmanager und bleibt immer aktuell.

Wichtige Umgebungsvariablen

Im Dockerfile werden zentrale Umgebungsvariablen gesetzt:

ENV UV_PROJECT_ENVIRONMENT=/venv \
    UV_NO_MANAGED_PYTHON=1 \
    UV_PYTHON_DOWNLOADS=never \
    VIRTUAL_ENV=/venv
  • UV_NO_MANAGED_PYTHON=1: uv verwaltet Python nicht selbst.
  • UV_PYTHON_DOWNLOADS=never: Downloads werden komplett deaktiviert.
  • UV_PROJECT_ENVIRONMENT=/venv: Virtuelle Umgebung wird unter /venv verwaltet.

Performance-Verbesserungen

ENV UV_COMPILE_BYTECODE=1 \
    UV_LINK_MODE=copy \
    UV_CACHE_DIR=/app/.cache/uv
  • Bytecode wird beim Installieren erzeugt (.pyc), schnellere Startzeit.
  • Hardlink-Probleme werden durch Kopieren vermieden.
  • Caching via Docker-Mounts beschleunigt Builds enorm.

Sicherheit und Reproduzierbarkeit

ENV UV_FROZEN=1 \
    UV_REQUIRE_HASHES=1 \
    UV_VERIFY_HASHES=1
  • Nur exakt definierte Versionen werden installiert.
  • Jeder Download wird über einen kryptografischen Hash abgesichert.

Abhängigkeiten installieren

RUN uv venv $VIRTUAL_ENV

RUN --mount=type=cache,target=/app/.cache/uv \
    --mount=type=bind,source=uv.lock,target=uv.lock \
    --mount=type=bind,source=pyproject.toml,target=pyproject.toml \
    uv sync --no-install-project --no-editable

Diese Befehle installieren exakt die in der uv.lock Datei festgelegten Pakete.

Dev- und Test-Abhängigkeiten verwalten

Mit dependency-groups lassen sich verschiedene Umgebungen differenzieren:

[project]
dependencies = ["django~=5.2"]

[dependency-groups]

dev = [“django-debug-toolbar”] test = [“pytest”]

[tool.uv]

default-groups = []

Mit Build-Argumenten lassen sich Gruppen gezielt installieren:

ARG BUILD_GROUPS=""

RUN --mount=type=cache,target=/app/.cache/uv \
    --mount=type=bind,source=uv.lock,target=uv.lock \
    --mount=type=bind,source=pyproject.toml,target=pyproject.toml \
    uv venv $VIRTUAL_ENV && \
    uv sync --no-install-project --no-editable $BUILD_GROUPS

Beispielaufrufe:

# Nur Produktivabhängigkeiten
$ docker build .

# Mit Entwicklungswerkzeugen
$ docker build --build-arg BUILD_GROUPS="--group dev"

# Mit Testumgebung
$ docker build --build-arg BUILD_GROUPS="--group test"

Migration von pip

Bestehende Projekte lassen sich überführen mit:

uv add --requirements requirements.txt
uv add --group dev --requirements requirements-dev.txt
uv lock

Pflege und Updates

Veraltete Pakete prüfen:

uv pip list --outdated

Lock-Datei aktualisieren:

uv lock --upgrade

Damit bleibt die Abhängigkeitsverwaltung reproduzierbar, sicher und wartbar.


Diese Methode spart Zeit, Bandbreite und sorgt für eine klar strukturierte und abgesicherte Docker-Infrastruktur für Python-Projekte wie Django. Wer auf schnelle CI/CD-Pipelines, reproduzierbare Builds und saubere Produktionsimages setzt, findet in uv eine moderne und effiziente Lösung.

Hier das finale Dockerfile

### BUILD IMAGE ###

FROM python:3.13-slim AS builder

ENV DJANGO_SETTINGS_MODULE=myproj.settings \
    PATH="/venv/bin:$PATH" \
    PYTHONDONTWRITEBYTECODE=1 \
    PYTHONUNBUFFERED=1 \
    UV_CACHE_DIR=/root/.cache/uv \
    UV_COMPILE_BYTECODE=1 \
    UV_FROZEN=1 \
    UV_LINK_MODE=copy \
    UV_NO_MANAGED_PYTHON=1 \
    UV_PROJECT_ENVIRONMENT=/venv \
    UV_PYTHON_DOWNLOADS=never \
    UV_REQUIRE_HASHES=1 \
    UV_VERIFY_HASHES=1 \
    VIRTUAL_ENV=/venv

COPY --from=ghcr.io/astral-sh/uv:latest /uv /usr/local/bin/uv

RUN <<EOT
apt-get update -y && \
apt-get install -y --no-install-recommends \
    build-essential \
    # other build dependencies here
EOT

WORKDIR /app

ARG BUILD_GROUPS=""

RUN --mount=type=cache,target=/app/.cache/uv \
    --mount=type=bind,source=uv.lock,target=uv.lock \
    --mount=type=bind,source=pyproject.toml,target=pyproject.toml \
    uv venv $VIRTUAL_ENV && \
    uv sync --no-install-project --no-editable $BUILD_GROUPS

# Copy what's needed to run collectstatic.
COPY myproj /app/myproj
COPY media /app/media
COPY manage.py /app/

RUN DEBUG=False ./manage.py collectstatic --noinput

### FINAL IMAGE ###

FROM python:3.13-slim

ARG PORT=8000
ENV DJANGO_SETTINGS_MODULE=myproj.settings \
    PATH="/venv/bin:$PATH" \
    PORT=${PORT} \
    PYTHONDONTWRITEBYTECODE=1 \
    PYTHONUNBUFFERED=1 \
    VIRTUAL_ENV=/venv

EXPOSE ${PORT}
ENTRYPOINT ["/bin/bash", "/app/bin/run"]
CMD ["prod"]

WORKDIR /app

RUN <<EOT
apt-get clean -y && \
apt-get update -y && \
apt-get install -y --no-install-recommends \
	# OS dependencies, e.g. bash, db clients, etc.
    bash && \
apt-get autoremove -y && \
apt-get clean -y && \
rm -rf /var/lib/apt/lists/* /tmp/* /var/tmp/*
EOT

# Copy selectively from builder to optimize final image.
# --link enables better layer caching when base image changes
COPY --link --from=builder /venv /venv
COPY --link --from=builder /app/myproj /app/myproj
COPY --link --from=builder /app/static /app/static
COPY --link --from=builder /app/manage.py /app/manage.py

Daily: How to transcribe Videos

Inhaltsverzeichnis

Using Commandline and Python

Option 1: Transcribe with Whisper (official)

pip install git+https://github.com/openai/whisper.git

Then run:

whisper demo.mp4 --model medium --language auto --output_format txt

Optional flags:

  • --output_format srt (for subtitles)
  • --language en (to skip language detection)

Create a shell script to transcribe multiple files

#!/usr/bin/env bash

# Loop through all arguments (filenames)
for VIDEO in "$@"; do
    echo "Transcribing: $VIDEO"
    whisper "$VIDEO" --model medium --language en --output_format txt
done

Option 2: Transcribe with faster-whisper (much faster on CPU or GPU)

pip install faster-whisper

Run via Python:

import sys
from faster_whisper import WhisperModel

VIDEO=sys.arg[1]

model = WhisperModel("medium", device="cpu")  # or "cuda" for GPU
segments, info = model.transcribe(VIDEO)

with open("transcript.txt", "w") as f:
    for s in segments:
        f.write(f"{s.start:.2f} --> {s.end:.2f}: {s.text.strip()}\n")

Optional: Convert to audio (if needed)

If transcription fails or is slow, extract audio first:

ffmpeg -i your_video.mp4 -ar 16000 -ac 1 -c:a pcm_s16le audio.wav

Then transcribe audio.wav instead.


Problems with numpy

Error when running whisper: A module that was compiled using NumPy 1.x cannot be run in NumPy 2.2.6 as it may crash.

Reason:

The error you’re seeing comes from an incompatibility between NumPy 2.x and some Whisper dependencies that were compiled against NumPy 1.x.

Solution: Downgrade NumPy

You can fix this by downgrading NumPy to version 1.x:

pip install "numpy<2"

Then run Whisper again:

whisper demo.mp4 --model medium --language auto --output_format txt

Hide warning UserWarning: FP16 is not supported on CPU; using FP32 instead

Option 1: Suppress all Python warnings (quick + global)

In your terminal or script, set the environment variable:

PYTHONWARNINGS="ignore" whisper dmeo.mp4 --model medium<br></code>

Or, in Python code:

import warnings

warnings.filterwarnings("ignore")

Option 2: Suppress only that specific warning

If you’re using faster-whisper in Python and want to filter only that one:

import warnings

warnings.filterwarnings(
    "ignore",
    message="FP16 is not supported on CPU; using FP32 instead"
)

Option 3: Patch the library (if you’re comfortable)

You can find the line in the faster_whisper source code (usually in transcribe.py) that issues the warning and comment it out or remove it:

# warnings.warn("FP16 is not supported on CPU; using FP32 instead")

Not recommended unless you maintain the code.

direnv – hide displaying variables

Situation

Running direnv reload, you see something like this:

❯ direnv reload
direnv: loading ~/.envrc
direnv: export +ENV_HOME +ENV_NAME +UV_PROJECT_ENVIRONMENT +VIRTUAL_ENV +VIRTUAL_ENV_PROMPT +VSCODE_HOME ~PATH

Solution

  • Create the file $HOME/.config/direnv/direnv.toml
  • Use this content:
    hide_env_diff = true

Script

#!/usr/bin/env bash

FILE_CONFIG=$HOME/.config/direnv/direnv.toml
FLDR_CONFIG=$(dirname $FILE_CONFIG)

echo "- Create folder $FLDR_CONFIG"
mkdir -p $FLDR_CONFIG

echo "- Create file   $FILE_CONFIG"
echo "  add hide_env_diff = true"
echo "hide_env_diff = true" >$FILE_CONFIG

uv – The new Python Package Manager

Inhaltsverzeichnis

A Developer’s Guide to Simplifying Environment Management

As developers, managing virtual environments is a crucial part of our workflow. With Python projects constantly shifting between dependencies and Python versions, using tools that streamline this process is key. Enter uv: a tool designed to simplify the creation, activation, and management of virtual environments and to manage python packages and projects.

In this post, I’ll introduce you to uv, walk you through its installation, and provide some tips to help you get started.

What is uv?

uv is an extremely fast Python package and project manager, written in Rust. It is a powerful tool that allows developers to manage Python virtual environments effortlessly. It provides functionality to create, activate, and switch between virtual environments in a standardized way.

By using uv, you can ensure that your virtual environments are consistently created and activated across different projects without the need to manually deal with multiple commands.

Why Use uv?

Managing Python projects often involves juggling various dependencies, versions, and configurations. Without proper tooling, this can become a headache. uv helps by:

  • Standardizing virtual environments across projects, ensuring consistency.
  • Simplifying project setup, requiring fewer manual steps to get your environment ready.
  • Minimizing errors by automating activation and management of virtual environments.

Hint

In our examples, before each command you will see our shell prompt:

Don’t type the ❯ when you enter the command. So, when seeing

❯  uv init

just type

uv init

In addition, when we activate the virtual environment, you will see a changed prompt:

✦ ❯ 

Installation and Setup

Getting started with uv is easy. Below are the steps for installing and setting up uv for your Python projects.

1. Install uv

With MacOS or Linux, you can install uv from the website:

❯ curl -LsSf https://astral.sh/uv/install.sh | sh

Alternatively, you can install uv using pip. You’ll need to have Python 3.8+ installed on your system.

❯ pip install uv

2. Create a New Virtual Environment

Once installed, you can use uv to create a virtual environment for your project. Simply navigate to your project directory and run:

❯ uv new

This command will create a new virtual environment inside the .venv folder within your project.

3. Activate the Virtual Environment

After creating the virtual environment, you can easily activate it using the following command:

uv activate

No need to worry about different activation scripts for Windows, Linux, or macOS. uv handles that for you.

4. Install Your Dependencies

Once the environment is active, you can install your project’s dependencies as you normally would:

❯ pip install -r requirements.txt

uv ensures that your dependencies are installed in the correct environment without any extra hassle.

You can also switch to a pyproject.toml file to manage your dependencies.

First you have to initialize the project:

❯ uv init

Then, add the dependency:

❯ uv add requests

Tips with virtual environments

When you create a virtual environment, the corresponding folder should be in your PATH.

Normally this is .venv/bin, when you create it with uv init. This path is added to your $PATH variable when you run uv activate.

But, if you want to choose a different folder, you must set the variable UV_PROJECT_ENVIRONMENT to this path:

❯ mkdir playground
❯ cd playground
❯ /usr/local/bin/python3.12 -m venv .venv/python/3.12
❯ . .venv/python/3.12/bin/activate

✦ ❯ which python
.../Playground/.venv/python/3.12/bin/python

✦ ❯ export UV_PROJECT_ENVIRONMENT=$PWD/.venv/python/3.12
✦ ❯ pip install uv
Collecting uv
  Downloading uv-0.4.25-py3-none-macosx_10_12_x86_64.whl.metadata (11 kB)
Downloading uv-0.4.25-py3-none-macosx_10_12_x86_64.whl (13.2 MB)
   ━━━━━━━━━━━━━━━━━━━━━━━━━━━━━━━━━━━━━━━━ 13.2/13.2 MB 16.5 MB/s eta 0:00:00
Installing collected packages: uv
Successfully installed uv-0.4.25

✦ ❯ which uv
.../Playground/.venv/python/3.12/bin/uv
✦ ❯ uv init
Initialized project `playground`

So, with the default settings, you will get an error because uv is searching the virtual environment in .venv.

✦ ❯ uv add requests
warning: `VIRTUAL_ENV=.venv/python/3.12` does not match the project environment path `.../.venv/python/3.12` and will be ignored

Use the environment variable to tell uv where the virtual environment is installed.

✦ ❯ export UV_PROJECT_ENVIRONMENT=$PWD/.venv/python/3.12

✦ ❯ uv add requests
Resolved 6 packages in 0.42ms
Installed 5 packages in 8ms
 + certifi==2024.8.30
 + charset-normalizer==3.4.0
 + idna==3.10
 + requests==2.32.3
 + urllib3==2.2.3

Tip

Use direnv to automatically set your environment:

  • Set .envrc file:
✦ ❯ . .venv/python/3.12/bin/activate
✦ ❯ export UV_PROJECT_ENVIRONMENT=$PWD/.venv/python/3.12
  • Allow the .envrc file:
✦ ❯ direnv allow

Common uv Commands

Here are a few more useful uv commands to keep in mind:

  • Deactivate the environment: uv deactivate
  • Remove the environment: uv remove
  • List available virtual environments in your project: uv list

Tips for Using uv Effectively

  1. Consistent Environment Names: By default, uv uses .venv as the folder name for virtual environments. Stick to this default to keep things consistent across your projects.
  2. Integrate uv into your CI/CD pipeline: Ensure that your automated build tools use the same virtual environment setup by adding uv commands to your pipeline scripts.
  3. Use uv in combination with pyproject.toml: If your project uses pyproject.toml for dependency management, uv can seamlessly integrate, ensuring your environment is always up to date.
  4. Quick Switching: If you manage multiple Python projects, uv‘s environment activation and deactivation commands make it easy to switch between projects without worrying about which virtual environment is currently active.
  5. Automate Activation: Combine uv with direnv or add an activation hook in your shell to automatically activate the correct environment when you enter a project folder.

Cheatsheet

uv Command Cheatsheet

General Commands

uv newCreates a new virtual environment in the .venv directory.
uv activateActivates the virtual environment.
uv deactivateDeactivates the active virtual environment.
uv removeRemoves the virtual environment in the project.
uv listLists all available virtual environments in the project.
uv installInstalls dependencies from requirements.txt or pyproject.toml.
uv pip [pip-command]Runs a pip command within the virtual environment.
uv python [python-command]Runs a Python command within the virtual environment.
uv shellStarts a new shell session with the virtual environment active.
uv statusShows the status of the current virtual environment.

Working with Dependencies

uv pip install [package]Installs a Python package in the active environment.
uv pip uninstall [package]Uninstalls a Python package from the environment.
uv pip freezeOutputs a list of installed packages and their versions.
uv pip listLists all installed packages in the environment.
uv pip show [package]Shows details about a specific installed package.

Environment Management

uv activateActivates the virtual environment.
uv deactivateDeactivates the active environment.
uv removeDeletes the current virtual environment.
uv listLists all virtual environments in the project.

Cleanup and Miscellaneous

uv cleanRemoves all .pyc and cache files from the project.
uv upgradeUpgrades uv itself to the latest version.

Using Python and Pip Inside Virtual Environment

uv pythonRuns Python within the virtual environment.
uv pip [command]Runs any pip command within the virtual environment.

Helper Commands

uv statusDisplays the current virtual environment status.
uv helpDisplays help about available commands.

More to read

Here is a shot list of websites with documentation or other information about uv:

Vue – Cookbook

Responsive Design

React on Size Change

<script>
export default {
    data() {
        return {
            isMobile: false,
            isDesktop: false,

            windowWidth: window.innerWidth,
            windowHeight: window.innerHeight,
        };
    },

    created() {
        this.updateWindowSize();
        window.addEventListener('resize', this.updateWindowSize);
    },

    methods: {
        updateWindowSize() {
            // console.log("updateWindowSize())");

            this.windowWidth = window.innerWidth;
            this.windowHeight = window.innerHeight;
            this.checkIsMobile();
        },

        checkIsMobile() {
            this.isMobile = this.windowWidth <= 768;
            // console.log(`checkIsMobile(): windowWidth = ${this.windowWidth} isMobile=${this.isMobile}`)
        },

        beforeUnmount() {
            console.log("beforeUnmount()");

            window.removeEventListener('resize', this.updateWindowSize);
        },

    },
};
</script>

Debugging

<script setup>
import {
    onActivated,
    onBeforeMount,
    onBeforeUnmount,
    onBeforeUpdate,
    /*  onCreated, */
    onDeactivated,
    onErrorCaptured,
    onMounted,
    /*  onRenderTracked,*/
    onRenderTriggered,
    onScopeDispose,
    onServerPrefetch,
    onUnmounted,
    onUpdated,
    /*  onWatcherCleanup, */

} from 'vue';

onActivated(() => { console.log('onActivated() called'); });
onBeforeMount(() => { console.log(`onBeforeMount():`) })
onBeforeUnmount(() => { console.log('onBeforeUnmount() called'); });
onBeforeUpdate(() => { console.log(`onBeforeUpdate():`) })
onDeactivated(() => { console.log('onDeactivated() called'); });
onErrorCaptured((err, instance, info) => { console.log('onErrorCaptured() called'); console.error(err); return false; });
onMounted(() => { console.log(`onMounted():`) })
onRenderTriggered((e) => { console.log('onRenderTriggered() called', e); });
onUnmounted(() => { console.log(`onUnmounted():`) })
onUpdated(() => { console.log('onUpdated() called'); });
onScopeDispose(() => { console.log('onScopeDispose() called'); });
onServerPrefetch(() => { console.log('onServerPrefetch() called'); });

</script>

Laravel | Cookbook

Inhaltsverzeichnis

Routing

Alle Routen anzeigen

php artisan route:list

Routen dynamisch erzeugen

composer require illuminate/support
use Illuminate\Support\Facades\File;

function generateRoutes($basePath, $baseNamespace = 'Pages', $routePrefix = '/')
{
    $files = File::allFiles($basePath);

    foreach ($files as $file) {
        $relativePath = str_replace([$basePath, '.vue'], '', $file->getRelativePathname());
        $routeName = str_replace(DIRECTORY_SEPARATOR, '.', $relativePath);
        $routeUri = str_replace(DIRECTORY_SEPARATOR, '/', $relativePath);

        // Example: if file is `resources/js/Pages/Examples/layout-discord.vue`
        // $routeName = 'Examples.layout-discord';
        // $routeUri = 'examples/layout-discord'

        Route::get($routePrefix . $routeUri, function () use ($relativePath, $baseNamespace) {
            return Inertia::render($baseNamespace . str_replace('/', '\\', $relativePath));
        })->name($routeName);
    }
}

generateRoutes(resource_path('js/Pages'));

Mail / SMTP

Lokaler Mailserver für SMTP Testing

MailHog: Web and API based SMTP testing

Vue3 and Laravel + Inertia | Cookbook

Inhaltsverzeichnis

Allgemeines

Vue and CSS

Styling with CSS Variables

<script setup>
const theme = {
    "menu": {
        "background": 'black',
        "item": {
            "background": "green"
        },
        "subitem": {
            "background": "green"
        }
    }
}
</script>
<style scoped>
.menu {
    background-color: v-bind('theme.menu.background');
}

Using PrimeVue

Installation

❯ pnpm add primevue @primevue/themes
❯ pnpm add primevue @primevue/icons

Vue3 | Einstieg

Inhaltsverzeichnis

Allgemeines

Installation

Installation mit der vue-cli

yarn global add @vue/cli
# OR
npm install -g @vue/cli

Neues Projekt erstellen

vue create my-project
# OR
vue ui

Installation mit Vite

Vite

Vite ist ein Build-Tool für die Webentwicklung, das aufgrund seines nativen ES-Modul-Importansatzes eine blitzschnelle Bereitstellung von Code ermöglicht.

Installation mit npm:

npm init @vitejs/app <project-name>
cd <project-name>
npm install
npm run dev

Oder mit Yarn

$ yarn create @vitejs/app <project-name>
$ cd <project-name>
$ yarn
$ yarn dev

Wenn der Projektname Leerzeichen ehthält, kann es zu Fehlern kommen. Dann hilft das nachfolgende Kommando

$ create-vite-app <project-name>

Vue Frameworks

Description:

GroupLink TextURLDescriptionDetailsAdvantages
UI FrameworkVuetifyhttps://next.vuetifyjs.com/Material design component framework for Vue 3.Rich in features and components.Highly customizable, extensive components, material design.
UI FrameworkQuasarhttps://quasar.dev/Build responsive websites, mobile, and desktop apps using a single codebase with Vue 3.All-in-one framework for web, mobile, and desktop apps.Cross-platform, fast development, rich ecosystem.
UI FrameworkElement Plushttps://element-plus.org/Enterprise-ready UI component library for Vue 3.Popular in the Chinese market, enterprise-friendly.Well-documented, easy to use, comprehensive components.
UI FrameworkNaive UIhttps://www.naiveui.com/Minimalistic and customizable component library for Vue 3.Lightweight and easy to integrate.Customizable, lightweight, modern.
UI FrameworkPrimeVuehttps://primefaces.org/primevue/Rich set of customizable UI components for Vue 3.Comes with many pre-built themes and components.Wide variety of components, responsive, many themes.
UI FrameworkAnt Design Vuehttps://2x.antdv.com/Vue 3 implementation of the Ant Design UI library.Well-suited for professional and enterprise-grade apps.Clean, professional design, extensive components.
UI FrameworkBootstrapVue 3https://bootstrap-vue.org/Bootstrap-based Vue 3 components.Based on Bootstrap for familiarity.Bootstrap ecosystem, responsive, familiar grid system.Lacks some modern UI components compared to newer libraries.
RoutingVue Routerhttps://router.vuejs.org/Official Vue 3 router for single-page applications.Powerful and flexible routing.Seamless integration with Vue 3, dynamic routing, nested routes.Requires setup for advanced features (SSR, lazy loading).
State ManagementPiniahttps://pinia.vuejs.org/Lightweight, intuitive state management library for Vue 3.Vuex alternative with Composition API support.Simple API, modular, Composition API support, easy to learn.Limited ecosystem compared to Vuex.
State ManagementVuexhttps://vuex.vuejs.org/Official state management library for Vue.js, compatible with Vue 3.Centralized state management for Vue apps.Well-supported, battle-tested, great for large apps.Can be complex for small applications, more boilerplate.
Build ToolVitehttps://vitejs.dev/Fast build tool with native support for Vue 3.Modern alternative to Webpack, optimized for Vue 3.Super fast builds, modern JavaScript support, HMR.Still evolving, lacks plugins compared to Webpack.
Build ToolVue CLIhttps://cli.vuejs.org/CLI to scaffold and manage Vue.js applications, supports Vue 3.Long-standing, mature build tool.Easy to use, integrates well with Vue ecosystem, powerful plugins.Slower build times compared to Vite.
Dev ToolsVue Devtoolshttps://devtools.vuejs.org/Browser extension for debugging Vue.js applications.Essential for Vue development.Powerful debugging, time-travel debugging, component inspection.Can slow down large apps in development mode.
Meta FrameworkNuxt 3https://v3.nuxtjs.org/Vue 3 meta-framework for SSR and static site generation.Built on Vue 3, optimized for server-side rendering.SSR, static site generation, auto-routing, great SEO support.More complex setup, slower build times than SPAs.
Utility LibraryVueUsehttps://vueuse.org/Collection of essential Vue 3 composition utilities.Focused on utility functions for the Composition API.Makes Vue Composition API easier, reusable functions.Only useful for Composition API users, lacks official support.
Data FetchingApollo Vuehttps://apollo.vuejs.org/A Vue 3 integration for building GraphQL-powered applications.Full-featured GraphQL client for Vue 3.Great GraphQL support, works well with Vue, powerful querying.Heavyweight, more setup required for small projects.
Data FetchingVue Queryhttps://vue-query.vercel.app/Data-fetching and state management library, similar to React Query, for Vue 3.Simplifies API data-fetching and caching.Easy API, great for handling remote data, caching, and synchronization.Less support for large data models compared to Vuex.
ValidationVuelidatehttps://vuelidate-next.netlify.app/Validation library for Vue 3 with support for the Composition API.Composition API-based validation.Lightweight, easy to integrate, simple to use.Not as feature-rich as some alternatives (like VeeValidate).
Form HandlingFormKithttps://formkit.com/Robust form management and validation for Vue 3.Advanced form management with full validation support.Extensive features for forms, great validation handling.Overkill for simple forms, can increase bundle size.
UI FrameworkIonic Vuehttps://ionicframework.com/docs/vue/Build cross-platform mobile apps with Vue 3 and Ionic.Optimized for mobile development.Cross-platform, mobile-first components, easy PWA integration.Can feel bloated for web-only applications.
UI FrameworkVue 3 Materialhttps://vuematerial.io/Material Design 3 component library for Vue 3.Material Design components for Vue 3.Simple to use, clean material design.Fewer components compared to other material design libraries like Vuetify.
UI FrameworkVuestic UIhttps://vuestic.dev/UI library for building accessible, fully customizable interfaces with Vue 3.Focused on accessibility and customization.Highly customizable, lightweight, accessible out of the box.Smaller community and ecosystem.
UI FrameworkDevExtreme Vuehttps://js.devexpress.com/Overview/Vue/Enterprise-ready Vue 3 components for data-heavy applications.Optimized for enterprise and data-heavy apps.Great data components, enterprise-grade, responsive.Commercial product, steeper learning curve.
TestingVue Test Utilshttps://test-utils.vuejs.org/Official unit testing library for Vue components.Built for Vue component testing.Official testing library, well-supported, integrates with Jest and Mocha.Can be challenging for complex components.
TestingCypresshttps://www.cypress.io/End-to-end testing framework for web applications, supports Vue 3.Easy-to-use end-to-end testing tool.Real browser testing, powerful debugging tools, great for Vue 3 apps.Requires real browser setup, slower than unit testing.
TestingJesthttps://jestjs.io/JavaScript testing framework with Vue 3 support via vue-jest.Popular testing framework in JavaScript.Fast, easy to configure, great Vue 3 support.Configuration required for Vue 3 with vue-jest.
AnimationGSAP Vue 3https://greensock.com/docs/v3/Installation?ref=platformsVue 3 integration for creating animations with GSAP (GreenSock Animation Platform).Leading animation library with Vue 3 integration.High-performance animations, extensive feature set, works well with Vue 3.Can add to the complexity and size of your app if overused.
Data VisualizationVue Chart 3https://vuechartjs.org/Charting library for Vue 3 built on Chart.js.Chart.js integration for Vue 3.Easy to use, lightweight, built on the popular Chart.js.Limited to what Chart.js supports, not as flexible as some other charting libraries.
TestingVitesthttps://vitest