cobc --version
cobc (GnuCOBOL) 2.2.0
Copyright (C) 2017 Free Software Foundation, Inc.
License GPLv3+: GNU GPL version 3 or later <http://gnu.org/licenses/gpl.html>
This is free software; see the source for copying conditions.  There is NO
warranty; not even for MERCHANTABILITY or FITNESS FOR A PARTICULAR PURPOSE.
Written by Keisuke Nishida, Roger While, Ron Norman, Simon Sobisch, Edward Hart
Built     Oct 15 2019 14:14:21
Packaged  Sep 06 2017 18:48:43 UTC
C version "4.2.1 Compatible Apple LLVM 11.0.0 (clang-1100.0.33.8)"
First Steps
Create sample programm
Create Hello World programm hello_world.cob
HELLO * HISTORIC EXAMPLE OF HELLO WORLD IN COBOL
       IDENTIFICATION DIVISION.
       PROGRAM-ID. HELLO.
       PROCEDURE DIVISION.
           DISPLAY "HELLO, WORLD".
           STOP RUN.
Werden Daten angeliefert, in denen das Gruppierungsmerkmal in den Zeilen vorhanden ist und somit mehrere Zeilen pro Datensatz vorhanden, wünscht man sich meist eine kompaktere Darstellung.
Für den Datensatz mit dem Wert “Daten 1” werden also vier Zeilen mit unterschiedlichen Werten in GRUPPE und Wert angeliefert.
Gewünscht ist aber eine kompaktere Darstellung mit den vorhandenen Gruppen als Spalten:
Die Aufgabenstellung ist somit die Umwandlung der angelieferten Daten:
Eine Beispieldatei liegt hier. Das Endergebnis liegt hier. Speichern sie beide Datein im Order C: \TMP, dann stimmt der Verweis in Query.xlsx auf die Daten Daten.xlsx.
Schritt 1: Daten vorbereiten
Im ersten Schritt erstellen wir eine neue Excel-Daten und greifen auf die vorbereiteten Daten über Power Query zu.
Wählen Sie dazu im Register Daten den Eintrag Daten abrufen / Aus Datei / Aus Arbeitsmappe und selektieren sie die gewünschte Datei:
= Table.TransformColumnNames(#"Removed Other Columns", each Text.Combine(
                    Splitter.SplitTextByCharacterTransition({"a".."z"},{"A".."Z"})(_), " "))
Daten transformieren
Zeilen gruppenweise pivotieren
Aufgabenstellung
Werden Daten angeliefert, in denen das Gruppierungsmerkmal in den Zeilen vorhanden ist und somit mehrere Zeilen pro Datensatz vorhanden, wünscht man sich meist eine kompaktere Darstellung.
Für den Datensatz mit dem Wert “Daten 1” werden also vier Zeilen mit unterschiedlichen Werten in GRUPPE und Wert angeliefert.
Gewünscht ist aber eine kompaktere Darstellung mit den vorhandenen Gruppen als Spalten:
Die Aufgabenstellung ist somit die Umwandlung der angelieferten Daten:
Eine Beispieldatei liegt hier. Das Endergebnis liegt hier. Speichern sie beide Datein im Order C: \TMP, dann stimmt der Verweis in Query.xlsx auf die Daten Daten.xlsx.
Schritt 1: Daten vorbereiten
Im ersten Schritt erstellen wir eine neue Excel-Daten und greifen auf die vorbereiteten Daten über Power Query zu.
Wählen Sie dazu im Register Daten den Eintrag Daten abrufen / Aus Datei / Aus Arbeitsmappe und selektieren sie die gewünschte Datei:
.\using_parameter.ps1 : Ein Parameter mit dem Namen "Debug" wurde mehrfach für den Befehl definiert.
In Zeile:1 Zeichen:1
+ .\using_parameter.ps1
+ ~~~~~~~~~~~~~~~~~~~~~
    + CategoryInfo          : MetadataError: (:) [], MetadataException
    + FullyQualifiedErrorId : ParameterNameAlreadyExistsForCommand
Using Jenkins as an automation server for your development, you can automate such repeating tasks as testing and deploying your app.
Starting with a sample Groovy App (a simple calculator) with tests, you will learn how to integrate your app in Jenkins and build a pipeline, so that Jenkins runs the desired tasks every time, you change the code.
You should clone the demo repository into you demo account, because you may change some file during this post., and you will not get write permissions for the demo repository.
Also, clone the repository to your local machine to see what our demo app looks like.
$ cd SampleApp_GroovyCalculator/
$ ls
Jenkinsfile README.md bin build.gradle gradlew src
Makefile SampleCalculator build gradle settings.gradle
The first task, Jenkins will do in our pipeline: build your app
$ ./gradlew build
Because it’s the first time you start gradlew, the required software will be downloaded:
First: the current Gradle Version (Gradle is the Build Tool used by Groovy Projects)
Downloading https://services.gradle.org/distributions/gradle-6.2.1-bin.zip
………10
Welcome to Gradle 6.2.1!
Here are the highlights of this release:
- Dependency checksum and signature verification
- Shareable read-only dependency cache
- Documentation links in deprecation messages
For more details see https://docs.gradle.org/6.2.1/release-notes.html
Starting a Gradle Daemon, 2 stopped Daemons could not be reused, use --status for details
After this, your app will be tested
> Task :test
Calculator02Spec > two plus two should equal four PASSED
Calculator01Spec > add: 2 + 3 PASSED
Calculator01Spec > subtract: 4 - 3 PASSED
Calculator01Spec > multiply: 2 * 3 PASSED
BUILD SUCCESSFUL in 34s
5 actionable tasks: 5 executed
Perform the build again
No download is required. The build is much quicker.
mvn -U archetype:generate -Dfilter="io.jenkins.archetypes:global-configuration-plugin"
[INFO] Scanning for projects...
Downloading from central: https://repo.maven.apache.org/maven2/org/apache/maven/plugins/maven-metadata.xml
Downloading from central: https://repo.maven.apache.org/maven2/org/codehaus/mojo/maven-metadata.xml
Downloaded from central: https://repo.maven.apache.org/maven2/org/apache/maven/plugins/maven-metadata.xml (14 kB at 32 kB/s)
Downloaded from central: https://repo.maven.apache.org/maven2/org/codehaus/mojo/maven-metadata.xml (20 kB at 44 kB/s)
Downloading from central: https://repo.maven.apache.org/maven2/org/apache/maven/plugins/maven-archetype-plugin/maven-metadata.xml
Downloaded from central: https://repo.maven.apache.org/maven2/org/apache/maven/plugins/maven-archetype-plugin/maven-metadata.xml (918 B at 18 kB/s)
[INFO]
[INFO] ------------------< org.apache.maven:standalone-pom >-------------------
[INFO] Building Maven Stub Project (No POM) 1
[INFO] --------------------------------[ pom ]---------------------------------
[INFO]
[INFO] >>> maven-archetype-plugin:3.1.2:generate (default-cli) > generate-sources @ standalone-pom >>>
[INFO]
[INFO] <<< maven-archetype-plugin:3.1.2:generate (default-cli) < generate-sources @ standalone-pom <<<
[INFO]
[INFO]
[INFO] --- maven-archetype-plugin:3.1.2:generate (default-cli) @ standalone-pom ---
[INFO] Generating project in Interactive mode
[INFO] No archetype defined. Using maven-archetype-quickstart (org.apache.maven.archetypes:maven-archetype-quickstart:1.0)
Choose archetype:
1: remote -> io.jenkins.archetypes:global-configuration-plugin (Skeleton of a Jenkins plugin with a POM and an example piece of global configuration.)
Choose a number or apply filter (format: [groupId:]artifactId, case sensitive contains): : 1
Choose io.jenkins.archetypes:global-configuration-plugin version:
1: 1.2
2: 1.3
3: 1.4
4: 1.5
5: 1.6
Choose a number: 5:
[INFO] Using property: groupId = unused
Define value for property 'artifactId': com.examples.jenkins.plugins
Define value for property 'version' 1.0-SNAPSHOT: :
[INFO] Using property: package = io.jenkins.plugins.sample
Confirm properties configuration:
groupId: unused
artifactId: com.examples.jenkins.plugins
version: 1.0-SNAPSHOT
package: io.jenkins.plugins.sample
 Y: : y
[INFO] ----------------------------------------------------------------------------
[INFO] Using following parameters for creating project from Archetype: global-configuration-plugin:1.6
[INFO] ----------------------------------------------------------------------------
[INFO] Parameter: groupId, Value: unused
[INFO] Parameter: artifactId, Value: com.examples.jenkins.plugins
[INFO] Parameter: version, Value: 1.0-SNAPSHOT
[INFO] Parameter: package, Value: io.jenkins.plugins.sample
[INFO] Parameter: packageInPathFormat, Value: io/jenkins/plugins/sample
[INFO] Parameter: version, Value: 1.0-SNAPSHOT
[INFO] Parameter: package, Value: io.jenkins.plugins.sample
[INFO] Parameter: groupId, Value: unused
[INFO] Parameter: artifactId, Value: com.examples.jenkins.plugins
[INFO] Project created from Archetype in dir: /Users/Shared/CLOUD/Kunde.BSH/workspace/SamplePlugin_Config/com.examples.jenkins.plugins
[INFO] ------------------------------------------------------------------------
[INFO] BUILD SUCCESS
[INFO] ------------------------------------------------------------------------
[INFO] Total time:  45.525 s
[INFO] Finished at: 2020-03-01T17:28:27+01:00
[INFO] ------------------------------------------------------------------------
Verify Plugin
 cd com.examples.jenkins.plugins
mvn verify
Run Plugin
mvn hpi:run
Working with Groovy Scripts
Include a common groovy script in Jenkins file
1: Create a common.groovy file with function as needed
def mycommoncode() {
}
2: In the main Jenkinfile load the file and use the function as shown below
node{
   def common = load “common.groovy”
   common.mycommoncode()
}
Basic example of Loading Groovy scripts
File example.groovy
def example1() {
 println 'Hello from example1'
}
def example2() {
 println 'Hello from example2'
}
The example.groovy script defines example1 and example2 functions before ending with return this. Note that return this is definitely required and one common mistake is to forget ending the Groovy script with it.Jenkinsfile
Continuing the demo from the last section, we now put the Groovy code into a callable function in a script called “github.groovy”. Then, in our Jenkinsfile, we proceed to load the script and use the function to process JSON response from Github API.github.groovy
If you follow the first part of this blog topic, you have a running Django dashboard.
But, the content ist still static. Lets review the current state:
Prepare our Django project
Right now, the whole content of our Django project is provided by the dashboard template
dashboard/template/site/base.html
Looking at our web site, you will see the different side menu items. So, intentionally, our web site should display different pages. And each page should provide the dynamic content.
The final goal of this part is to change our web app, so that each side item navigates us to a different page. For this, we have to take care about two things:
Navigation: how to we get to another page in our app
Project Structure: where to place the required components for each page
Basics of Navigation
Navigation usually is the process of getting from one page to another by clicking on a link.
So, we need to things:
the source page, containing the link
the destination page
the link, pointing to the destination page
Let’s take a look into the site template with the side menu:
Linking to a html page is not possible, because Django does not work with html pages. Navigation in Django works with urls (in urls.py) and views in (views.py).
We must replace the html link tag (<a href="buttons.html">) with an Django-conform code. Read here for more details and the basics.
The idea behind the navigation is
Define the needed links
/buttons
Give each link a name
“buttons”
Define, which view to call for this link
components/buttons/views.py
Tell Django, how to insert this link in a html page
<a href="{
With this in mind, we change our site template for the side navigation (e. g. for the components menu):
But, if you save the template and try to view the web page, you will see this error:
We missed to tell Django, what to do when the corresponding link for this name is requested. We have to tell Django to use the view defined in buttons/views.py to generate the resulting view/page.
So, change the global url mapping file dashboard/urls.py
Each template base.html should have the following content:
{
{
{
And each corresponding view.py file should have the following content, only the template_name should be different (the name of the template base.html file)
from django.views import generic
class IndexView(generic.TemplateView):
template_name = 'buttons/base.html'
So, for each template file, we have to
locate the corresponding html file from the install folder (see table above)
copy the content between these tags to the template file:
If you follow the first part of this blog topic, you have a running Django dashboard.
But, unfortunately, the content is still static. Let’s review the current state:
Perfect. We are done with the basic setup.
Still, some work to do, because our dashboard is only a static dashboard. All content is programmed in the dashboard template file dashboard/templates/site/sb-admin-2/base.html
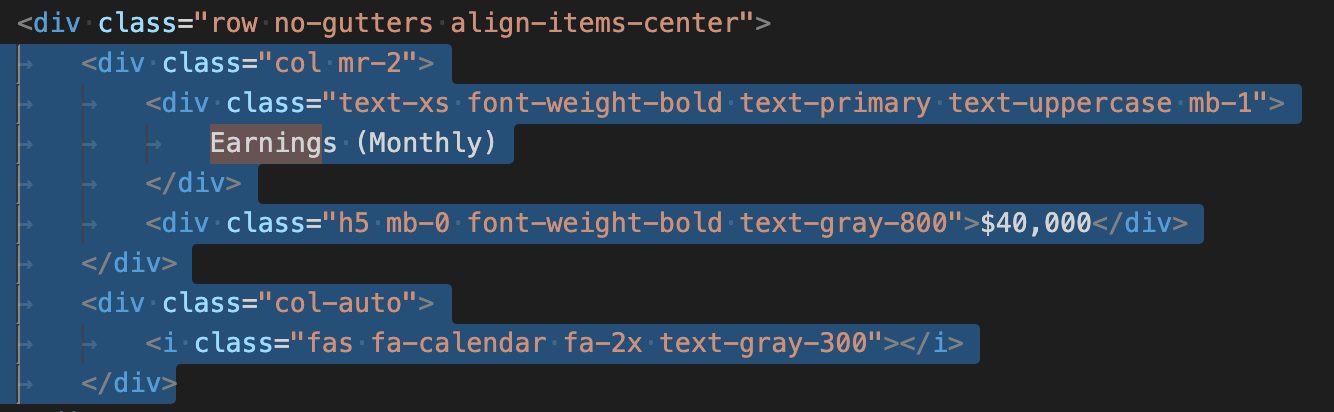
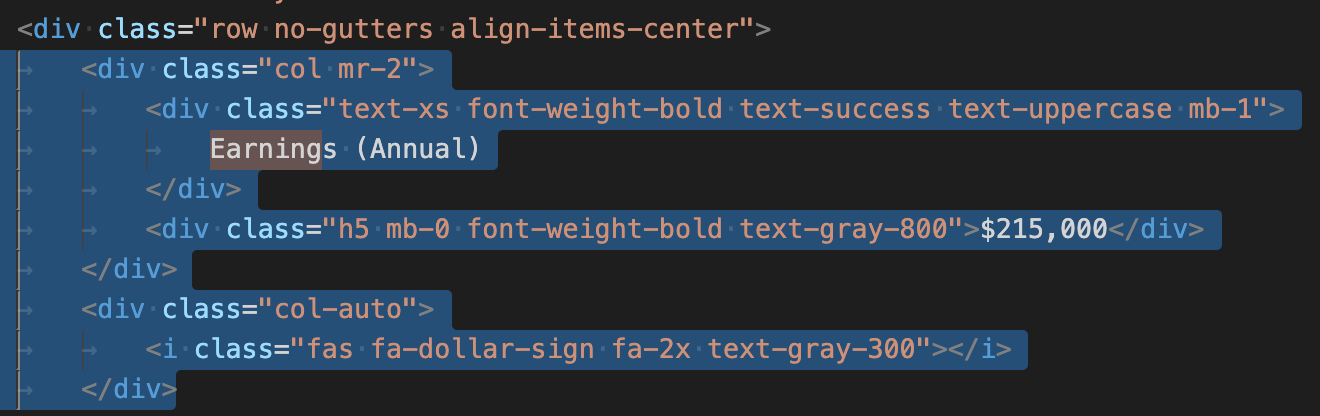
For example, look at the cards with the earnings at the top:
To achieve a more dynamic content, we need to move the desired parts of the dashboard from the template file to the frontend view file.
We will do this by following these steps:
Identify the dynamic parts
Move these parts from the template into for frontend view template index.html
Modify frontend view.py to generate dynamic content from data
Identify dynamic parts
How to find the parts, which are dynamic.
One way is to ask:
Which parts should be on every page (unchanged) and
What should change on every page
You mostly get the same answers by the question:
What are the main components of a web page (including navigation and content)
For answer the first question, take a look at the current page and “name” the areas:
So, these “names” are also the answer for the 3. Question:
sidemenu
top bar
content
And maybe you find additional “names”
header
footer
top menu
left and right sidebar
Find identified parts in template
Next step is, to find the identified parts in our dashboard template
dashboard/templates/site/sb-admin-2/base.html
This is an easy step, because the developer of the SB Admin 2 template documented their template well:
Looking into the code of the template, you will find comment lines describing the content:
<!-- Sidebar -->
<!-- Topbar -->
<!-- Top Search -->
<!-- Top Navbar -->
<!-- Begin Page Content-->
So, it is obvious what do to next:
get the dynamic part (lines under)<!-- Begin Page Content--> the green box in the following image
move it to the frontend template
place some information in the dashboard template, that the real content should be displayed here the blue curly braces in the following image
This is the way, the template system of django works:
Let’s explain this with a simple example: the page title
We declare a title (which should be considered as the default title). And in the frontend page, we declare the title for this page (the frontend page).
To achieve this, we have to tell our template system the following:
Now, we do the same with the content:
Looking at our resulting page, nothing changes. This is the desired result, but how could we be sure, that we really change the structure?
Well, let’s make a test and try to include a different content in the dashboard template.
Change the lines, where we include the content into this:
{
MISSING CONTENT
{
Did you notice the other name of the content: content_missing?
Change the template, save the file and have a look at the result:
Change content back, so your template is working again:
{
MISSING CONTENT
{
The final step in Part 3 will be replacing all static content of the dashboard with dynamic content.
We use cookies on our website to give you the most relevant experience by remembering your preferences and repeat visits. By clicking “Accept All”, you consent to the use of ALL the cookies. However, you may visit "Cookie Settings" to provide a controlled consent.
This website uses cookies to improve your experience while you navigate through the website. Out of these, the cookies that are categorized as necessary are stored on your browser as they are essential for the working of basic functionalities of the website. We also use third-party cookies that help us analyze and understand how you use this website. These cookies will be stored in your browser only with your consent. You also have the option to opt-out of these cookies. But opting out of some of these cookies may affect your browsing experience.
Necessary cookies are absolutely essential for the website to function properly. These cookies ensure basic functionalities and security features of the website, anonymously.
Cookie
Duration
Description
cookielawinfo-checkbox-analytics
11 months
This cookie is set by GDPR Cookie Consent plugin. The cookie is used to store the user consent for the cookies in the category "Analytics".
cookielawinfo-checkbox-functional
11 months
The cookie is set by GDPR cookie consent to record the user consent for the cookies in the category "Functional".
cookielawinfo-checkbox-necessary
11 months
This cookie is set by GDPR Cookie Consent plugin. The cookies is used to store the user consent for the cookies in the category "Necessary".
cookielawinfo-checkbox-others
11 months
This cookie is set by GDPR Cookie Consent plugin. The cookie is used to store the user consent for the cookies in the category "Other.
cookielawinfo-checkbox-performance
11 months
This cookie is set by GDPR Cookie Consent plugin. The cookie is used to store the user consent for the cookies in the category "Performance".
viewed_cookie_policy
11 months
The cookie is set by the GDPR Cookie Consent plugin and is used to store whether or not user has consented to the use of cookies. It does not store any personal data.
Functional cookies help to perform certain functionalities like sharing the content of the website on social media platforms, collect feedbacks, and other third-party features.
Performance cookies are used to understand and analyze the key performance indexes of the website which helps in delivering a better user experience for the visitors.
Analytical cookies are used to understand how visitors interact with the website. These cookies help provide information on metrics the number of visitors, bounce rate, traffic source, etc.
Advertisement cookies are used to provide visitors with relevant ads and marketing campaigns. These cookies track visitors across websites and collect information to provide customized ads.