Developer Blog

Tipps und Tricks für Entwickler und IT-Interessierte

Flask | Cookbook

Installation

$ pip install flask
$ flask --version
Python 3.7.3
Flask 1.1.1
Werkzeug 0.15.5

Creating a App

Create base python script app.py

from flask import Flask

app = Flask(__name__)

@app.route('/')
def example():
   return '{"name":"Bob"}'

if __name__ == '__main__':
    app.run()

Start Flask

flask run
 * Environment: production
   WARNING: This is a development server. Do not use it in a production deployment.
   Use a production WSGI server instead.
 * Debug mode: off
 * Running on http://127.0.0.1:5000/ (Press CTRL+C to quit)
127.0.0.1 - - [01/Aug/2019 12:19:00] "GET / HTTP/1.1" 200 -
127.0.0.1 - - [01/Aug/2019 12:19:00] "GET /favicon.ico HTTP/1.1" 404 -

Jekyll | Cookbook

Working with Arrays

Define the array

---
layout: post
title:  "Universe"
date:   2019-06-17 10:00:00
planets:
    - mercury 
    - venus
    - earth

Access the array

    <a href="https://{{planet}}.universe}">{{planet}}</a>


Liquid

Links

https://github.com/Shopify/liquid/wiki/Liquid-for-Designers#optional-arguments

Code Snippets

for-loop-sorted-collection

<ul>
    
    
    <li>{{ item.title }}</li>
    
</ul>


Code Snippets and recieps

https://gist.github.com/ryerh/b2fa73829f1b7b1c39988f09a65eb227

SAS | Cookbook

Handling data

Split fields

Data Cleaning


Filter out by value of an entry

if prxmatch('/^(TST|TEST|ek-test-)/', USERNAME) then
   output &_TSTDSN.;            
else
   output &_OUTDSN.;

Linux | Cookbook

Run file without execute permission

$ /lib64/ld-2.17.so ./chmod +x ./chmod

Copy permissions from other file

$ getfacl /bin/ls | setfacl --set-file=- thefile

Change permissions with rsync

$ rsync thefile tmp/thefile --chmod=ugo+x

Jupyter | Cookbook

Cookbook

Customize start dir

$ jupyter notebook --generate-config<br>
Writing default config to: /Users/demo/.jupyter/jupyter_notebook_config.py

Search for the following line in the file

#c.NotebookApp.notebook_dir = ''

Replace by

c.NotebookApp.notebook_dir = '†/the/path/to/home/folder/'

Change password

jupyter lab password

Free online Notebooks

https://notebooks.azure.com/

https://nbviewer.jupyter.org/

https://colab.research.google.com/notebooks/welcome.ipynb

Zsh | Cookbook

Useful tips

Speed-up zsh start

Depending on the way, you install zsh, the installation process clones git-repositories to your home folder $HOME.

Starting zsh does at one point check files git ‘git ls-files’. So, if you have a lot of files and folders in your home directory, this will take some time.

If you want to speedup the start, create a .gitignore file in your home an include all files with not relations to zsh, e.g. .npm, .ssh or .Trash.

Customize Zsh Prompt

Powerlevel9k

Installation on mac OS

Install

$ brew tap sambadevi/powerlevel9k
$ brew install powerlevel9k

Add Themes to .zshrc

. /usr/local/opt/powerlevel9k/powerlevel9k.zsh-theme

Install on macx OS to use in Oh-My-Zsh

To install this theme for use in Oh-My-Zsh, clone this repository into your OMZ custom/themesdirectory.

$ git clone https://github.com/bhilburn/powerlevel9k.git ~/.oh-my-zsh/custom/themes/powerlevel9k

You then need to select this theme in your ~/.zshrc:

ZSH_THEME="powerlevel9k/powerlevel9k"

Links and Resources

Zsh with Powerlevel9K — Power up your terminal‘s colour scheme and productivity level

Git | Cookbook

Github hints

Repository — Quick setup

Clone repository

.. or create a new repository on the command line

echo "# Init " >> README.md
git init
git add README.md
git commit -m "first commit"
git remote add origin <url>
git push -u origin master

…or push an existing repository from the command line

git remote add origin git@github.com:<username>/<repository>.git
git push -u origin master

Merge branch with master

Merging via command line

Step 1: From your project repository, bring in the changes and test.

git fetch origin
git checkout -b develop origin/develop
git merge master

Step 2: Merge the changes and update on GitHub.

git checkout master
git merge --no-ff develop
git push origin master

Useful commands

To show information about a remote, for example if tracked branches are up-to-date:

git remote show origin
git remote -v
git remote add <shortname> <url>
git fetch <remote>
git push <remote> <branch>
git remote show <remote>
git remote rename <old> <new>
git remote remove <name>

To show log messages of the changes between branches:

git log origin/master ^master

Show log graph

git log --pretty=format:


To show differences between branches:

$ git diff master origin/master

Show , what git pull will doing

$ git fetch && git diff HEAD..@{u}

Or add the command to ~/.gitconfig file:

[alias]
        diffpull=!git fetch && git diff HEAD..@{u}

Run this to see how git diff resolution works

git rev-parse origin

Delete remote branch

git clone <repository> master
cd master
git push origin --delete feature-2.01.03

Show log

git log --oneline --graph --all --decorate

Undo commit

git commit --amend

Unstaging a staged file

git reset HEAD <filename>

Unmodifying a Modified File

$ git checkout -- <filename>

Retrieve last modification date

git ls-files -z | xargs -0 -n1 -I{} -- git log -1 --format=


Git Configuration

Show location of configuration files

git config --list --show-origin

This dows not work, if you have set the environment var GIT_CONFIG. In this case, do

unset GIT_CONFIG
git config --global --list

Edit config files

git config --edit --global
git config --edit --system
DESCRIPTIONGIT COMMAND
Configure the author name to be used with your commits.git config --global user.name "XXX"
Configure the author email address to be used with your commitsgit config --global user.email xxx@example.com
Will remove user credential details from the repositorygit config --local credential.helper ""
git config —show-origin
List all currently configured remote repository URLsgit remote -v
If you haven’t connected your local repository to a remote server, To add a remote server to a local repositorygit remote add origin <repo_url>

Git Commit and Push

DESCRIPTIONGIT COMMAND
Create a file name README.md with Readme content contentecho "Readme content" >> README.md
List the files you’ve changed and those you still need to add or commitgit status
Add all or one file to staginggit add . OR git add file_name
Commit changes to head with messagegit commit -m 'message'
Commit any files you’ve added with git add, and also commit any files you’ve changed since thengit commit -a
Send all commits from local repository to remote repositorygit push
Do a git push and sets the default remote branch for the current local branch. So any future git pull command will attempt to bring in commits from the <remote-branch>into the current local branchgit push -u <remote-branch>
Send changes to the master branch of your remote repositorygit push origin master
Push a specific branch to your remote repositorygit push origin <branch_name>
Push all branches to your remote repositorygit push --all origin

Working with the Git Workflow

The following steps are based on a branching model, described here.

Name Beschreibung
master
hotfixes
release
develop
feature

Working with branches

Create branch ‘develop’

$ git clone git@github.com:<USER>/<REPO>.git develop
$ cd develop
$ git checkout -b develop
$ git push --set-upstream origin develop

Create branch ‘feature-xxx’

We dont’t want do clone the whole repository, but only the files needed for the feature

$ git clone -b develop -n --depth 1 git@github.com:<USER>/<REPO>.git feature-2.2.0
$ cd feature-2.2.0

Branch löschen

$ git push origin -delete hotfix-1.2.1-compress-data

Workflow – Cheatsheet

Working with branches

How to rename git local and remote branches

Check out branch with old name

git checkout feature-2.1.2

Rename branch

git branch -m feature-2.01.02

Checkin branch with new name

git push origin :feature-2.1.2 feature-2.01.02

1. Rename your local branch.

If you have named a branch incorrectly AND pushed this to the remote repository follow these steps before any other developers get a chance to jump on you and give you shit for not correctly following naming conventions.

If you are on the branch you want to rename:

git branch -m new-name

If you are on a different branch:

git branch -m old-name new-name

2. Delete the old-name remote branch and push the new-name local branch.

git push origin :old-name new-name

3. Reset the upstream branch for the new-name local branch.Switch to the branch and then:

git push origin -u new-name

Or you as a fast way to do that, you can use these 3 steps: command in your terminal

git branch -m old_branch new_branch         # Rename branch locally    
git push origin :old_branch                 # Delete old branch    
git push --set-upstream origin new_branch   # Push new branch, set local branch to track new remote
Neues Feature erstellen
Repository clonen$ git checkout -b feature-1.2.2 develop
Änderungen durchführen
Änderungen einchecken$ git checkout develop
$ git merge –no-ff feature-1.2.2
$ git branch -d feature-1.2.2
$ git push origin develop
Neuen Hotfix erstelllen
Repository auschecken$ git checkout -b hotfix-1.2.1 master
Änderungen durchführen
Änderungen einchecken$ git commit -a -m “hotfix: hotfix-1.2.1| compress mart”
Hotfix beenden$ git checkout master
$ git merge –no-ff hotfix-1.2.1
$ git tag -a 1.2.1
Hotfix in Master einchecken$ git checkout develop
$ git merge –no-ff hotfix-1.2.1  
Hotfix Branch entfernen$ git branch -d hotfix-1.2.1
Neues Release erstellen:
Repository clonen$ git checkout -b release-1.2 develop
Änderungen durchführen
Änderungen einchecken$ git commit -a -m “release: changes for release 1.2”
Release beenden$ git checkout master
$ git merge –no-ff release-1.2
$ git tag -a 1.2

Git Flow

Initialize

Start using git-flow by initializing it inside an existing git repository:

$ git flow init

Start a new feature

Development of new features starting from the ‘develop’ branch.

git flow feature start MYFEATURE

Finish up a feature

Finish the development of a feature. This action performs the following

git flow feature finish MYFEATURE

Publish a feature

Publish a feature to the remote server so it can be used by other users.

git flow feature publish MYFEATURE

Getting a published feature

Get a feature published by another user.

git flow feature pull origin MYFEATURE

You can track a feature on origin by using

git flow feature track MYFEATURE

Start a release

git flow release start RELEASE [BASE]

It’s wise to publish the release branch after creating it to allow release commits by other developers. Do it similar to feature publishing with the command:

git flow release publish RELEASE

(You can track a remote release with the 
git flow release track RELEASEcommand)

Finish up a release

git flow release finish RELEASE

Don’t forget to push your tags with git push origin --tags

Hotfixes

git flow hotfix start VERSION [BASENAME]

Finish a hotfix

git flow hotfix finish VERSION

Usefull commands

basic commandsdescription
git init
git status  [ -s ]status of files and local repo
git ls-filesshow files which are tracked by git
git log [ –oneline ]
git log [–oneline –graph –decorate –all]
shows commit history
git add <changed file>
git add .git add -u
add single file to indexadd all files from the workspace to indexstage current workspace into index to cleanup inconsistencies
git commit [ -m ‘message’ ]commit into local repo only
git push -u origin masterpush the repo from local to remote repo
git help [option]get help page for specific options
git config –global alias.bla “command”
git bla [– <filename>]
set alias bla to a specific commandexec alias (for specific file)
git mv fileA fileB
git commit -m “…..”
rename fileA to fileBand commit
git rm fileC
git commit -m “…..”
delete fileCand commit
advanced commandsdescription
git reset HEAD <filename>undo changes from index back to workspace
git checkout <filename>
git checkout master
git checkout <branchname>
checkout single file from local repo to workspacecheckout/switch to the master branchcheckout/switch to another branch
git checkout -b <new branchname>
git branch <new branchname>
create new branch and switch to it immediatelycreate new branch in the background, doesn’t switch to it
git branchshows all available branches
git diff
git difftool
show differences of local and committed file
shows diff in vimdiff
git merge <other branch>
git mergetool
merge other branch into master (current branch)manage the different files in vimdiff
git branch -d <branchname>delete branch (does NOT include merge)
git branch -m <new name>rename a
$ git diff master..developmentcompare two branches
git tag <mytag>
git tag -a v1.0 -m “description”
git show v1.0
add an additional label/tag to a branchannotation tag with release informationshows details of tag v1.0
git stash
git reset <ID> [–soft | –mixed | –hard]
git reflog ….
git fetch ….update local repo with changes from remote repo. (non destructive)
git pull …update local repo with changes from remote repo. it does effectively a fetch and merge in one command
git clone https://<username>:<token>@github.com/<organisation-space>/<repository>
download the remote repo into local workspace
git remote -v
git remote show origin
shows url of remote reposhows detail infos of a remote repo
.gitignorecontains filename to exclude from git

Git Workflow

Release

Creating a release branch

Release branches are created from the develop branch. For example, say version 1.1.5 is the current production release and we have a big release coming up. The state of developis ready for the “next release” and we have decided that this will become version 1.2 (rather than 1.1.6 or 2.0). So we branch off and give the release branch a name reflecting the new version number:

$ git checkout -b release-1.2 develop

After creating a new branch and switching to it, we bump the version number. Here, bump-version.sh is a fictional shell script that changes some files in the working copy to reflect the new version. (This can of course be a manual change—the point being that some files change.) Then, the bumped version number is committed.

This new branch may exist there for a while, until the release may be rolled out definitely. During that time, bug fixes may be applied in this branch (rather than on the developbranch). Adding large new features here is strictly prohibited. They must be merged into develop, and therefore, wait for the next big release.

$ ./bump-version.sh 1.2<br>
$ git commit -a -m "Version 1.2"

Finishing a release branch 

$ git checkout master
$ git merge --no-ff release-1.2
$ git tag -a 1.2
$ git checkout develop
$ git merge --no-ff release-1.2
$ git branch -d release-1.2

When the state of the release branch is ready to become a real release, some actions need to be carried out.

First, the release branch is merged into master (since every commit on master is a new release by definition, remember).

Next, that commit on master must be tagged for easy future reference to this historical version.

Finally, the changes made on the release branch need to be merged back into develop, so that future releases also contain these bug fixes.

$ git checkout master
$ git merge --no-ff release-1.2
$ git tag -a 1.2

The release is now done, and tagged for future reference.

To keep the changes made in the release branch, we need to merge those back into develop, though. In Git:

$ git checkout develop
$ git merge --no-ff release-1.2

This step may well lead to a merge conflict (probably even, since we have changed the version number). If so, fix it and commit.

Now we are really done and the release branch may be removed, since we don’t need it anymore:

$ git branch -d release-1.2

Feature

$ git checkout -b myfeature develop
$ .. do changes...

$ git checkout develop
$ git merge --no-ff myfeature
$ git branch -d myfeature
$ git push origin develop

Creating a feature branch 

When starting work on a new feature, branch off from the develop branch.

$ git checkout -b myfeature develop
Switched to a new branch "myfeature"

Incorporating a finished feature on develop 

Finished features may be merged into the develop branch to definitely add them to the upcoming release:

$ git checkout develop<
$ git merge --no-ff myfeature
$ git branch -d myfeature
$ git push origin develop 

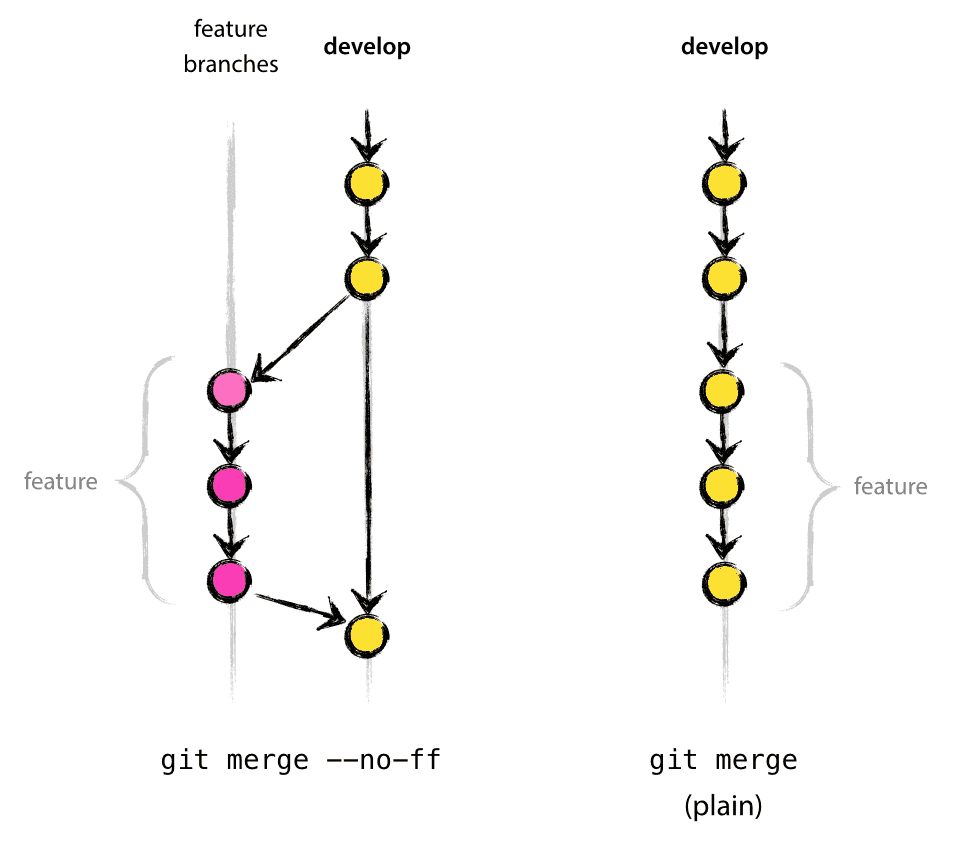
The --no-ff flag causes the merge to always create a new commit object, even if the merge could be performed with a fast-forward. This avoids losing information about the historical existence of a feature branch and groups together all commits that together added the feature.

In the latter case, it is impossible to see from the Git history which of the commit objects together have implemented a feature—you would have to manually read all the log messages. Reverting a whole feature (i.e. a group of commits), is a true headache in the latter situation, whereas it is easily done if the --no-ff flag was used.

Hotfix

$ git checkout -b hotfix-1.2.1 master
$ ... do changes ... 
$ git commit -a -m "Hotfix Version 1.2.1"
$ .. fix bug
$ git commit -m "Fixed severe production problem"

$ git checkout master
$ git merge --no-ff hotfix-1.2.1
$ git tag -a 1.2.1

# incude hotfix into develop
$ git checkout develop
$ git merge --no-ff hotfix-1.2.1

# finally, remove hotfix branch
$ git branch -d hotfix-1.2.1

Troubleshooting

Debugging Github Errors

export GIT_TRACE_PACKET=1
export GIT_TRACE=1
export GIT_CURL_VERBOSE=1

Error Message: Your local changes to the following files would be overwritten by merge:

error: Your local changes to the following files would be overwritten by merge:<br>
        README.md<br>
Please commit your changes or stash them before you merge.

Solution:

$ git fetch origin master
$ git diff origin/master -- [local-path]
$ git add [local-path]
$ gt commit -m "change: in file [local-path]"

fatal: sha1 file ‘<stdout>’ write error: Broken Pipe

When using ssh to connect to the repositoriy, sometime, you got a timeout if you push to many files or if the files are to big

One possible Solution

Configure ssh to use the following value

~/.ssh/config
Host *
     ServerAliveInterval 30
     ServerAliveCountMax 4

git clone: file name to long on windows

git config --system core.longpaths true

git config –global user.email “some@email.com” throws “error: only one config file at a time.

Try to unset GIT_CONFIG and then list your global config with

unset GIT_CONFIG
git config --global --list

Other Links

Useful Git commands for everyday use

10 useful Git commands you always need

Most useful Git commands

Git Cheat Sheet

Useful Git commands

Using local Filesystem as Respository-Master

Preparation

Set environment variables for easy typing

$ REPOS=$HOME/repos

Create Repository

$ mkdir $REPOS
$ cd    $REPOS
$ git init --bare src

Create src folder

$ mkdir $HOME/entw
$ cd    $HOME/entw
$ mkdir src
$ cd    src
$ git init

Create some content

$ touch README.md
$ git add -A
$ git commit -m "initial commit"
$ git remote add origin $REPOS/src
$ git remote -v
$ git push --set-upstream origin master
$ git push origin master

Create clone

$ mkdir $HOME/test
$ cd    $HOME/test
$ git clone $HOME/repos/src
$ cd src
$ ls -al
total 0
drwxr-xr-x   4 user  wheel  128 19 Mär 18:48 .
drwxr-xr-x   3 user  wheel   96 19 Mär 18:48 ..
drwxr-xr-x  12 user  wheel  384 19 Mär 18:48 .git
-rw-r--r--   1 user  wheel    0 19 Mär 18:48 README.md

You will notice, that the file README.md is empty. Because it was ony created with touch.

Add some content to source repository

$ cd $HOME/entw/src
$ echo "# This is the README.md from ENTW" >README.md
$ touch git_update
$ touch git_push
$ ls -al
total 16
drwxr-xr-x   6 user  wheel  192 19 Mär 18:53 .
drwxr-xr-x   3 user  wheel   96 19 Mär 18:43 ..
drwxr-xr-x  12 user  wheel  384 19 Mär 18:47 .git
-rw-r--r--   1 user  wheel   34 19 Mär 18:52 README.md
-rw-r--r--   1 user  wheel    0 19 Mär 18:53 git_push
-rw-r--r--   1 user  wheel    0 19 Mär 18:53 git_update

Add changes to repository

$ git add -A
$ git commit -m "-"
[master 106b27a] -
 3 files changed, 1 insertion(+)
 create mode 100644 git_push
 create mode 100644 git_update
$ git push --set-upstream origin master
Objekte aufzählen: 5, Fertig.
Zähle Objekte: 100% (5/5), Fertig.
Delta-Kompression verwendet bis zu 8 Threads.
Komprimiere Objekte: 100% (2/2), Fertig.
Schreibe Objekte: 100% (3/3), 320 bytes | 320.00 KiB/s, Fertig.
Gesamt 3 (Delta 0), Wiederverwendet 0 (Delta 0)
To ..../repos/src
   7ed6d3b..106b27a  master -> master
Branch 'master' folgt nun Remote-Branch 'master' von 'origin'.

Update clone

$ cd $OME/test/src
$ git pull
# git fetch   # This updates 'remote' portion of local repo. 
# git reset --hard origin/<your-working-branch>
remote: Objekte aufzählen: 5, Fertig.
remote: Zähle Objekte: 100% (5/5), Fertig.
remote: Komprimiere Objekte: 100% (2/2), Fertig.
remote: Gesamt 3 (Delta 0), Wiederverwendet 0 (Delta 0)
Entpacke Objekte: 100% (3/3), Fertig.
Von .../repos/src
   7ed6d3b..106b27a  master     -> origin/master
$ git merge origin/master
Aktualisiere 7ed6d3b..106b27a
Fast-forward
 README.md  | 1 +
 git_push   | 0
 git_update | 0
 3 files changed, 1 insertion(+)
 create mode 100644 git_push
 create mode 100644 git_update
$ ls -al
total 16
drwxr-xr-x   6 user  wheel  192 19 Mär 19:02 .
drwxr-xr-x   3 user  wheel   96 19 Mär 18:48 ..
drwxr-xr-x  14 user  wheel  448 19 Mär 19:02 .git
-rw-r--r--   1 user  wheel   34 19 Mär 19:02 README.md
-rw-r--r--   1 user  wheel    0 19 Mär 19:02 git_push
-rw-r--r--   1 user  wheel    0 19 Mär 19:02 git_update

TODO

See changes before pulling from remote git repositoryf

# fetch the changes from the remote
git fetch origin
# show commit logs of changes
git log master..origin/master
# show diffs of changes
git diff master..origin/master
# apply the changes by merge..
git merge origin/master
# .. or just pull the changes
git pull

You want to push your local files to remote files

git push -f <remote> <branch>
git push -f origin master

Configure Hooks

git config --global core.hooksPath .githooks
mkdir .githooks
cp .git/hooks/* .githooks

commit-msg

#!/bin/sh
#

NAME=$(git rev-parse --abbrev-ref HEAD) 
DESCRIPTION=$(git config branch."$NAME".description)

echo "$NAME"': '$(cat "$1") > "$1"
if [ -n "$DESCRIPTION" ] 
then
   echo "" >> "$1"
   echo $DESCRIPTION >> "$1"
fi

prepare-commit

#!/bin/sh
#

COMMIT_MSG_FILE=$1
COMMIT_SOURCE=$2
SHA1=$3

branchPath=$(git symbolic-ref -q HEAD)
branchName=${branchPath##*/}


if [ -n "$branchName" ]; then
    echo "$branchName | $(cat $1)" > $1
fi
file=$(git config hooks.versionfilename)
if [[ -z $file ]]
then
  file=".version"
fi

# Version number
echo "$(git rev-parse --abbrev-ref HEAD): $(git describe --tags --long)" >$file

exec git add $file

pre-commit

#!/bin/sh

_BRANCHPATH=$(git symbolic-ref -q HEAD)
_BRANCHNAME=${_BRANCHPATH##*/}

_TIMESTAMP="$(date '

echo "HOOK      : $0"
echo "PARAMETER : '$*''"
echo "BRANCHPATH: $_BRANCHPATH"
echo "BRANCHNAME: $_BRANCHNAME"

LOG() {
    [[ "$GIT_COMMIT_DETAILED_LOGGING" == "YES" ]] && echo "LOG: $*"
}

REPLACE()
{
   local _TYP;   _TYP="$1"; shift
   local _TAG;   _TAG="$1"; shift
   local _WITH; _WITH="$1"; shift
   local _FILE; _FILE="$1"; shift

   case "$_TYP" in
      PYTHON)   perl -pi -e 's/(\s*)(__DEPLOY_'${_TAG}'\s*=\s*)(".+")/${1}${2}"'"${_WITH}"'"/' "${_FILE}"
                ;;
      *)        LOG "Undefined typ '$TYP' for file $_FILE"
                ;;
   esac

   rm -f "${_FILE}.bak"
}

LOG "working on branch $_BRANCH"

for _FILE in $(git diff-index --name-status --cached HEAD | grep -v ^D | cut -c3-)
do
    LOG "checking: $_FILE"

    # Only examine known text files
    if [[ "$_FILE" =~ [.](py)$ ]]; then
        LOG "patching: $_FILE"

        REPLACE PYTHON TAG       "$_BRANCHNAME" "$_FILE"
        REPLACE PYTHON TIMESTAMP "$_TIMESTAMP"  "$_FILE"
    fi
done

Get Information

git rev-parse –abbrev-ref HEADget branch namefeature/add-new-content
git symbolic-ref -q HEADrefs/heads/feature/add-new-content
git rev-parse –show-toplevelshow current path of git repository

Config

Change Github repository for local clone

cd <original repository>
git remote set-url origin https://github.com/<new git user>/<new project name>
git push -u origin master

CR/LF Mapping

git config core.autocrlf true
git config --global core.safecrlf false

Create Release

#!/bin/bash

if [ $# -ne 1 ]; then
  echo "Syntax: release [VERSION]"
  exit 1
fi

VERSION=$1

# Create release
git flow release start $VERSION || exit 1
GIT_MERGE_AUTOEDIT=no git flow release finish -m $VERSION $VERSION

# Publish release
git push origin HEAD --tags

# Merge release into develop
git checkout develop
git merge master

Bash | Cookbook

Configure Bash Environment

Using Bash Completion

Add git completion

Download git-completion.bash to $HOME/etc

$ mkdir $HOME/etc
$ cd $HOME/etc
$ wget https://raw.githubusercontent.com/git/git/master/contrib/completion/git-completion.bash

Add git-prompt to .bashrc

. $HOME/etc/git-completion.sh

Add completion for Makefiles

Add this to .bashrc

complete -W "`grep -oE '^[a-zA-Z0-9_.-]+:([^=]|$)' ?akefile | sed 's/[^a-zA-Z0-9_.-]*$//'`" make

Customize Bash prompt

Add git repository/branch to prompt

Download git-prompt.sh to $HOME/etc

$ mkdir -p $HOME/etc
$ cd $HOME/etc
$ wget https://raw.githubusercontent.com/git/git/master/contrib/completion/git-prompt.sh

Add git-prompt to .bashrc

. $HOME/etc/git-prompt.sh

Configure prompt to display git branch

export PS1='[\033[33;1m]\w[\033[m] [\033[32m]$(__git_ps1 " 


Writing Bash Scripts

Set vi commands in bash-script

Parsing Parameter

$ brew install gnu-getopt

Bash Script Template

#------------------------------------------------------------------------------------------
CMD_GETOPT=/usr/local/opt/gnu-getopt/bin/getopt

S_OPTS="vdm:"
L_OPTS="verbose,debug,versions,install:,init:"

OPTS=$($CMD_GETOPT --options "$S_OPTS"--longoptions "$L_OPTS"    -- "$@")

eval set $OPTS
shift

while [[ $# -gt 0 ]]; do
    echo "Param 1: '$1'"

    case "$1" in
        -v | --verbose)    VERBOSE=true;                 ;;
        -d | --debug)      DEBUGLEVEL="$2";  shift       ;;

        --versions)        MODE=GETVERSIONS              ;;
        --install)         TYPE="$2";        shift
                           MODE=INSTALL                  ;;

        --init)            MODE=INIT                     ;;

        --)                                  shift; break;;
        * )                                         break;;
    esac

    shift
done

Show progress with a spinner

#!/bin/bash
 
COMMAND="${1^^}"
 
SYMBOL_PASS="$(printf '\e[0;32m\xe2\x9c\x94\e[0m')"
SPINNER_STATE='\|/-'
 
spinner()
{
        local _lastpos=$((${#SPINNER_STATE}-1))
        SPINNER_STATE="${SPINNER_STATE:$_lastpos:1}${SPINNER_STATE:0:$_lastpos}"
 
        printf 
}
 
#---------------------------------------------------------------------------------------------------
#
#---------------------------------------------------------------------------------------------------
if [[ "$COMMAND" = "STEP1" ]]; then
        printf 
        _LASTDATE=
        for _LINE in *.csv
        do
                _FILE="$(basename $_LINE)"
                _CURRDATE=${_FILE:19:8}
                rm    -rf       $_CURRDATE
                mkdir -p        $_CURRDATE
                cp       $_LINE $_CURRDATE
 
                if [[ "$_CURRDATE" = "$_LASTDATE" ]]; then
                        spinner
                else
                        printf "${SYMBOL_PASS}\n${_CURRDATE}: "
                fi
 
                _LASTDATE=$_CURRDATE
        done
        printf "\n"
fi
Docker

Docker | Cookbook

Useful apps

portainer.io: MAKING DOCKER MANAGEMENT EASY. Build and manage your Docker environments with ease today.

dive: About A tool for exploring each layer in a docker image

Useful commands

  • docker ps — Lists running containers.
    Some useful flags include: -a / -all for all containers (default shows just running) and —-quiet /-q to list just their ids (useful for when you want to get all the containers).
  • docker pull — Most of your images will be created on top of a base image from the Docker Hub registry. Docker Hub contains many pre-built images that you can pull and try without needing to define and configure your own. To download a particular image, or set of images (i.e., a repository), use docker pull.
  • docker build — Builds Docker images from a Dockerfile and a “context”.
    A build’s context is the set of files located in the specified PATH or URL. Use the -t flag to label the image, for example docker build -t my_container . with the . at the end signalling to build using the currently directory.
  • docker run — Run a docker container based on an image.
    You can follow this on with other commands, such as -it bash to then run bash from within the container. 
    Also see Top 10 options for docker run — a quick reference guide for the CLI command
    docker run my_image -it bash
  • docker logs —  Display the logs of a container.
    You must specify a container and can use flags, such as --follow to follow the output in the logs of using the program. 
    docker logs --follow my_container
  • docker volume ls — Lists the volumes,.
    Volumes are the preferred mechanism for persisting data generated by and used by Docker containers.
  • docker rm — Removes one or more containers.
    docker rm my_container
  • docker rmi — Removes one or more images. 
    docker rmi my_image
  • docker stop — Stops one or more containers.
    docker stop my_containerstops one container, while docker stop $(docker ps -a -q) stops all running containers. A more direct way is to use docker kill my_container, which does not attempt to shut down the process gracefully first.
  • Use them together, for example to clean up all your docker images and containers:
  • kill all running containers with docker kill $(docker ps -q)
  • delete all stopped containers with docker rm $(docker ps -a -q)
  • delete all images with docker rmi $(docker images -q)

Create new container

Start a new docker image with a given name

You can start a new container by using the run command and specify the desired image 

$ docker run -it --name playground ubuntu:17.10 /bin/bash
....
root@c106fbb48b20:/# exit

As a result, you are in the container at the bash command line

Reconnect to image
$ docker attach playground
Commit changes in container
$ docker start playground
$ docker attach playground
root@c106fbb48b20:/# echo 1.0 >VERSION
root@c106fbb48b20:/# exit
$ docker commit playground playground:1.0
$ docker tag playground:1.0 playground:latest
$ docker images
REPOSITORY TAG IMAGE ID CREATED SIZE
playground 1.0 01703597322b Less than a second ago 94.6MB
playground latest 01703597322b Less than a second ago 94.6MB

Add tools and utilities

Python

$ apt-get update 
$ apt-get upgrade 
$ apt-get install python3 python3-pip

Java

$ apt-get install default-jre

Manage File Shares

File shares with Docker Desktop on Mac OS

Configuration is stored under

~/Library/Group Containers/group.com.docker/settings.json

Monitor Docker Logs

Logs with Docker Desktop on Mac OS

pred='process matches ".*(ocker|vpnkit).*" || (process in {"taskgated-helper", "launchservicesd", "kernel"} && eventMessage contains[c] "docker")'
/usr/bin/log stream --style syslog --level=debug --color=always --predicate "$pred"

Alternative you can run

/usr/bin/log show --style syslog --debug --info --last 1d --predicate "$pred" >/tmp/logs.txt

Add Timezone Konfiguration

ENV TZ 'Europe/Berlin'

RUN echo $TZ > /etc/timezone 
RUN    apt-get install -y tzdata \
    && rm /etc/localtime \
    && ln -snf /usr/share/zoneinfo/$TZ /etc/localtime \
    && dpkg-reconfigure -f noninteractive tzdata \
    && apt-get clean

Install local apps in a docker container

Install Atom Editor

Start docker image

$ docker run -it --name docker-atom -v /Dockerfiles/HOME:/home -e DISPLAY=192.168.99.1:0 ubuntu /bin/bash

Install Atom

# apt-get update
# apt-get install curl
# curl -sL https://deb.nodesource.com/setup_7.x | bash -
# apt-get install nodejs
# node -v
v7.4.0
# apt-get -y install git
# apt-get -y install software-properties-common
# add-apt-repository -y ppa:webupd8team/atom
# apt-get update
# apt-get -y install atom
# apt-get install libxss1

Commit changes  and build a image

# docker commit -a "Docker Tutorial 1.0.0" -m ionic d378e8647af9 atom:1.0.0
# docker tag atom:1.0.0 atom:latest

Links and Resources

Docker quick reference guides

Docker in more depth

Working with networks

I’ve got a lot of inspiration from wsargent/docker-cheat-sheet.

Goal

We will setup to applications, each in his one container, running on the smae network, so they can communication together.

Setup

Starting with the default configuration, you will see 4 networks

$ docker network ls
NETWORK ID          NAME                DRIVER              SCOPE
6742a11bff1e        bridge              bridge              local
3af0a1c9eaac        host                host                local
e60f68aad9d6        none                null                local

Create a bridged network for running two apps inside: web and database

$ docker network create -d bridge playground_bridge
c97a80b449d9b6b28ddffa0a7bd4a7938e0b8261773080ab33ae4b7ab08826b1
$ docker network ls
NETWORK ID          NAME                DRIVER              SCOPE
6742a11bff1e        bridge              bridge              local
3af0a1c9eaac        host                host                local
e60f68aad9d6        none                null                local
c97a80b449d9        playground_bridge   bridge              local

Start the database application using the bridges network

$ docker run -d --net=playground_bridge --name playground_db training/postgres
88abb9d018c628ed1abe7da0466289846a8342a28b2cbef3305ea5313c46d647
$ docker inspect --format='{{json .NetworkSettings.Networks}}' playground_db| python -m json.tool
{
    "playground_bridge": {
        "Aliases": [
            "88abb9d018c6"
        ],
        "DriverOpts": null,
        "EndpointID": "9fdfe9baf5b159471a39601779ee451aa555a9a9be72be4472e56bd3fcfd1350",
        "Gateway": "172.18.0.1",
        "GlobalIPv6Address": "",
        "GlobalIPv6PrefixLen": 0,
        "IPAMConfig": null,
        "IPAddress": "172.18.0.2",
        "IPPrefixLen": 16,
        "IPv6Gateway": "",
        "Links": null,
        "MacAddress": "02:42:ac:12:00:02",
        "NetworkID": "c97a80b449d9b6b28ddffa0a7bd4a7938e0b8261773080ab33ae4b7ab08826b1"
    }
}

Now, start the web application with the default network (not the playground_bridge used by the database)

$ docker run -d --name playground_web training/webapp python app.py
2f31761168d75d10c2f1bffc805fb8963a18529e17c2592c2b279afd9e364e7b

They cannot communication, because they are running in different networks:

$ docker exec -it playground_db ifconfig | grep inet
         inet addr:172.18.0.2 Bcast:0.0.0.0 Mask:255.255.0.0
         inet addr:127.0.0.1 Mask:255.0.0.0
$ docker exec -it playground_web ifconfig | grep inet
         inet addr:172.17.0.2 Bcast:0.0.0.0 Mask:255.255.0.0
         inet addr:127.0.0.1 Mask:255.0.0.0

Now check the connectivity. The Web application can reach itself:

$ docker exec -it playground_web ping -c 5 172.17.0.2
PING 172.17.0.2 (172.17.0.2) 56(84) bytes of data.
64 bytes from 172.17.0.2: icmp_seq=1 ttl=64 time=0.027 ms
64 bytes from 172.17.0.2: icmp_seq=2 ttl=64 time=0.033 ms
64 bytes from 172.17.0.2: icmp_seq=3 ttl=64 time=0.036 ms
64 bytes from 172.17.0.2: icmp_seq=4 ttl=64 time=0.031 ms
64 bytes from 172.17.0.2: icmp_seq=5 ttl=64 time=0.029 ms

But could not reach the database application (because of the different network):

$ docker exec -it playground_web ping -c 5 172.18.0.2
PING 172.18.0.2 (172.18.0.2) 56(84) bytes of data.

--- 172.18.0.2 ping statistics ---
5 packets transmitted, 0 received, 100% packet loss, time 4126ms

To connect both apps together, put them in the same network:

Before, they use different networks:

$ docker inspect --format='{{json .NetworkSettings.Networks}}' playground_web | python -m json.tool|grep NetworkID
        "NetworkID": "6742a11bff1ebcdeaee9151f146a74b1c3d77db95d4931e4e79f48f7d7f491f7"
$ docker inspect --format='{{json .NetworkSettings.Networks}}' playground_db | python -m json.tool|grep NetworkID
        "NetworkID": "c97a80b449d9b6b28ddffa0a7bd4a7938e0b8261773080ab33ae4b7ab08826b1"

Connect Web Application to network playground_bridge:

$ docker network connect playground_bridge playground_web

 Now, they use the same network:

$ docker inspect --format='{{json .NetworkSettings.Networks}}' playground_web | python -m json.tool|grep NetworkID
        "NetworkID": "6742a11bff1ebcdeaee9151f146a74b1c3d77db95d4931e4e79f48f7d7f491f7"
        "NetworkID": "c97a80b449d9b6b28ddffa0a7bd4a7938e0b8261773080ab33ae4b7ab08826b1"
$ docker inspect --format='{{json .NetworkSettings.Networks}}' playground_db | python -m json.tool|grep NetworkID
        "NetworkID": "c97a80b449d9b6b28ddffa0a7bd4a7938e0b8261773080ab33ae4b7ab08826b1"

And they can communication

$ docker exec -it playground_web ping -c 5 172.17.0.2
PING 172.17.0.2 (172.17.0.2) 56(84) bytes of data.
64 bytes from 172.17.0.2: icmp_seq=1 ttl=64 time=0.044 ms
64 bytes from 172.17.0.2: icmp_seq=2 ttl=64 time=0.032 ms
64 bytes from 172.17.0.2: icmp_seq=3 ttl=64 time=0.033 ms
64 bytes from 172.17.0.2: icmp_seq=4 ttl=64 time=0.032 ms
64 bytes from 172.17.0.2: icmp_seq=5 ttl=64 time=0.033 ms

--- 172.17.0.2 ping statistics ---
5 packets transmitted, 5 received, 0% packet loss, time 4144ms
rtt min/avg/max/mdev = 0.032/0.034/0.044/0.008 ms

$ docker exec -it playground_web ping -c 5 172.18.0.2
PING 172.18.0.2 (172.18.0.2) 56(84) bytes of data.
64 bytes from 172.18.0.2: icmp_seq=1 ttl=64 time=0.134 ms
64 bytes from 172.18.0.2: icmp_seq=2 ttl=64 time=0.052 ms
64 bytes from 172.18.0.2: icmp_seq=3 ttl=64 time=0.056 ms
64 bytes from 172.18.0.2: icmp_seq=4 ttl=64 time=0.052 ms
64 bytes from 172.18.0.2: icmp_seq=5 ttl=64 time=0.053 ms

--- 172.18.0.2 ping statistics ---
5 packets transmitted, 5 received, 0% packet loss, time 4156ms
rtt min/avg/max/mdev = 0.052/0.069/0.134/0.033 ms

Usefull Links

https://blog.docker.com/2019/07/intro-guide-to-dockerfile-best-practices/