Developer Blog

Tipps und Tricks für Entwickler und IT-Interessierte

XAMPP – Setup HTTPS/SSL localhost on macOS

Original Post from here

Preparation

1. Check XAMPP SSL config

Open /Applications/XAMPP/xamppfiles/etc/httpd.conf and make sure your settings are the same as below:

LoadModule socache_shmcb_module lib/httpd/modules/mod_socache_shmcb.so
LoadModule ssl_module modules/mod_ssl.so
<IfModule ssl_module>
    <IfDefine SSL>
        Include etc/extra/httpd-ssl.conf
    </IfDefine>
</IfModule>

Test SSL config with this command:

sudo /Applications/XAMPP/xamppfiles/xampp enablessl

2. Backup httpd-ssl.conf

  • Go to: /Applications/XAMPP/xamppfiles/etc/extra
  • Copy httpd-ssl.conf & paste as httpd-ssl.conf.bak

3. Edit httpd-ssl.conf

  • Open /Applications/XAMPP/xamppfiles/etc/extra/httpd-ssl.conf
  • Change default port from 8443 to 443
#Listen 8443
Listen 443
  • Find this line and remove everything below it
## SSL Virtual Host Context

Setup HTTPS/SSL localhost

Open Terminal

4. Create SSL folder to store SSL files

cd
/Applications/XAMPP/xamppfiles/etc/
mkdir ssl
cd ssl

5. Create SSL CSR & private key

You can use any file name here (just replace localhost)

openssl req -new -newkey rsa:2048 -nodes -keyout localhost.key -out localhost.csr

Enter info as below. Note: change localhost to your localhost domain name (ex: www.domain.name)

Country Name (2 letter code) [AU]:VN
State or Province Name (full name) [Some-State]:HCM
Locality Name (eg, city) []:HCM
Organization Name (eg, company) [Internet Widgits Pty Ltd]:VN
Organizational Unit Name (eg, section) []:VN
Common Name (e.g. server FQDN or YOUR name) []:<strong>localhost</strong>
Email Address []:abc@gmail.com

There are 2 more information may be asked:

  • A challenge password
  • An optional company name

Leave this information BLANK (just Enter, no need to input anything)

6. Create .ext file

touch localhost.ext

Copy & paste below content to v3.ext file

Note: change localhost to your localhost domain name

authorityKeyIdentifier=keyid,issuer
basicConstraints=CA:FALSE
keyUsage = digitalSignature, nonRepudiation, keyEncipherment, dataEncipherment
subjectAltName = @alt_names

[alt_names]
DNS.1 = localhost

7. Create SSL CRT

openssl x509 -req -sha256 -extfile localhost.ext -days 3650 -in localhost.csr -signkey localhost.key -out localhost.crt

8. Add SSL CRT to macOS Keychain

  • Double click on localhost.crt on Finder
  • Select Keychain: System then click Add
XAMPP - Setup HTTPS/SSL localhost on macOS
  • Find & double click on localhost cert in Keychain Access
  • Expand Trust, select When using this certificates: Always Trust
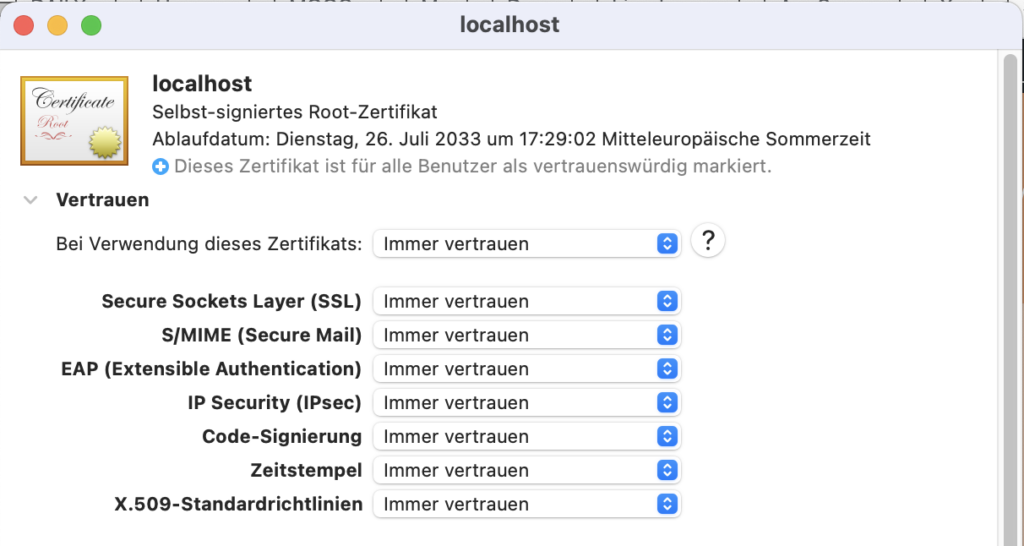
XAMPP - Setup HTTPS/SSL localhost on macOS
  • Close the window and click Update Settings

9. Config SSL in XAMPP virtual host

Open /Applications/XAMPP/xamppfiles/etc/extra/httpd-vhosts.conf

Update your config:

from

<VirtualHost *:80>
	ServerName localhost
	DocumentRoot "/Applications/XAMPP/xamppfiles/htdocs"
</VirtualHost>

to

<VirtualHost *:443>
	ServerName localhost
	DocumentRoot "/Applications/XAMPP/xamppfiles/htdocs"

	SSLEngine on
	SSLCertificateFile "/Applications/XAMPP/xamppfiles/etc/ssl/localhost.crt"
	SSLCertificateKeyFile "/Applications/XAMPP/xamppfiles/etc/ssl/localhost.key"
</VirtualHost>

10. Open Chrome and access https://localhost.

Apache Zeppelin | Getting Started

First Steps with Zeppelin

Zeppelin and MySQL

Create a new Interpreter

Create a new interpreter

or confgure existing mysql interpreter

Configure Mysql Interpreter

Under artifact, add absoulte path of mysql-connector-java-8.0.19.jar.

Add/modify properties for

default.user

default.password

Prepare MySQL Database

Create a database user spark with password spark

Create a database spark wirth all permissions to user spark

Add demo values

Test Mysql Conection

Create a new notebook with mysql interpreter

Write sample code

select * from spark.demo;

Installation

Install with Docker

docker run -p 8080:8080 — rm — name zeppelin apache/zeppelin:0.8.1

Set docker volume options to persist notebooks and logs like

docker run -p 8080:8080 — rm -v $PWD/logs:/logs -v $PWD/notebook:/notebook -e ZEPPELIN_LOG_DIR=’/logs’ -e ZEPPELIN_NOTEBOOK_DIR=’/notebook’ — name zeppelin apache/zeppelin:0.8.1

Install in a vagrant box

Setup base Vagrant Box

vagrant init ubuntu/trusty64
vagrant up
vagrant ssh

Update Operating System

sudo apt-get update -y
sudo apt-get upgrade -y

Install the Vagrant Key

The only way that all the vagrant commands will be able to communicate over ssh from the host machine to the guest server is if the guest server has this “insecure vagrant key” installed. It’s called “insecure” because essentially everyone has this same key and anyone can hack into everyone’s vagrant box if you use it.

mkdir -p /home/vagrant/.ssh
chmod 0700 /home/vagrant/.ssh
wget --no-check-certificate \
    https://raw.github.com/mitchellh/vagrant/master/keys/vagrant.pub \
    -O /home/vagrant/.ssh/authorized_keys
chmod 0600 /home/vagrant/.ssh/authorized_keys
chown -R vagrant /home/vagrant/.ssh

Install Zeppelin and required Software

Detailed description can be found here.

sudo apt-get install -y gcc build-essential linux-headers-server
sudo apt-get install git
sudo apt-get install openjdk-7-jdk
sudo apt-get install npm
sudo apt-get install libfontconfig
sudo apt-get install r-base-dev
sudo apt-get install r-cran-evaluate
git clone https://github.com/apache/zeppelin.git
sudo apt-get -y install maven
mvn clean package -DskipTests -Pspark-2.0 -Phadoop-2.4 -Pr -Pscala-2.11

Configure Zeppelin

Apache Spark | Getting started

Apache Spark is a lightning-fast cluster computing designed for fast computation. It was built on top of Hadoop MapReduce and it extends the MapReduce model to efficiently use more types of computations which includes Interactive Queries and Stream Processing.

This is an extract from this brief tutorial that explains the basics of Spark Core programming.

Environment / Requirements

Installation on Mac OS X

Check or install java

$ java -version
java version "12.0.1" 2019-04-16
Java(TM) SE Runtime Environment (build 12.0.1+12)
Java HotSpot(TM) 64-Bit Server VM (build 12.0.1+12, mixed mode, sharing)

Check or install Scala

$ brew install scala
$ scala -version
Scala code runner version 2.13.0 -- Copyright 2002-2019, LAMP/EPFL and Lightbend, Inc.

Check or install Apache Spark

Setup environment in .bashrc

export PATH="$PATH:$SPARK_HOME/bin"

Installation on Ubuntu

Prepate Upuntu

apt update
apt upgrade
 apt-get install openjdk-8-jdk
 java -version

Links and Resources